5thGenRams Forums

Register a free account today to become a member! Once signed in, you'll be able to participate on this site by adding your own topics and posts, as well as connect with other members through your own private inbox!

Full audio upgrade and sound treatment

Alter Ego Trip

Active Member
Joined
Aug 23, 2020
Messages
127
Reaction score
95
This is my 7th Ram after a small hiatus to an SRT Jeep. Currently sitting on about 300 miles on the odo when I rolled her into the garage and started the tear down. I have a pretty busy schedule so this will be a couple week project, but I'll try and document what I can along the way for anyone else who wants to go down the rabbit hole.

Treatment:
1 layer of Second Skin Damplifier Pro on floor and back wall, stuffing all open orifices with insulation (pillars holding seat belts), 1 layer of SS mass loaded vinyl (trying for as close to 100% coverage as possible or else it defeats the purpose) on floor and back wall. SS sludge on fender wells and MLV adhered to fender liners, 1 layer of Resonix CLD on outer/inner door skin with CCF on inner door panel and black hole tiles in door

Audio:

Speakers:
SI TM8's in doors, Gladen PP80 in OEM dash location, Gladen PP28 glassed into sails, AF GB12 for sub underseat (I will be building a 1.5net ported enclosure tuned to 32hz for under seat).
Amps:
Audison 5.1k for tweeter/midrange/sub, Audison Due for midbass
Processor:
Helix DSP3
Source:
12" and Topping D10s

OK, here we go.

That was a lot more work than I remember in the past lol. Each new iteration creates more headaches due to more wiring, and odd mounting implementations.

There are some small areas where the factory tossed some dampening tiles, but they do almost nothing. Rapping on the floor creates an audible ringing. The front seat risers are going to get filled with closed cell foam. That is a large cavity that can resonate pretty easily.
1719357120069.png

I absolutely despise the Torque system. I wish they hadn't forced everyone's hand with that. Rats nest of wiring and extra crap that do literally nothing. I'm going to try and pull the batteries away from the wall enough to get some CLD and MLV behind it. If the MLV isn't solid, it is a complete waste of time and money.
1719357161245.png

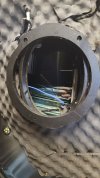
Trying to stuff some extra wires through for the midbass is going to be challenging. I'd prefer not to run the 18 gauge OEM wires for a couple reasons, but we'll see how that works. I have 200' of OFC 16 gauge I would like to use to wire the entire system. I prefer to separate everything from the OEM wiring whenever possible. Easier to troubleshoot issues that may arise (ground hum, etc.).
1719357494361.png
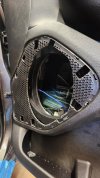
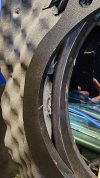
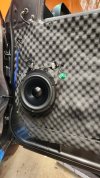
Fitting an 8" midbass will also present some interesting challenges. The tolerances come down to mm's. The speaker mount will have to be cut up a bit with the baffle placed perfectly to keep the door panel from hitting the driver or baffle. I'll probably end up removing the speaker grille to ensure I have it aligned perfectly before finalizing.
1719357540986.png
This modular carrier assembly is also a major PITA. What a crappy design. I love having to disassemble everything down to even the door handle, to remove the assembly for access to the outer skin.
 

Rock Crawler

5thGenRams Supporter
Site Supporter
Joined
Sep 17, 2020
Messages
1,062
Reaction score
1,337
Location
Lone Star State
That’s a lot of work. Been there, done that twice. I had a Dodge Durango that I removed the entire interior and covered the ceiling, floor, walls and door panels with DynaMat. Did the same thing with a 2006 Ram 2500 CTD Mega Cab that I had after the Durango. Made a big difference in noise and sound quality. Looking forward to your progress.
 
Last edited:

Alter Ego Trip

Active Member
Joined
Aug 23, 2020
Messages
127
Reaction score
95
Every new truck I swear I'm leaving it stock.😎

Cld on floor done.
1000006904.jpg 1000006905.jpg 1000006906.jpg

Planning out best layout for mlv. This is the most important part so want to get it right.
1000006909.jpg
 

Alter Ego Trip

Active Member
Joined
Aug 23, 2020
Messages
127
Reaction score
95
As promised, not a lot of pics lol. Almost done with sound treatment. Back wall has layer of mlv as well. I stuffed boxes in floor with safe and sound as well as the rear pillars (that's a huge cavity). I used damplifier pro on floor and switched to resonix for doors and it's definitely a better product. 1 full layer on both front door outer skins, with butyl on top and bottom of impact beam (in typical ram qc, the beam wasn't even attached to door in multiple places, so the door was resonating against the beam itself), with black hole tiles on top, and closed cell foam on inner skin. You can see just how little treatment is on the stock door in the first pic. There was a OEM CLD at the bottom of the door that was literally 1/2 attached and hanging off. It was like this on 3 of the 4 doors. You can knock on the OEM door and it literally sounds like a drum. Major difference afterward.

I ran low so rear doors just got a couple sheets of resonix on outer skin and closed cell foam on inner. I also managed to pull new wires to the front door speakers. I didn't snap a pic, but there is a perfect slot on top and bottom of center plug input on door connector. Getting that removed and reinstalled was a friggin nightmare. I don't think you could get much larger than 16ga through there without some serious effort.
 

Attachments

  • 20240629_211839.jpg
    20240629_211839.jpg
    140.9 KB · Views: 32
  • 20240704_210033.jpg
    20240704_210033.jpg
    127.3 KB · Views: 31
  • 20240703_222841.jpg
    20240703_222841.jpg
    167.5 KB · Views: 31
  • 20240703_141057.jpg
    20240703_141057.jpg
    87.3 KB · Views: 31
  • 20240703_140721.jpg
    20240703_140721.jpg
    135.9 KB · Views: 32
Last edited:

Alter Ego Trip

Active Member
Joined
Aug 23, 2020
Messages
127
Reaction score
95
Doors were a little stressful. Drilled through grille brackets to remove grille from door to verify alignment. Not a lot of room for error when trying to drill out grille mounts. Mocked up an HDPE bracket that combined the factory 6x9 mounting location and new 8" driver. I then mounted it in where I felt the best spot would be and marked out the cuts in the factory door mount. Driver fits and only a little glassing will be required. I managed to keep the mounting surface to the right of the driver intact, and will only need to glass the left side of the driver at the widest part. I could have moved driver up about another 3/8" higher (bottom is really close) but I really wanted to keep the original mounting points for strength. This template hits all four of the original mounting points. I was a little worried the 1/2" HDPE would be too thick, but I surprisingly can still clear the door panel with driver installed, so the 1/2" HDPE will provide a pretty rigid mount for the driver. I just need to cut away the solid OEM grille surround and remount the OEM grille.
 

Attachments

  • 20240705_195804.jpg
    20240705_195804.jpg
    161.5 KB · Views: 19
  • 20240705_200449.jpg
    20240705_200449.jpg
    136.1 KB · Views: 17
  • 20240705_200456.jpg
    20240705_200456.jpg
    160.8 KB · Views: 18
  • 20240705_210641.jpg
    20240705_210641.jpg
    159 KB · Views: 17
  • 20240705_210757.jpg
    20240705_210757.jpg
    169.1 KB · Views: 17
Last edited:

Alter Ego Trip

Active Member
Joined
Aug 23, 2020
Messages
127
Reaction score
95
Well the doors are close to going back together. After test fit number 1,000,000, I think everything will clear as needed. I wasted about an hr of my life the other night, drilling out the grille in the wrong door panel lol. That's what I get from pulling all nighters.

I would have liked to have made brand new cutouts based off the template, but I ran out of HDPE and am ready to get the door back together at this point. They work just fine, they just aren't OCD approved lol.

I was going to glass the door area, but decided against it due to how often I trade in my vehicles. I also wanted an option to swap to a different driver should I get a wild hair, so I tried to keep from making any permanent modifications. Obviously I can't uncut the door panel, but even if putting the truck back to stock, I can cut a new 6x9 template and she'll cover everything up just fine, with no ill effects to the new owner.

I mocked up some pieces to flank the driver cutout area. This will serve to reinforce the area with no support, while also sealing the driver to the door area.

Well, I found something PL premium will not stick to. Even after sanding and drilling small holes, HDPE is impervious to glue. I mocked up some guide pin holes and screwed the two pieces together.
1000007107.jpg
1000007108.jpg
I cut out the grille to avoid contacting the driver surround. There is enough clearance in all directions, that no contact is possible.
1000007113.jpg

With the factory grille back on, you'd never be the wiser.
1000007116.jpg

Playing around with a few different amp rack options. It's a tight squeeze with the surfboard Audisons.
1000007117.jpg
 

Alter Ego Trip

Active Member
Joined
Aug 23, 2020
Messages
127
Reaction score
95
Well 1 step forward, 5 steps back. After CCF on plate and driver and wrapping cone, I attempted to snap door panel back together. Well, the additional 1/4 inch or so of final movement threw a monkey wrench in the whole thing. The speaker now contacts the grille at about the 10 o clock position. I removed CCF but still not enough room. Gonna take it back apart for the millionth time and router a 1/4" groove in the hdpe. Hopefully that will get me the clearance I need. My fear now is the basket won't fit inside the door. It really is a matter of mm's you have to work with.
1000007120.jpg 1000007124.jpg 1000007125.jpg


I was also super happy to find a big ol paint sagger in my lower door. I have yet to get a ram without some QC issue.
 
Last edited:

Alter Ego Trip

Active Member
Joined
Aug 23, 2020
Messages
127
Reaction score
95
Slowly putting things back together. Had to completely redo the adapter plates I made to get things to clear door once snapped back together. I moved from 1/2" to 1/4", and it provided just enough room to add CCF between speaker/plate/door, and still clear grille when reassembled (I think lol).
1000007182.jpg 1000007184.jpg
I finished covering the final back of the truck in MLV and cut out the amp rack. I originally was going to mount amps next to each other, between the cab and e torque battery, but it puts the amp behind the center seatbelt and I don't want any chance of having an issue should there be an accident. I don't haul a ton of people, but I do assist with our church youth group, so not taking any chances. This really made for a tight squeeze, but I should just be able to get the amps to fit on top of each other, while barely clearing seat belt.

I disassembled the factory mid housing and cut away the internal surround. She was not made for a 3" plus mid. :)
1000007186.jpg

I also decided to add some led strips to the doors seeing as they were already apart.
1000007208.jpg 1000007212.jpg
1000007241.jpg


Finished adding CCF to the back of the trim panels.
1000007134.jpg

I now need to turn to glassing a trim panel for the tweeter in the sails. I was going to fiberglass and wrap the whole panel but have since opted to add a panel on top. The design will match the mid speaker shape in the door to tie everything together.
 
Last edited:

Users who are viewing this thread

Top