From the bottom.Second clip from the bottom or top?
5thGenRams Forums
You are using an out of date browser. It may not display this or other websites correctly.
You should upgrade or use an alternative browser.
You should upgrade or use an alternative browser.
Eibach Pro-Truck Stage 1 Install
- Thread starter djevox
- Start date
Sniper75
Active Member
Another Money Pit
Active Member
Hope you don't live in a place where you have snow and ice. Your going to have rust and junk on those uca zerk grease point area, it just sits there with no place to go and will eventually cause problems. I got rid of mine before I had this problem and bought Rough Country that did have caps on them and am happy with them.I decided on using Eibach's Pro-Truck Stage 1 over the Stage 2 (with threaded coilovers) because the head tech rep at Eibach claimed the Stage 2 is rougher on the road. I ordered directly from Eibach, and got the kit in about a week. If anyone is doing this install on a 4x4, the correct part number is E80-27-011-02-22. Ensure you get that part number, as the spring rates are different for 2 and 4wd, but that won't stop companies from trying to sell you the wrong part. Three companies tried that with me, which is why I ordered directly from Eibach.
I was very skeptical of this kit, but have liked Eibach's products in the past so I felt like while it might not be as good as high-end kits, I wouldn't regret it. Another big motivating factor was the fact that Eibach claimed all I needed was to remove the upper strut mounts from the stock struts and put them on the Eibach kit. The time savings from doing that by buying a new pair of upper strut mounts and isolators so I didn't have to take apart the stock struts sounded great.
View attachment 109505
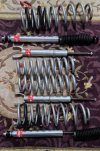
When I opened the box, I quickly learned that what one of the techs told me about only needing upper strut mounts was incorrect. I called and requested the head tech help representative, and he told me that they couldn't source the lower strut mount from the manufacturer without buying a pair of new shocks and that is not cost-effective. While I agree with that, I purchased this kit partially because I wanted to just uninstall the old struts and toss them in a corner for re-installation later. At this point, I was already too invested emotionally into this to return them.
I decided to add the awesome Readylift Upper Control Arms (UCA's) to the install to help with ball joint angles after the upgrade. The Eibach head tech rep said this wasn't necessary but would help, so I decided to install them. I ended up buying a whole Readylift 2" front level kit from TireRack because I got the whole kit on sale and shipped for $33 less than the cheapest price I could find for just the UCA's. Added bonus, I can now sell just the Readylift 2" spacers to make a little cash.
View attachment 109506
Install began. This is my first time doing a suspension install not in a shop and on a rack. With the Big Red SUV jackstands I bought and the Daytona crossbeam adapter for my 3-ton Daytona jack, it wasn't too bad and I felt comfortable doing what I needed to do.
View attachment 109507
I started with the fronts and it only took ~20mins to remove the first shock. As I mentioned before, I wanted a quick install and with the misinformation from Eibach, that wasn't happening. I removed the first shock and used cheapie coil spring compressors to do the job.
Stock shock left, Eibach right
View attachment 109508
Note the paint pen cross on the stock shock. This needs to line up with the tallest part of the triangle on the upper strut mount and centered with the opening for the lower shock mount.
View attachment 109509
I used my trusty 40-year-old Blue Point rubber mallet to hammer off the lower strut mount and the metal cap on the stock shock. This process was way easier than I thought, but that's probably because the shocks are pretty much new.
View attachment 109510
I seated the aluminum collar into the lower strut mount and installed it with the adjustable C-clip in position #2, which Eibach claims is for a 2.6" front lift.
View attachment 109514
Here's a pic of the cheapie spring compressors. They were sketchy at best and I felt pretty uncomfortable using them with the Eibach springs. They seemed fine with the stock springs though. Note, I installed all of the stock coil wraps, bump stop, and left the stock dust boot on the upper isolators.
View attachment 109516
Ignore my dirty fingerprints, lol
View attachment 109517
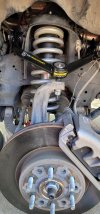
I installed the new struts on the front and installed the Readylift UCA's. The UCA's were incredibly easy to install.
View attachment 109519
I also have rough country uca’s now (and a different truck), but I see your point with how those are designed. A little never seize, liquid film, or rubbing grease on it with each oil change will mitigate problems though.Hope you don't live in a place where you have snow and ice. Your going to have rust and junk on those uca zerk grease point area, it just sits there with no place to go and will eventually cause problems. I got rid of mine before I had this problem and bought Rough Country that did have caps on them and am happy with them.
Sniper75
Active Member
Just installed my Eibach kit with Icon uca. Have the front shocks set on the second notch and only have the shocks in the rear no springs. Wheels and tires are 20x9 +1 & 35x12.50x20
Measurements before lift and tires.
FD 37
FP 37
RD 38 3/4
RP 39
Measurements kit and tire install
FD 40 1/2
FP 40 3/4
RD 41
RP 40 3/4
There is a very very small rub on the FP tire
Measurements before lift and tires.
FD 37
FP 37
RD 38 3/4
RP 39
Measurements kit and tire install
FD 40 1/2
FP 40 3/4
RD 41
RP 40 3/4
There is a very very small rub on the FP tire
Attachments
BowersFJ
Ram Guru
- Joined
- Oct 8, 2020
- Messages
- 713
- Reaction score
- 581
- Points
- 93
- Age
- 62
Just installed my Eibach kit with Icon uca. Have the front shocks set on the second notch and only have the shocks in the rear no springs. Wheels and tires are 20x9 +1 & 35x12.50x20
Measurements before lift and tires.
FD 37
FP 37
RD 38 3/4
RP 39
Measurements kit and tire install
FD 40 1/2
FP 40 3/4
RD 41
RP 40 3/4
There is a very very small rub on the FP tire
Very nice …. Were you ORP to start with ? My 22 Laramie is 36-1/8” in the front and 38-5/8” in the rear
Sent from my iPhone using Tapatalk
harleydavidson19
Member
- Joined
- Oct 10, 2021
- Messages
- 6
- Reaction score
- 2
- Points
- 3
- Age
- 49
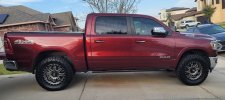
Here are the results! It's a full 3" lift in the front and a 1" lift in the rear. I wasn't expecting that since the one consistency with this kit was that no one gave me a solid answer on the actual lift. It doesn't really look like it, but the rear is 1/8" higher on the driver's rear than the front, and the passenger rear is 1/4" higher than the front. These measurements are with a full tank of gas and nothing in the bed.
These pics also show my new tint. I got IR tint with 70% on the front windshield, 20% on the driver and passenger front windows, and left the rear windows with the stock tint.
Driving Impressions:
The more I drive it, the more impressed I am at the spring rate and shock valving. This truck rode a little rough with my LT tires and stock front suspension/ 2" rear lowering springs. It was harsh enough that I didn't like it. After the Eibach install, all that small bump harshness is now gone. All the random waywardness and scary high-speed shifting when hitting hard bumps is gone also. The suspension is very well mannered for on-road. This truck will never see off-road, so I can't speak on the off-road capabilities.
Overall, would I recommend this kit? Absolutely, with one caveat: know that unless you are willing to buy spare stock shocks to take apart, you have to take apart the stock shocks to get the lower strut mount. I still think it's worth it though at the reasonable price point.
View attachment 109529
View attachment 109532
View attachment 109530View attachment 109531
View attachment 109533
View attachment 109534
It's so close to my garage door that it rubs the weatherstrip.
View attachment 109528Love your setup, what offset wheel?
harleydavidson19
Member
- Joined
- Oct 10, 2021
- Messages
- 6
- Reaction score
- 2
- Points
- 3
- Age
- 49
Anyone else install Eibach's? I just had the pro kit installed on my 2022 and with the front set on the 2nd notch i am 3/4" higher in the front. Eibach said it won't settle any and if I want level then to drop down to first notch. However everyone I talk to seems to have used the 2nd notch and are sitting perfectly level. I also did the icon UCA. Anything we could have done during install that would cause the front to gain 3.5" when it should have been 2.75?
BowersFJ
Ram Guru
- Joined
- Oct 8, 2020
- Messages
- 713
- Reaction score
- 581
- Points
- 93
- Age
- 62
Anyone else install Eibach's? I just had the pro kit installed on my 2022 and with the front set on the 2nd notch i am 3/4" higher in the front. Eibach said it won't settle any and if I want level then to drop down to first notch. However everyone I talk to seems to have used the 2nd notch and are sitting perfectly level. I also did the icon UCA. Anything we could have done during install that would cause the front to gain 3.5" when it should have been 2.75?
I’m reading this a lot with Eibach and Rough Country …. That’s why I’m waiting till Oct for Bils
Sent from my iPhone using Tapatalk
I didn’t have that issue.Anyone else install Eibach's? I just had the pro kit installed on my 2022 and with the front set on the 2nd notch i am 3/4" higher in the front. Eibach said it won't settle any and if I want level then to drop down to first notch. However everyone I talk to seems to have used the 2nd notch and are sitting perfectly level. I also did the icon UCA. Anything we could have done during install that would cause the front to gain 3.5" when it should have been 2.75?
My wheels are 22x10 -19 offset.
harleydavidson19
Member
- Joined
- Oct 10, 2021
- Messages
- 6
- Reaction score
- 2
- Points
- 3
- Age
- 49
How far passed the fender do they stick out? Any side shots looking down the side of your truck?I didn’t have that issue.
My wheels are 22x10 -19 offset.
I traded that truck in on a ‘22 and still have the wheels but not the same tires. The original wheel and tire set up stuck out an inch from the fender flares. You still want some pics?How far passed the fender do they stick out? Any side shots looking down the side of your truck?
U
User_72751
Guest
Have you had the front end aligned yet?Anyone else install Eibach's? I just had the pro kit installed on my 2022 and with the front set on the 2nd notch i am 3/4" higher in the front. Eibach said it won't settle any and if I want level then to drop down to first notch. However everyone I talk to seems to have used the 2nd notch and are sitting perfectly level. I also did the icon UCA. Anything we could have done during install that would cause the front to gain 3.5" when it should have been 2.75?
HookedonRam
Active Member
I just ordered Bilstein 6112s for me and I want to be able to pretty much do the same thing. Would you happen to have the top mount strut part numbers to be able to assemble the whole strut by any chance? I believe I only need the top mount parts for Bilstein 6112s. TIA!Hope you don't live in a place where you have snow and ice. Your going to have rust and junk on those uca zerk grease point area, it just sits there with no place to go and will eventually cause problems. I got rid of mine before I had this problem and bought Rough Country that did have caps on them and am happy with them.
You need the top strut mounts and isolators. You can plug your van into any online Mopar parts place and get the numbers. All variations without air suspension use the same upper strut mount and isolators.I just ordered Bilstein 6112s for me and I want to be able to pretty much do the same thing. Would you happen to have the top mount strut part numbers to be able to assemble the whole strut by any chance? I believe I only need the top mount parts for Bilstein 6112s. TIA!
HookedonRam
Active Member
I am guessing 55366387AA for the spring isolator and 68329762AC for the top mount? Did you have to replace any nuts or anything because they are only a 1-time use?You need the top strut mounts and isolators. You can plug your van into any online Mopar parts place and get the numbers. All variations without air suspension use the same upper strut mount and isolators.
Yes, those are the part numbers. When I looked up procedures in my mitchell1 software, I did not see anything mentioned about not being able to reuse nuts, but they are pretty cheap if you want to buy them.I am guessing 55366387AA for the spring isolator and 68329762AC for the top mount? Did you have to replace any nuts or anything because they are only a 1-time use?
Users who are viewing this thread
Total: 1 (members: 0, guests: 1)


