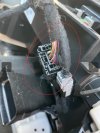
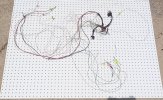
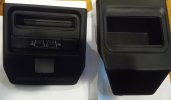
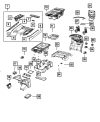
There was a thread on here a while back about adding the OEM rear console USBs and 115v outlet to trucks that currently don't have it. I saw some good options on the thread, but a lot of people decided to just make their own rather than go about the OEM way due to price. I ended up finding a laramie console trim on eBay with the USBs and 115v at a good price and deciding to pull the trigger. I decided to go ahead and order the wire harness I needed that would give me rear access to the USBs and outlet (Part 68387136AB). Removed the console yesterday and installed all of the parts and the wire harness. One of the reasons I wanted to go the OEM route was to grant USB carplay access to the back, as I usually take my truck on road trips or vacations, and have that allowance for friends who want to play music from the back (Not the end of the world if I can't get this feature to work, but still would be nice). I can deal with the backseat USBs just being charging only, but I also don't have power to my 12V outlet in the back. Maybe others could help with this, or at worst this thread could be useful for those seeking to do this. I have attached some pictures of what the install looked like and will make a step-by-step if others need it.
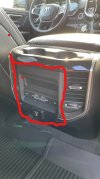
The rear USBs are working after the install, but both sets just are charge only. I thought maybe this might be an AlphaOBD feature to allow the radio to show the option for the 3rd USB, since the first and second USB show on the radio regardless of anything plugged in. See picture.

I tried activating 4 alpha codes figuring maybe the BCm needs to recognize the backseat option as a playable USB
ECU config 3: Power Inverter Present
ECU config 18 USB Connectivity Present
Cabin net VES2 Vehicle Entertainment 2nd row AND Last row
No luck. I think the Cabin net VES2 codes are for DVD players maybe?
My first guess is maybe I am missing a fuse for the power feed. I checked the Fuse diagram in the manual and found what I think would be the needed fuse location, F54B. The current layout had the 20 Amp fuse in location F54A, so I moved that fuse to the B slot, figuring this would solve the issue. No dice. I did some research on this and found this is for the 12v cig lighter port

My second guess is that maybe a missing Inverter is needed for this outlet. I thought this wouldn't be likely since my truck came with the 12V cigarette lighter port, and I think I remember reading something about all three outlets sharing the same current distribution from a single inverter (Correct me if I'm wrong). I don't have the wiring diagram, but I'm sure that would answer this question.
So that's where I am with this, I know people have gone from the jumpseat to the console and vice versa and I read through that thread, but no mention of adding the usbs/outlet if they didn't already have one. Maybe some bright people on this thread could help me out!

The rear USBs are working after the install, but both sets just are charge only. I thought maybe this might be an AlphaOBD feature to allow the radio to show the option for the 3rd USB, since the first and second USB show on the radio regardless of anything plugged in. See picture.
I tried activating 4 alpha codes figuring maybe the BCm needs to recognize the backseat option as a playable USB
ECU config 3: Power Inverter Present
ECU config 18 USB Connectivity Present
Cabin net VES2 Vehicle Entertainment 2nd row AND Last row
No luck. I think the Cabin net VES2 codes are for DVD players maybe?
My first guess is maybe I am missing a fuse for the power feed. I checked the Fuse diagram in the manual and found what I think would be the needed fuse location, F54B. The current layout had the 20 Amp fuse in location F54A, so I moved that fuse to the B slot, figuring this would solve the issue. No dice. I did some research on this and found this is for the 12v cig lighter port
My second guess is that maybe a missing Inverter is needed for this outlet. I thought this wouldn't be likely since my truck came with the 12V cigarette lighter port, and I think I remember reading something about all three outlets sharing the same current distribution from a single inverter (Correct me if I'm wrong). I don't have the wiring diagram, but I'm sure that would answer this question.
So that's where I am with this, I know people have gone from the jumpseat to the console and vice versa and I read through that thread, but no mention of adding the usbs/outlet if they didn't already have one. Maybe some bright people on this thread could help me out!