5thGenRams Forums

Register a free account today to become a member! Once signed in, you'll be able to participate on this site by adding your own topics and posts, as well as connect with other members through your own private inbox!

Adding Passive Entry: How-to

aeriosv

Member
Joined
Dec 1, 2023
Messages
5
Reaction score
1
Looks just like the one I have.
Thanks for your reply!
I'm asking because in the post on page one, it seems like they're still using the car's OBDII. I assume I need to connect the OBDII interface to it instead of relying on the car's OBDII for the PE programming, right?
 

MannyN

Ram Guru
Joined
Apr 24, 2021
Messages
836
Reaction score
680
Thanks for your reply!
I'm asking because in the post on page one, it seems like they're still using the car's OBDII. I assume I need to connect the OBDII interface to it instead of relying on the car's OBDII for the PE programming, right?
You don't plug anything into the car's OBDII port for programming. The 2 smaller plugs get pluged into Secutity Bypass Module, then you plug in your OBDII reader into the larger plug on this Bypass Cable.
 

HSKR R/T

locally hated
Site Supporter
Joined
Jul 25, 2020
Messages
9,977
Reaction score
9,817
You don't plug anything into the car's OBDII port for programming. The 2 smaller plugs get pluged into Secutity Bypass Module, then you plug in your OBDII reader into the larger plug on this Bypass Cable.
That harness plugs into the factory harness for the SGW module. Not to the module itself.
 

HSKR R/T

locally hated
Site Supporter
Joined
Jul 25, 2020
Messages
9,977
Reaction score
9,817
Thanks for your reply!
I'm asking because in the post on page one, it seems like they're still using the car's OBDII. I assume I need to connect the OBDII interface to it instead of relying on the car's OBDII for the PE programming, right?
There are different types of SGW bypass devices. The one you have basically replaced the factory OBD connector when plugged in
 

aeriosv

Member
Joined
Dec 1, 2023
Messages
5
Reaction score
1
You don't plug anything into the car's OBDII port for programming. The 2 smaller plugs get pluged into Secutity Bypass Module, then you plug in your OBDII reader into the larger plug on this Bypass Cable.
Thank you very much for your response!
 

Okie22

Active Member
Joined
Jan 6, 2023
Messages
29
Reaction score
7
I’ve been contemplating creating a separate passive entry thread just to discuss the rear door add on, but it seems like it isn’t a topic that comes up too frequently on here so I’ve held off.

You should. I'm interested in adding PE to my tailgate. I'm getting ready to add PE to my front doors.
 

Quietpeen

Active Member
Joined
Apr 30, 2022
Messages
162
Reaction score
56
I see those hesitant to try the install; I just completed the install on my 2023 Quad Cab Bighorn 1500 Night Edition and the install is a lot easier than it sounds. The process could take as little as a couple hours per door taking your time. It took me three hours per door because of a couple issues along the way. I thought I'd add my "and another thing" things to help others further simplify the process.

Before you even start, measure your new wire harness before you tear things apart! The harness I purchased was 69" and was 6" too short for my 2023 1500 Quad Cab Bighorn. To follow the OEM harness in my particular truck it had to be 75". I spent an extra hour per door to cut, patch in, splice four 6' wires so that the connector could stick out the door handle 1". My truck was in no mood to travel with the doors disassembled so I had to rummage around for splicing parts that I luckily had. Be prepared.

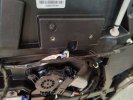
The hardest part of the entire project was disconnecting the rubber harness from the door to the body. It was brutal. In my case there were 3 tabs that needed to be pushed in NOT the typical top and bottom like you see in all the instructions. One on the top and 2 on the bottom. If you notice in any videos you watch everyone conveniently fast forwards this part! A good tip would be to gently pull back the rubber boot from the inner white clip ring with a pair of needle nose pliers totally exposing the white ring and getting the rubber boot out of the way. Doing this will allow you to actually see the clips so your not poking around blindly especially if you have the 2 lower clips like i did. For reinstallation, make sure to reassemble the entire assembly (with all the boot little rubber alignment tabs properly seated in the white ring) before connecting to the white and brown plugs from the truck side. Oh and another thing; the white oval connector piece is directional, it connects to the black plastic wire harness in only one direction. Mine spun during the wire running process so I was trying to fit a square peg in a round hole for about ten minutes, yeeah stupid! Make sure to put it back into the rubber boot in the right direction. Totally reassembled the rubber harness is big and won't fit back in the body hole unless you close the door a little. Closing the door a little actually gives you more room so your not fighting the angle of reinsertion as much, the rubber of the boot likes to grip the door limiting its ability to slide easily. Recounting, I'm realizing I have a little PTSD from this!

Other quick points not in any order:
The 2 body side connector plugs, (the white and brown plugs) the white one is 'C' the brown one is 'D' - the orientation of the plugs in the instruction pictures show the brown clip before the white clip which leads those with OCD to second guess. Just throwin' that out there.

When detaching the inside door handle cable from the liner; be careful the plastic is soft an you do not want to break one of the two tabs. If I had to do it again I'd line my needle nose with a piece of electrical tape to limit marring.

OP instructions say to "loosen" the two bolts holding the window but for me I fought with lifting the window until I removed them.

When putting the door liner back on, make sure the lock knob assembly fits back into its white plastic holder attached to the liner. If you go pounding on the liner to reattach the clips and that thing isn't sitting in its holder your gonna have a problem. I found reattaching the liner from the top down to be the easiest.

Pay attention to the instuctions on removing the cover plate under the door latch. The extra Fort Knox style clip makes removing this little thing so unnecessarily difficult you could easily break the plate if your not careful.

Make sure your two new wires follow and are secured to the OEM harness wires to safely pass pinch points along the path across your door.

When installing the new door handle I found the bolts attaching the carrier plate to the door in the area of the handle inside the truck need to be tightened or the handle wouldn't slide into place easily. Also, the T25 bolt behind the handle cannot be too tight. I had to back off on it a bit then the handle slid forward. Not too loose or the underlying plastic will get dragged forward during sliding. I fought with the handle reinstallation a bit till the above combo worked for me.

Rear antennae install couldn't be easier, no need to drop the tire. I didn't bother with anything other than zip ties, it's in the holder tightly. (Purchased cable was plenty long enough, *sigh*)

No wait time for programming to kick in, the option showed up in Uconnect and the doors locked and unlocked within seconds.

Excellent job and many thanks to all those providing the "how to" to get what would have cost Ram no more than 10 bucks extra functioning on our trucks.
Thank you for this post it was very helpful. First thing is my harnesses from Jimmy07 were also 69”. I have only done the passenger door so far but I went into it knowing it could be short and was ready to lengthen them if needed which i needed to do(maybe if I didn’t follow the factory harness and also not leave a little slack at the plug it would have worked). My truck is a 2021 so i don’t think there is any change on your 2023. @Jimmy07 maybe make them longer? It’s easier to deal with it a little long than too short.

I must have gotten very lucky because getting the main harness removed from the body was very easy. In fact the bottom two tabs popped out on their own. Now getting the two plugs out was another story. It took me a while to get them out till I figured out what worked. With putting the main harness back into the body good tip on closing the door some, that made all the difference in the world.

I have already lengthened the harness for the drivers door so I anticipate it to go quicker tomorrow.
 

Jimmy07

Honorary Site Supporter
Site Supporter
Joined
Apr 11, 2019
Messages
2,003
Reaction score
2,196
Thank you for this post it was very helpful. First thing is my harnesses from Jimmy07 were also 69”. I have only done the passenger door so far but I went into it knowing it could be short and was ready to lengthen them if needed which i needed to do(maybe if I didn’t follow the factory harness and also not leave a little slack at the plug it would have worked). My truck is a 2021 so i don’t think there is any change on your 2023. @Jimmy07 maybe make them longer? It’s easier to deal with it a little long than too short.

I must have gotten very lucky because getting the main harness removed from the body was very easy. In fact the bottom two tabs popped out on their own. Now getting the two plugs out was another story. It took me a while to get them out till I figured out what worked. With putting the main harness back into the body good tip on closing the door some, that made all the difference in the world.

I have already lengthened the harness for the drivers door so I anticipate it to go quicker tomorrow.
I’ll start making these longer. After three years, and hundreds of sets of these, all at the same length, you guys are the first two to ever mention this. I’m not sure what route everyone else is running them, and I’ve never actually laid eyes on the inside of a DT 1500 door, so I just started making them that length, and never heard any feedback otherwise.
 

Quietpeen

Active Member
Joined
Apr 30, 2022
Messages
162
Reaction score
56
I’ll start making these longer. After three years, and hundreds of sets of these, all at the same length, you guys are the first two to ever mention this. I’m not sure what route everyone else is running them, and I’ve never actually laid eyes on the inside of a DT 1500 door, so I just started making them that length, and never heard any feedback otherwise.
that does raise the question of what did we do different?
 

skyhawk42

Well-Known Member
Joined
Mar 7, 2022
Messages
261
Reaction score
219
Mine was short when I followed the factory harness exactly. When I pulled it back and went the most direct route it was spot on. I think an extra 6” would allow to follow the factory harness.
 

Soso

Member
Joined
Oct 3, 2023
Messages
8
Reaction score
7
Thank you for this post it was very helpful. First thing is my harnesses from Jimmy07 were also 69”. I have only done the passenger door so far but I went into it knowing it could be short and was ready to lengthen them if needed which i needed to do(maybe if I didn’t follow the factory harness and also not leave a little slack at the plug it would have worked). My truck is a 2021 so i don’t think there is any change on your 2023. @Jimmy07 maybe make them longer? It’s easier to deal with it a little long than too short.

I must have gotten very lucky because getting the main harness removed from the body was very easy. In fact the bottom two tabs popped out on their own. Now getting the two plugs out was another story. It took me a while to get them out till I figured out what worked. With putting the main harness back into the body good tip on closing the door some, that made all the difference in the world.

I have already lengthened the harness for the drivers door so I anticipate it to go quicker tomorrow.
Your very welcome! Well God certainly was smiling on you to have gotten those clips to pop so easily! Did you use the needle nose trick to pull the rubber away to expose the white clip ring? I had a much easier time on the second door doing that. Yeah the short cable was super frustrating which was further compounded by the supplier totally discounting my claim that included pictures of the routing path. Meh.... Stripping that wire tape loom was a bear wasn't it!! Yes your right about those plugs, also tough to get separated given the tight quarters.

Glad that incredibly long post helped someone out.

Mine was short when I followed the factory harness exactly. When I pulled it back and went the most direct route it was spot on. I think an extra 6” would allow to follow the factory harness.
I tried that as a lazy man option but I felt really uncomfortable as the wire was stretched to max tautness. I ruled it out totally seeing the cable would have passed directly under the area where the two bolts securing the door liner were thus creating a nasty pinch point. Check out the picture, the spliced area is between the electrical tape (obviously) and above that you can see the holes for the door liner bolts which the cable would have crossed right over.

Don't worry, I'm sure yours are fiiiiiine! haha!
 

Attachments

  • IMG20231204172915.jpg
    IMG20231204172915.jpg
    118.1 KB · Views: 33
Last edited:

Quietpeen

Active Member
Joined
Apr 30, 2022
Messages
162
Reaction score
56
Your very welcome! Well God certainly was smiling on you to have gotten those clips to pop so easily! Did you use the needle nose trick to pull the rubber away to expose the white clip ring? I had a much easier time on the second door doing that. Yeah the short cable was super frustrating which was further compounded by the supplier totally discounting my claim that included pictures of the routing path. Meh.... Stripping that wire tape loom was a bear wasn't it!! Yes your right about those plugs, also tough to get separated given the tight quarters.

Glad that incredibly long post helped someone out.


I tried that as a lazy man option but I felt really uncomfortable as the wire was stretched to max tautness. I ruled it out totally seeing the cable would have passed directly under the area where the two bolts securing the door liner were thus creating a nasty pinch point. Check out the picture, the spliced area is between the electrical tape (obviously) and above that you can see the holes for the door liner bolts which the cable would have crossed right over.

Don't worry, I'm sure yours are fiiiiiine! haha!
Yes I did use the needle nose. It was when I was pulling the rubber off the bottom two clips popped right out.

As far as splicing the wires I didn't need to remove any of the tape because i was checking the length thanks to your post while running it. I just cut the end off with the pin and soldered in the 6” piece.
 

Quietpeen

Active Member
Joined
Apr 30, 2022
Messages
162
Reaction score
56
I got this all done today and everything appears to be working as it should. I had to run to lowes and I had a check engine light. When I got home I used AlphaOBD to check for faults and only things that came up were related to me turning the truck on with doors unplugged. I cleared the codes and started the truck up. I’m hoping that’s all it was.

Does the check engine light pertain to all faults and not just something wrong with the engine?
 

vincentw56

Spends too much time on here
Joined
Aug 5, 2020
Messages
3,139
Reaction score
2,237
I got this all done today and everything appears to be working as it should. I had to run to lowes and I had a check engine light. When I got home I used AlphaOBD to check for faults and only things that came up were related to me turning the truck on with doors unplugged. I cleared the codes and started the truck up. I’m hoping that’s all it was.

Does the check engine light pertain to all faults and not just something wrong with the engine?
Yes, all faults. But not all faults turn on the check engine light.
 

Boatman22

Member
Joined
Sep 19, 2023
Messages
23
Reaction score
9
Does anyone know who can does this installation in Houston area please?
I was looking also but no luck. I decided to tackle this myself and I can tell you and anybody on the fence that it is not that bad of a job. Just get the cables from Jimmy07 and follow the directions on the first few pages. Took me about 2.5 hours on the pass door and about 2 hours driver's side and rear antenna. Programming was simple with the AlfaOBO and the steps provided on the first few pages. Thanks to everyone who contributed to this thread to get this done.
 

Users who are viewing this thread

Top