So a week of troubleshooting after work, talking to my dealer, who actually gave some great advice and was also frustrated with the slider's design and continual issues, and talking to an independent, local glass shop who said he'd heard my story many times and replaced tons of windows in 5th gens, I have at least made progress on slowing the flood. Thought I'd give a run down.
Bought a tube of 3M Window Weld Urethane which I've used many times with great success. Not a cheap date at $38 a tube but goes a long ways. Scrubbed the window frame out with Purple Power and a paint brush, flushed it with water good followed by blow out with an air gun. Wanted to clean it of any residual oils that the wash didn't remove so sprayed it down with starting fluid, aka ether. Used ether in college to pull oil out of waste water samples, ether really likes to dissolve oil, personally I haven't seen it do anything to paint, and isn't hard on plastics like carb or brake clean can be. Hosed the the gaps down good with ether, let it flash off for a 10 minutes and then blew it out with air. Before the safety police start barking, OF COURSE this has to be done outside in a well ventilated area and away from any flame or ignition source. Starting fluid / ether is very flammable, duh... And take my advice with a grain of salt at your own peril. I disconnected the roof trim on the back by prying down on the gap of the little extension piece at the end sliding it down about 1/4 or so inch. Then holding it there and some light prying and wiggling was able to pop the trim off the back stud that holds it in place. I taped it to the side out of the way and got ready to seal the window.
Once the frame and body were dry I used the factory smallest hole on the 3M tube nozzle and filled the top of the window frame level with the glass edge in the area directly below the brake light smoothing it with a gloved finger making sure it was pressed to the metal side and the glass side while also allowing enough gap that the urethane wouldn't interfere with the brake light. The urethane is very hard to get off your skin so wear gloves. Then I filled the gap between the cab and window with urethane. I like to push the urethane as it fills the gaps rather than pull it, this helps to avoid air gaps in the sealant. At the corner I pumped some down the side gap then filled in that area below the roof trim. With the roof trim moved this area is much easier to get to. I then filled down the edges about 2 inches and stopped thinking that would be enough.
I let the urethane cure over night and drove it to work in the rain and it rained all day. Water was slowed from a flood to a trickle but still leaked along the sides of the window. So that night flushed the both edges where I had not sealed between the window and the cab and filled them in clear to the bottom of the glass. These gaps are small so I used a putty knife to push the urethan into the gap and then to the side under the glass and against the window frame. This took some time. Then I filled the remaining gap and smoothed with the finger. Tested for leaks. Less but still there.
Window shop suggested i use some sealant around the brake light as they had seen some leak even though mine seemed dry when i removed it. They were nice enough to just give me a little off the end of a roll. It was a flat tacky soft sealant tape, not a foam tape. Installed that and it did seem to add pressure to the brake light seal. While in there checked shark fin. Nice, tight and no leakage signs. Drove to work in the rain the next day. Still water in truck... grrr.
Day 4, 5, and 6 of slow progress was this weekend. Cleaned and urethan sealed the gaps between the two outer glass panels and the plastic rectangles above and below the slider. Packed some sealant into the bottom corners of the window. BUT, ONLY go about 4 inches inboard because the drains for the slider track are there and you don't want to plug those off or it will be a new leak. After everything cured I sat the lawn sprinkler on top of the truck turned it on, got inside then waited. Window seemed sealed and no water running around the edges of it either so have to assume brake light is sealed too! Look down, water on the floor....
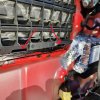
Watched some more and the vents in the rear firewall are leaking around the edges. Blow everything out and dry it, seal with more urethane. Once cured more water testing figuring I had it beat. Nope. Small molded gap in the vents was now letting water in, Attached an image of that one and you can see the water coming in one gap. In the background is my flashing tape gutter on the control module. Packed the molded gaps in both vents with more urethane. Tossed sprinkler on the roof again and currently flooding it.
Hoping this fixes every thing. Just tossing in a new window would have fixed some of it but not the vent leaks and potential brake light leak. Not sure if this is a case of poor build during covid days or just poor design by penny pinching engineers, maybe both. I will say that if the window starts to leak again it will be replaced with a solid glass window to reduce the risk of leaks. Plus they are literally 1/4 the cost for a tinted solid glass with defrost over the slider. I just really like having a slider so the effort to try and save it was worth it to me. Plus I was able to find other manufacturing flaws that contributed to the water. Yes the vents would have been covered by 3-36 B to B warranty but I have no faith in the replacements either and prefer to go the home grown fix route.
Hope this helps some of you troubleshoot. Sorry if this isn't the perfect thread for it but wanted to close it out on the one I started. Thank you all for your input on this early on, it helped get this all done also.