Ruben-Ram5th 1500
Active Member
- Joined
- Apr 11, 2021
- Messages
- 39
- Reaction score
- 73
- Points
- 18
- Age
- 43
2019 Ram 1500 OBD code U11E9 Fixed!
Last week I got this OBD code U11E9 “AGS grille shutter malfunction or lost communication.” After doing some research I notice that a lot of people were just changing the grill shutters right away but the issue persisted. I did more research, and found that it the grille shutters and the air dam at the bottom behind the front bumper are linked together and that a lot of times the issue is either a broken wire at the grille shutters connector or a bad air dam. The only repair that I found was one for the electrical connector for the grille shutters and nothing else.
Here’s what I did to repair mine.
Hopefully this $10 repair and some dedication helps someone out there that is struggling with the same issue.
Last week I got this OBD code U11E9 “AGS grille shutter malfunction or lost communication.” After doing some research I notice that a lot of people were just changing the grill shutters right away but the issue persisted. I did more research, and found that it the grille shutters and the air dam at the bottom behind the front bumper are linked together and that a lot of times the issue is either a broken wire at the grille shutters connector or a bad air dam. The only repair that I found was one for the electrical connector for the grille shutters and nothing else.
Here’s what I did to repair mine.
- Disconnect the bottom air dam to see if the code clears. If it does, follow the next steps. If the code didn’t clear, check the harness going to the grille shutters looks like one of the wires corrodes and breaks near the windshield washer reservoir.
- If the code cleared. Leave air dam unplugged and remove 4 nuts holding the assembly, the unit is very light.
- Once the unit has been removed, place on a table or workbench for easier disassembly.
- Take pictures to make so you have some reference on how everything was.
- Remove the four 10mm bolts to air dam.
- Loosen the two 10mm on the hinge bracket and slide out. For the motor side, 3 torx screws must be removed, then slide out.
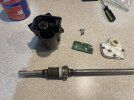
- With a medium flathead screw driver, super gently and evenly start prying on the white cap of the motor. In my case, I got a lot of rusty water coming out.


- Once the white cap is removed, remove water.


- Gently pull on the electric board and set it a side. The board just plugged in.

- Remove shaft and 4 smaller torx screws inside and with a small flathead screwdriver gently pry upwards the motor and gear assembly inside.

- Remove shaft seals one on each end. In my case, both were hard dried out and cracked.

- At this point, the unit is disassembled and everything should be cleaned and degreased. I clean the electronic board with alcohol and compressed air, no scrubbing on the board.

- In my case, the seals were bad so I ordered them in Amazon for $10. These seals fit perfect. Of course they will be a tight because they are new.

- Grease and assemble. Fitting the shaft in the seals gets a bit tricky, but nothing crazy. Before putting the white cap, add sealant to keep water from coming in. Find someone to help you keep thing aligned.
Hopefully this $10 repair and some dedication helps someone out there that is struggling with the same issue.