S
sbourne
Guest
I have more pics but the forum only allows you to attach 10. To see the finished product go to www.ramtruckguy.com
2019 RAM 1500 REBEL
ZROADZ LED LIGHT BAR AND WIND DEFLECTOR KIT
(Z334721-kit-c) (Z330050C)
Full rundown of the purchase and installation process.
Executive Summary
ZROADZ products look and work great - but installing them could be a nightmare for those who aren’t very experienced with this sort of thing.
The documentation shipped with the product is pretty much worthless. The quality control is way below average and company support runs from totally non-responsive to good - depending on what you need. Other brands are much easier to install but cost more. Read the details to see if this is something you could do.
In my opinion, non-professional installers will have lots of trouble with this product.
DETAILS
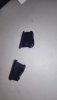
The kit was packaged well and shipped well. Brackets were well made save a few issues.
A step by step headliner removal guide should be added for this as the main problem when selling the kit to under-experienced people as a lot of damage can occur and just stating “see industry R&R method” in step 1 doesn’t really help people who don’t have access to these documents or proper tools. I understand that the 5th gen RAM is a new model, but the ZROADZ crew bills these products as RAM worthy. In my opinion, that is optimistic at best.
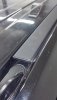
The drill points in the rain gutter are right on the edge of a spot weld. If this is consistent on all chassis this would be a straightforward area to recommend drilling. This bracket was slightly too long for that though, so I had to drill right on the rear seam of the weld which made drilling difficult between the denseness of the front and rear metals of the final ½ inch drill. Because of this there was slight travel in the holes probably and 1/8th of an inch difference between left and right. (did not affect finally assembly but still should be mentioned here as a frustration.)
The rain gutters trim cut (step 13 in their instructions) ends abruptly. It just says to tape and cut the trim to allow room for the bracket. This can be easily cleaned up by removing the cosmetic front trim clip from the deposed area of trim, cut the finish end off at an inch long and use some butyl (or anything else) to secure it into the remaining gutter trim. This would mean the gutter trim cut in step 13 wound need to be cut at the correct angle which is very easy to mark. This leaves a much cleaner finish then cut straight aluminum.
The instructions NEED to mention before the LED bar is fully mounted (step 20) that if you have the wind deflector, it should be installed before you continue. As I mention in the electrical notes. If someone followed these instructions first and to completion, they would have to redo all the butt connecting and wiring to remove the light bar harness from inside the chassis, just to rivet on the wind deflector to the bottom of the light bar later. Maybe this was forgotten since this page (page5) skips from “step 14 & 15” to “step 20”
For the Electrical side:
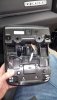
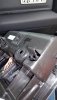
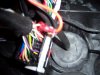
Due to the way we were running the switches I ran my own harness into the upper center console/switch panel and then down to the driver’s foot well. This would be easier for the wiring tech to finish the install without being limited on the relay location and supplied harness lengths for kit (Z390020S-A).
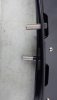
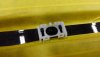
But I feel the cutting and butt connecting of the light bar harness (step 21 – 26) should be rethought. Instead of bringing the weatherproof connector inside the vehicle and under the headliner, running It cleanly outside was easier and more thought out for a few reasons. If there is a theft or damage and a light bar replacement is required, then the headliner doesn’t need to be dropped again. This is also cleanly done with longer 10-32 stainless allen bolts, a few “mounting cable ties” and extra 10-32 Stainless retaining nuts as I pictured. Just two more small hole drilled in the cooling fins for two retaining zip ties means no modification needs to be made to the LED harness. Since the kit comes with an unused pigtail for the other side of the LED harness, there is less work and difficulty to run wires inside. Butt connecting and heat shrink is still required with this, but no sheath trimming or extra cutting now or later if the need to replace the bar is required.
PROBLEMS
The kit is very well put together and designed but a lot of time was lost do to quality control issues.
The left roof bracket was not threaded far enough down, so when fully tightened through the roof the bracket was still semi-loose compared to the right. I had to get the correct die and finish threading the stud down.
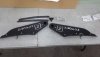
The powder coating is very good quality but the treads in the light bar as well as the holes for the mounting tamper bolts were not prepped. As a result I had to tap the lightbar to clean the treads, and drill the bracket holes out to allow proper threading and mounting.
The Instructions for the wind diffuser are generic for 6 different part numbers, it is possible I only needed to make the modifications I did in the deflector because the wrong one was sent, this however ties into the quality control category.
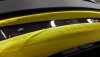
The wind deflector (Z330050C) was too long when compared to the pictures in the instructions. I would not slip into the second cooling fin without me having to trim over an inch more out of the notched areas. Once this was done, I was able to slide into the second fin, mark, drill and rivet.
The deflector needs to be mentioned in the roof bracket install instructions before the wiring has to be redone.
The wrong LED light bar was sent with the kit at first. We received a straight 50-inch bar instead of the curved 50-inch bar that we ordered. The company was very attentive to this and overnighted us the correct bar with a return label for the straight bar. But it added time to the project and there is no excuse for shipping the wrong product. Pretty basic.
This alone took more than 10 hours with professional help. Billing for this made any cost savings in the product a moot point. Had I purchased a more well-known brand, it would have cost more for the product but less for install making it a push.
ZROADZ HOOD HINGE / A-PILLAR LED LIGHT MOUNTS
(Z3264721-KIT2)
While installing the roof LED kit I ran a custom harness from our switch panel location down to the driver’s foot well with matching red, black and blue wires for the harness (Z3900020S-A). This way the headliner/interior would not need to be disassembled more than needed.
This bracket kit and LED lights were very straight forward. The instructions were easy to follow and straight forward.
I put the bolts holding the LED lights to the brackets on threads up to keep the look sleek and clean. This way also leaves as much clearance as possible between the bolt and the exterior surface of the vehicle.
Anyone with a modicum of experience could install these - I do feel that the installation of the bolts being threads up should be noted in the instructions.
Electrical Finish Work
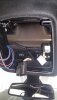
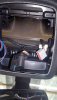
It took about six and a half hours to run the wires to a switch box I put in the place that holds the sunglasses. I would assume about half of this time was spent because of the switch. No matter how you install it - clean or dirty - there will be some significant time spent running the wires. I am running them so it looks OEM plus.
CONCLUSION
I do not regret buying these products despite all the hassles. The company hasn’t responded to two different attempts to discuss all the issues so I am posting this in various forums making sure everyone knows what they are getting into.
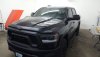
The lights look fantastic and the wind deflector actually works. The light pattern is great and at the end of the day, despite the nightmarish problems caused by ZROADZ poor quality control, I am happy with how it came out.
I hope those considering purchasing these products find my comments helpful. This is a whole lot of work to install and many people may not want to get involved in something so complex. Me? I am a glutton for punishment.
2019 RAM 1500 REBEL
ZROADZ LED LIGHT BAR AND WIND DEFLECTOR KIT
(Z334721-kit-c) (Z330050C)
Full rundown of the purchase and installation process.
Executive Summary
ZROADZ products look and work great - but installing them could be a nightmare for those who aren’t very experienced with this sort of thing.
The documentation shipped with the product is pretty much worthless. The quality control is way below average and company support runs from totally non-responsive to good - depending on what you need. Other brands are much easier to install but cost more. Read the details to see if this is something you could do.
In my opinion, non-professional installers will have lots of trouble with this product.
DETAILS
The kit was packaged well and shipped well. Brackets were well made save a few issues.
A step by step headliner removal guide should be added for this as the main problem when selling the kit to under-experienced people as a lot of damage can occur and just stating “see industry R&R method” in step 1 doesn’t really help people who don’t have access to these documents or proper tools. I understand that the 5th gen RAM is a new model, but the ZROADZ crew bills these products as RAM worthy. In my opinion, that is optimistic at best.
The drill points in the rain gutter are right on the edge of a spot weld. If this is consistent on all chassis this would be a straightforward area to recommend drilling. This bracket was slightly too long for that though, so I had to drill right on the rear seam of the weld which made drilling difficult between the denseness of the front and rear metals of the final ½ inch drill. Because of this there was slight travel in the holes probably and 1/8th of an inch difference between left and right. (did not affect finally assembly but still should be mentioned here as a frustration.)
The rain gutters trim cut (step 13 in their instructions) ends abruptly. It just says to tape and cut the trim to allow room for the bracket. This can be easily cleaned up by removing the cosmetic front trim clip from the deposed area of trim, cut the finish end off at an inch long and use some butyl (or anything else) to secure it into the remaining gutter trim. This would mean the gutter trim cut in step 13 wound need to be cut at the correct angle which is very easy to mark. This leaves a much cleaner finish then cut straight aluminum.
The instructions NEED to mention before the LED bar is fully mounted (step 20) that if you have the wind deflector, it should be installed before you continue. As I mention in the electrical notes. If someone followed these instructions first and to completion, they would have to redo all the butt connecting and wiring to remove the light bar harness from inside the chassis, just to rivet on the wind deflector to the bottom of the light bar later. Maybe this was forgotten since this page (page5) skips from “step 14 & 15” to “step 20”
For the Electrical side:
Due to the way we were running the switches I ran my own harness into the upper center console/switch panel and then down to the driver’s foot well. This would be easier for the wiring tech to finish the install without being limited on the relay location and supplied harness lengths for kit (Z390020S-A).
But I feel the cutting and butt connecting of the light bar harness (step 21 – 26) should be rethought. Instead of bringing the weatherproof connector inside the vehicle and under the headliner, running It cleanly outside was easier and more thought out for a few reasons. If there is a theft or damage and a light bar replacement is required, then the headliner doesn’t need to be dropped again. This is also cleanly done with longer 10-32 stainless allen bolts, a few “mounting cable ties” and extra 10-32 Stainless retaining nuts as I pictured. Just two more small hole drilled in the cooling fins for two retaining zip ties means no modification needs to be made to the LED harness. Since the kit comes with an unused pigtail for the other side of the LED harness, there is less work and difficulty to run wires inside. Butt connecting and heat shrink is still required with this, but no sheath trimming or extra cutting now or later if the need to replace the bar is required.
PROBLEMS
The kit is very well put together and designed but a lot of time was lost do to quality control issues.
The left roof bracket was not threaded far enough down, so when fully tightened through the roof the bracket was still semi-loose compared to the right. I had to get the correct die and finish threading the stud down.
The powder coating is very good quality but the treads in the light bar as well as the holes for the mounting tamper bolts were not prepped. As a result I had to tap the lightbar to clean the treads, and drill the bracket holes out to allow proper threading and mounting.
The Instructions for the wind diffuser are generic for 6 different part numbers, it is possible I only needed to make the modifications I did in the deflector because the wrong one was sent, this however ties into the quality control category.
The wind deflector (Z330050C) was too long when compared to the pictures in the instructions. I would not slip into the second cooling fin without me having to trim over an inch more out of the notched areas. Once this was done, I was able to slide into the second fin, mark, drill and rivet.
The deflector needs to be mentioned in the roof bracket install instructions before the wiring has to be redone.
The wrong LED light bar was sent with the kit at first. We received a straight 50-inch bar instead of the curved 50-inch bar that we ordered. The company was very attentive to this and overnighted us the correct bar with a return label for the straight bar. But it added time to the project and there is no excuse for shipping the wrong product. Pretty basic.
This alone took more than 10 hours with professional help. Billing for this made any cost savings in the product a moot point. Had I purchased a more well-known brand, it would have cost more for the product but less for install making it a push.
ZROADZ HOOD HINGE / A-PILLAR LED LIGHT MOUNTS
(Z3264721-KIT2)
While installing the roof LED kit I ran a custom harness from our switch panel location down to the driver’s foot well with matching red, black and blue wires for the harness (Z3900020S-A). This way the headliner/interior would not need to be disassembled more than needed.
This bracket kit and LED lights were very straight forward. The instructions were easy to follow and straight forward.
I put the bolts holding the LED lights to the brackets on threads up to keep the look sleek and clean. This way also leaves as much clearance as possible between the bolt and the exterior surface of the vehicle.
Anyone with a modicum of experience could install these - I do feel that the installation of the bolts being threads up should be noted in the instructions.
Electrical Finish Work
It took about six and a half hours to run the wires to a switch box I put in the place that holds the sunglasses. I would assume about half of this time was spent because of the switch. No matter how you install it - clean or dirty - there will be some significant time spent running the wires. I am running them so it looks OEM plus.
CONCLUSION
I do not regret buying these products despite all the hassles. The company hasn’t responded to two different attempts to discuss all the issues so I am posting this in various forums making sure everyone knows what they are getting into.
The lights look fantastic and the wind deflector actually works. The light pattern is great and at the end of the day, despite the nightmarish problems caused by ZROADZ poor quality control, I am happy with how it came out.
I hope those considering purchasing these products find my comments helpful. This is a whole lot of work to install and many people may not want to get involved in something so complex. Me? I am a glutton for punishment.
Attachments
-
 KIMG1096 (1).JPG63.7 KB · Views: 354
 -
 KIMG1097.JPG71.8 KB · Views: 366
 -
 KIMG1098.JPG60.3 KB · Views: 359
 -
 KIMG1103.JPG69.6 KB · Views: 321
 -
 KIMG1105.JPG47.1 KB · Views: 311
 -
 KIMG1106.JPG72.6 KB · Views: 308
 -
 KIMG1120.JPG86.6 KB · Views: 317
 -
 KIMG1122.JPG88.4 KB · Views: 319
 -
 KIMG1182.JPG126.2 KB · Views: 314
 -
 KIMG1164.JPG77.4 KB · Views: 305