FirstTimeRamDriver
Well-Known Member
- Joined
- Jan 26, 2019
- Messages
- 332
- Reaction score
- 249
- Points
- 43
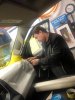
First time saw a true taxiway and runway diagram in a car GPS

Ambient light kit. Got off eBay. Can change any color. they are cheap and easy.Hows those lights red?
Installed the Pulasr performance module and 3.5” kicker dash speakers
Do you have a link by chance?Ambient light kit. Got off eBay. Can change any color. they are cheap and easy.
Sent from my MI MAX 3 using Tapatalk
I just cut the cigarette lighter off and wired it into the fuse box.Do you have a link by chance?
Yes it plugs into the current engine computer and was a breeze to install, took me longer to find my 10mm socket than it did to install. Programming the instrument cluster was easy following the directions. Setting tire size and axle ratio was a bit tricky, you have to press down on the accelerator and the harder you press the bigger number you get so it took a little finess. As for how it works I was quite impressed. Put it in performance mode and pulled out of the driveway as I normally do and the tires broke loose and it really caught me off guard so of course I left it in performance mode all evening and got on it all around town and hopefully got it out of my system because I know it’s not helping gas mileage. I don’t know about HP or torque gains but throttle response is the biggest think I noticed.Is that the unit that plugs directly into the PCM? What are your thoughts on that?
What audio system do you have? Stock, Alpine or the HK?
 ).
).
If it is a clear deflector, paint the back side of it. Add a clear coat after paint cures. When spraying, spray in long sweeping sprays starting before the end of the deflector and continue past the other end. Keep the spray nozzle about 12” away and parallel to the deflector. Don’t shoot for full coverage in one shot. In fact, I might do a one prime spray to give the paint something to stick to, let that dry and then continue. If the deflector is plastic wrapped, expose only the back, leaving the wrap intact on the front edge and face. If not use blue tape on the front edges. Don’t wait for the paint to dry before removing, otherwise you may chip the edge of the paint line.Received my led lights today for 3rd brake/cargo lights. Just need a warmer/dry day to install
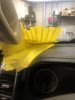
Waiting on AVS Aeroskin 2 to arrive. Anyone ever paint their bug deflector to color match(or as close to as possible) their vehicle? Any advice for a diy’er?
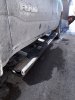
Just installed U-Guard ST-3324 side steps on my Big Horn quad cab with perfect fit
Thanks bought them at PartsEngine.ca 349.00 + tax = 366.45 delivered took me an hour to installed themMan those are shiny, comparatively...
I painted an aeroskin 2 hood deflector and custom garage made grill for my previous EcoBoost. Make sure you clean it we'll, degreaser, the. Windex then rubbing alcohol. Don't skimp on clean rags. I used an adhesion promotor. It's like primer but more agressive for plastic. Then I put some automotive black paint on it, 3 light coats. Then 3 light coats of auto clear. Held up very well for the two year I had it. Michigan Winters and all. No signs of wear. I also did it in temperature controlled garage and had it positioned above a heater so I could "bake" each coat in. Take your time, prep is 90% of a good paint joReceived my led lights today for 3rd brake/cargo lights. Just need a warmer/dry day to install
Waiting on AVS Aeroskin 2 to arrive. Anyone ever paint their bug deflector to color match(or as close to as possible) their vehicle? Any advice for a diy’er?


If it is a clear deflector, paint the back side of it. Add a clear coat after paint cures. When spraying, spray in long sweeping sprays starting before the end of the deflector and continue past the other end. Keep the spray nozzle about 12” away and parallel to the deflector. Don’t shoot for full coverage in one shot. In fact, I might do a one prime spray to give the paint something to stick to, let that dry and then continue. If the deflector is plastic wrapped, expose only the back, leaving the wrap intact on the front edge and face. If not use blue tape on the front edges. Don’t wait for the paint to dry before removing, otherwise you may chip the edge of the paint line.
If the deflector is not clear, paint the front side and either have it wrapped in PPF or have it ceramic coated or both.
Show some pics when done!
I painted an aeroskin 2 hood deflector and custom garage made grill for my previous EcoBoost. Make sure you clean it we'll, degreaser, the. Windex then rubbing alcohol. Don't skimp on clean rags. I used an adhesion promotor. It's like primer but more agressive for plastic. Then I put some automotive black paint on it, 3 light coats. Then 3 light coats of auto clear. Held up very well for the two year I had it. Michigan Winters and all. No signs of wear. I also did it in temperature controlled garage and had it positioned above a heater so I could "bake" each coat in. Take your time, prep is 90% of a good paint jo
Ford pics for reference....I'm all Ram now!
View attachment 18222
View attachment 18223
Ordered the same dash speakers and harness adapter - everyone seems to rave about how much better it sounds with new dash speakers so I figured for under $40 why notMetra makes a wiring harness adapter available thru crutchfield but I just spliced them myself