
5thGenRams Forums
You are using an out of date browser. It may not display this or other websites correctly.
You should upgrade or use an alternative browser.
You should upgrade or use an alternative browser.
Vented seat module?
- Thread starter Grey03svt
- Start date


L a r r y
Active Member
I've been looking into what all is needed to do this to my rear seats in my Laramie....FOLLOWING
THANKS FOR THE INFO
THANKS FOR THE INFO
FM45
Well-Known Member
@ Dav--- just double check that module.. that appears to be 'heat' only... if you need heat/vent, the module looks the same but it has a different part number as well as more plugs being used.... Following ")
-=FM45=-
-=FM45=-
Daverous
Well-Known Member
- Joined
- Sep 14, 2020
- Messages
- 391
- Reaction score
- 253
- Points
- 63
Correct sir,those are parts from a heated nonrecline laramie. I still need the vented/heated module in my hands to verify pins for the harness as well. I'll also have to modify my seat foam in line with vented reclining versions. Would have been way easier to do this if I didn't want to keep my seat covers. My guess is a straight limited seat swap would have been a couple weekends worth of work.
LaxDfns15
Ram Guru
Did you do the same thing for the fronts, or did you just install the vented modules in your heated seats? I don't care about the rears, but I'd love to have vented seats up front.Correct sir,those are parts from a heated nonrecline laramie. I still need the vented/heated module in my hands to verify pins for the harness as well. I'll also have to modify my seat foam in line with vented reclining versions. Would have been way easier to do this if I didn't want to keep my seat covers. My guess is a straight limited seat swap would have been a couple weekends worth of work.
tdb0021
Well-Known Member
So i have rear seats from a Laramie that are heated. Don't these have the module and wiring already in them? I think the only thing i would need is whatever wire connects from the seats to the body computer?
FM45
Well-Known Member
@Dav -- just thinking, once you get the rear seat parts and wiring figured out... I could be wrong but I believe you will also have to change wiring harness in the console and change/add the rear switches to control the rear heat/vented seats.. You'll also have AlfaObd or the dealer add the change to the BCM...
-=FM45=-
-=FM45=-
Daverous
Well-Known Member
- Joined
- Sep 14, 2020
- Messages
- 391
- Reaction score
- 253
- Points
- 63
Again, correct sir. I pulled the center console harness from the same laramie for testing purposes and installed it, along with wireless charging and the cd player, in my rebel. All of it bolted/snapped right in place. The main harness connection matched up pin for pin to the new laramie console harness when reviewing the wires. After activating in alphaobd everything but the rear heat switches are functional. I'm under the impression the rear is exactly like the front in that if the canbus can't communicate with the module then the switches don't work even if they're physically there. I'll be testing that as I move forward.
Regarding the front, I'll snap some pictures of the differences between heat vs ventilated when I get back in the garage. Basically you could install the blowers on the seat but would need to modify the foam and get a new harness or build your own. Either option works just fine, I just happened to find a couple full seat seats to play with for reasonable prices. Having never seen anyone do the full swap I didn't want to be without needed parts.
Regarding the front, I'll snap some pictures of the differences between heat vs ventilated when I get back in the garage. Basically you could install the blowers on the seat but would need to modify the foam and get a new harness or build your own. Either option works just fine, I just happened to find a couple full seat seats to play with for reasonable prices. Having never seen anyone do the full swap I didn't want to be without needed parts.
Daverous
Well-Known Member
- Joined
- Sep 14, 2020
- Messages
- 391
- Reaction score
- 253
- Points
- 63
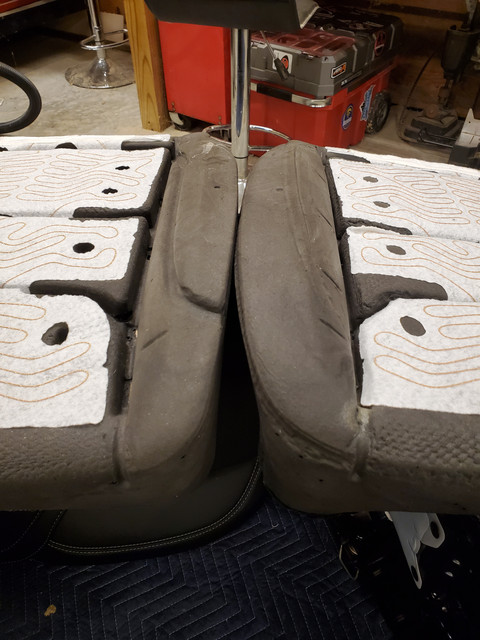
As promised. You'll notice the bolster foam in the non-rebel isn't as pronounced. I personally don't notice it much with the covers on and sitting in them. That being said 80% of my driving is on pavement. If anything it makes them a little nicer on long trips. I had to do a little finessing with steam to get everything flat but that's pretty standard when installing covers, regardless of who made them.
Another notable but not pictured items is that the fabric on the laramie/limited back vented section matches the seat bottoms on the inside. That kinda plastic mesh stuff instead of foam. I'm sure it helps with cooling. The rebel back cover is only lined with foam. That being said the covers still flow plenty of air, they just aren't as padded. I'll also have to grab some pictures of the harness for those that would want to modify the rebel foam instead.
I have to say that if limited seats were more common, and you didn't care about the rebel on the seat, it'd be a way easier job.
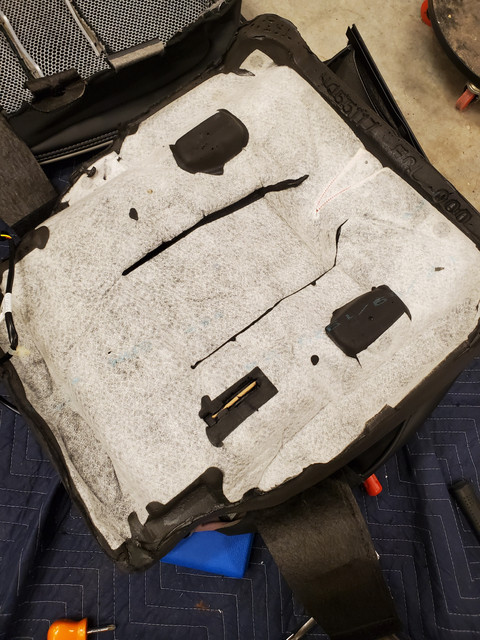
LaxDfns15
Ram Guru
Oh man. Yeah it seems a little more involved than I had imagined. I would go your route to find Limited/Laramie seats that I could swap the covers. I'd want to keep the Rebel covers like you did to keep everything matching.
Daverous
Well-Known Member
- Joined
- Sep 14, 2020
- Messages
- 391
- Reaction score
- 253
- Points
- 63
Truthfully if I wasn't doing all this the first time I'd say it's a 1 or 2 day job tops if you take your time. Intimidating for sure, but actually very straight forward. There's a few things I've had to figure out due to a lack of a manual. Sure wish those things would come off back order... Had one ordered for weeks.
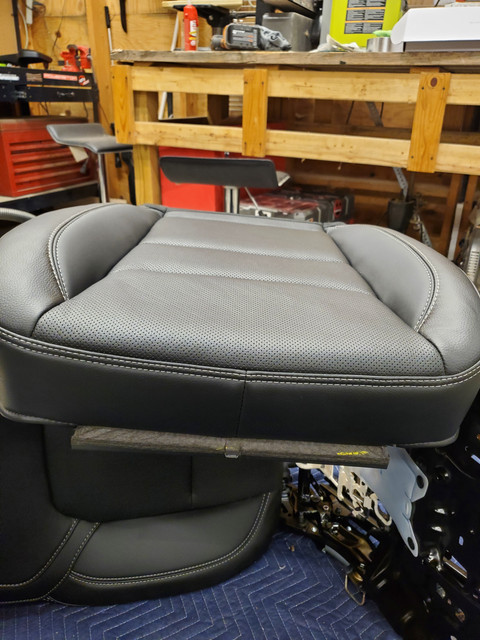
For example the pictured rebel seat was done last night as I put things together for a second set. Start to finish was about 3 hours. About 4 if I included sound deadening and mlv install under where the seat goes.
For example the pictured rebel seat was done last night as I put things together for a second set. Start to finish was about 3 hours. About 4 if I included sound deadening and mlv install under where the seat goes.
L a r r y
Active Member
Following for instructions on the rear heated/ventilated mod
Daverous
Well-Known Member
- Joined
- Sep 14, 2020
- Messages
- 391
- Reaction score
- 253
- Points
- 63
Sorry to report no real progress on the rear this weekend. Ran into several snags.
Firstly if you're thinking you'll save money by buying the parts and installing them on your seats I can confirm that's probably not the case. I sold my complete limited rear and console to recoup funds for this project and pricing it all out, not to mention looking up the part numbers, is going to cost me just as much if not more. Huge let down and again highlights the advantage of not going the same route as me. Just swap in the dang limited seats and console harness if you can...
Second issue was rear seat cover removal. I could cut it but I'm trying to save the leather. A section of the cover is under the spring bracket for the 40 side. It requires you remove the that bracket to get it off/put it on in one piece. Maybe there's a trick to it I don't see without the manual? Also requires a 5 point tamper proof torx due to the spring...You read that right. I sure didn't have one that size among the thousands of tools in my boxes. Couldn't find it local so waiting on the old Amazon as of right now.
Part of me wonders if it's worth it for me. No one is ever in the back of my truck but my daughter. She'll be in a car seat for at least the next 6 years anyway!
Daverous
Well-Known Member
- Joined
- Sep 14, 2020
- Messages
- 391
- Reaction score
- 253
- Points
- 63
Took some time today to look around in the back and unbolt the seats. Have to work off that turkey you know...
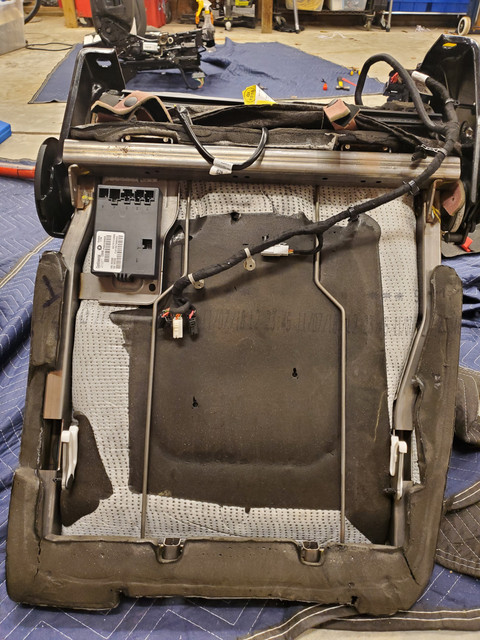
Bad news, no harnesses back there in my truck that fits the seats. Only harness I have is pictured below and has no part tag on it. Guess it's more research time. At least I got to do baffle boxes, killmat, and mlv I guess?
Pulled the carpet and panels all the way to the front and there's nothing else.
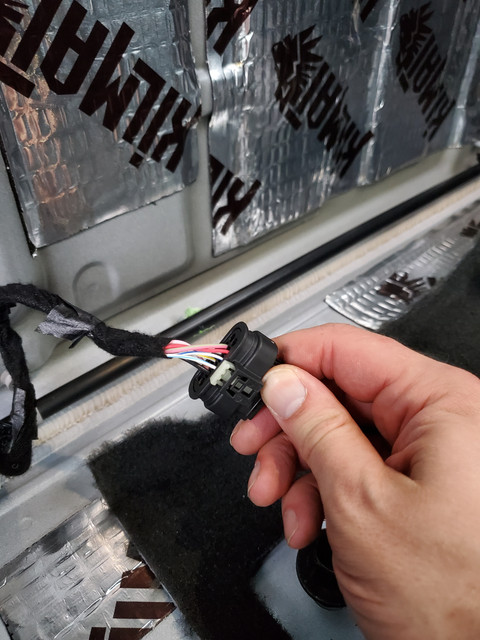
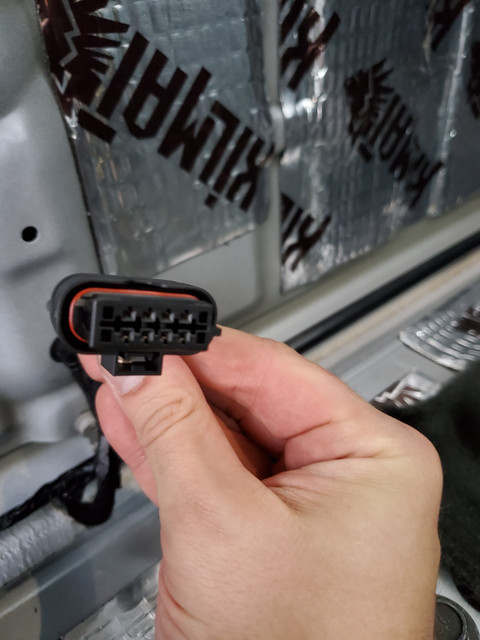

Daverous
Well-Known Member
- Joined
- Sep 14, 2020
- Messages
- 391
- Reaction score
- 253
- Points
- 63
Interesting. Thanks for the info on that. I wonder if it's powered in my harness? I'll hit it with a meter in a few.
I'll need to peel back a bit further it would seem. Still no manual in hand and no wiring diagram sure hinders progress.
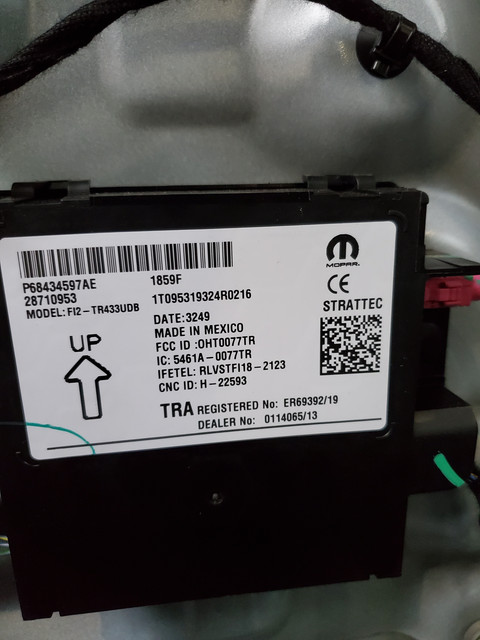
I also tried to pull the PN on the below with no luck. Appears to be a fakra cable running into it so guessing back up camera?
I'll need to peel back a bit further it would seem. Still no manual in hand and no wiring diagram sure hinders progress.
I also tried to pull the PN on the below with no luck. Appears to be a fakra cable running into it so guessing back up camera?
FM45
Well-Known Member
@Dav--- ya no manual here either but there is a lot of useful info here http://connectors.dcctools.com/home.htm
If your good a making harnesses, you can grab the proper connectors for all your projects and make your own, and with the help of Alfa you should be in good shape...
the part you posted--
 www.mymoparparts.com
When you search the part number don't include the first letter---
-=FM45=-
If your good a making harnesses, you can grab the proper connectors for all your projects and make your own, and with the help of Alfa you should be in good shape...
the part you posted--
2020-2025 Ram 1500 Wireless Control Module Receiver 68583952AA | My Mopar Parts
2020-2025 Ram 1500 part # 68583952AA - Wireless Control Module Receiver
www.mymoparparts.com
When you search the part number don't include the first letter---
-=FM45=-
Last edited:
someone else posted two threads asking about heated vented rear seats. in those 2 threads I posted all the part numbers. maybe it will help, but as for body harness, it gets expensive fast if you don't have it from the factory https://5thgenrams.com/community/threads/adding-heat-cool-to-rear-laramie-seats.25850/post-362947
and https://5thgenrams.com/community/th...tions-to-laramie-rear-seats.25851/post-365160
and https://5thgenrams.com/community/th...tions-to-laramie-rear-seats.25851/post-365160
Last edited:
Daverous
Well-Known Member
- Joined
- Sep 14, 2020
- Messages
- 391
- Reaction score
- 253
- Points
- 63
Thanks for the numbers. I've been looking for the seat harness on the connector link above but it's a little cryptic with some names. My understanding of canbus is somewhat limited but I'm curious if the switch signal could jump onto the bus at any location? Meaning I could hijack power/ground and the canbus signal from another location... It would need suitable current load capability, but it seems doable if that's a sound theory. It'd need to be an unused or lightly used bus in order to avoid conflicts, I'm sure. Maybe something like the unused etorque harness...
Users who are viewing this thread
Total: 1 (members: 0, guests: 1)
Site Vendors


