5thGenRams Forums
You are using an out of date browser. It may not display this or other websites correctly.
You should upgrade or use an alternative browser.
You should upgrade or use an alternative browser.
XoVoX
Active Member
Ooooo!
DarkKn1ght
Active Member
- Joined
- May 14, 2019
- Messages
- 119
- Reaction score
- 32
- Points
- 28
- Age
- 36
- Location
- Boonton Township, New Jersey
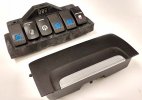
Do you think we can hook up the top switches normally and run separate wires (not hooked up to the BCM) from under the hood for the bottom switches?
XoVoX
Active Member
Thats what I was hoping for but I cant for the life of me find the part anywhere.Do you think we can hook up the top switches normally and run separate wires (not hooked up to the BCM) from under the hood for the bottom switches?
There is a thread on that switch panel. Ram claims it’s a no go. Doesn’t mean there is not a way to make it work though. Just not going to be easy, or cheap.
 5thgenrams.com

Upfitter Switches
Anyone know if we can buy the 2019 Ram 2500/3500 upfitter switches? If so I was looking to install them in my 1500. Was hoping someone on here was familiar with how to get the part numbers. Thanks
Malodave
Ram Guru
Been working on my own version to replace the sunglass cubby.
It has 6 switches and a Digital readout of PSI for my On Board Air System.
When I have the final design I will post the files on the forum for others to use.
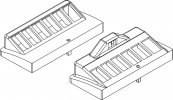
Here is a Resin print I did last night. Some Elements need to be Thickened
and some dimensions modified. I also want to get some ABS type Resin.
Malodave
Attachments
GadgetMason
Ram Guru
OOOOORRRRRRR you could tell us how much $$ to make them for usBeen working on my own version to replace the sunglass cubby.
It has 6 switches and a Digital readout of PSI for my On Board Air System.
When I have the final design I will post the files on the forum for others to use.
Here is a Resin print I did last night. Some Elements need to be Thickened
and some dimensions modified. I also want to get some ABS type Resin.
Malodave
Malodave
Ram Guru
I am using about 400 grams of resin to make it. It is about a 6 hour print
Time. I will probably make a version with just the 6 Switches at a different
angle to make reading them easier. Not many People will need my PSI
Gauge for On Board Air.
Malodave
Time. I will probably make a version with just the 6 Switches at a different
angle to make reading them easier. Not many People will need my PSI
Gauge for On Board Air.
Malodave
Malodave
Ram Guru
I am still working on the fit, finish and mounting. Waiting for the newWhere can I get this?
ABS Gray Resin to show up too. Once I am happy with it, I will post the files
in DWG, DXF, and STL formats. I may include a Presupported Version for
medium sized Resin Printers. ie: Elegoo Saturn, Anycubic Photon Mono X, ETC.
I have the Mono X. Check for a MakerSpace near you with 3-d Printing
availability. That would probably be your cheapest option. I also may
do limited prints for about $50. I am using $25 worth of resin, then there
is about an hour of clean up, and then Shipping.
Malodave
ZombieSlayer
Ram Guru
I am still working on the fit, finish and mounting. Waiting for the new
ABS Gray Resin to show up too. Once I am happy with it, I will post the files
in DWG, DXF, and STL formats. I may include a Presupported Version for
medium sized Resin Printers. ie: Elegoo Saturn, Anycubic Photon Mono X, ETC.
I have the Mono X. Check for a MakerSpace near you with 3-d Printing
availability. That would probably be your cheapest option. I also may
do limited prints for about $50. I am using $25 worth of resin, then there
is about an hour of clean up, and then Shipping.
Malodave
I would purchase one with the digital read out
Ginger_Beast
Member
- Joined
- Dec 29, 2020
- Messages
- 9
- Reaction score
- 14
- Points
- 3
- Age
- 38
I would be in for $50I also may
do limited prints for about $50. I am using $25 worth of resin, then there
is about an hour of clean up, and then Shipping.
Malodave
Malodave
Ram Guru
I have finished the Two Versions of the switch panel. One with the Digital Display
for my PSI Gauge and the other without. The ZIP file includes DXF format 3D CAD files
and STL format files for 3D Printing.
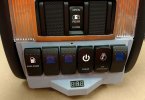
The Picture in the truck shows what it will look like. That one was printed with ABS like
Gray Resin on my Anycubic Photon Mono X resin Printer. It still needed some minor
adjustments for size and the Screw. The panel uses a 6-32 x 1 3/4" Flat Head Screw.
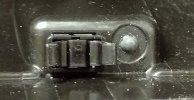
Two mods to the Overhead Console are a hole to bring the Wiring into the Console.
I suggest using a Male/Female connector Outside of the console for easy removal if
Needed. The other Mod is to pull the little Rubber Bumper out of the console. Put
some JB Weld on the top of the hole. Drill and Tap for a 6-32 Screw. The Plastic is very
thin there for Threads.
I am going to order some Black ABS Resin to print it in. The Resin takes Paint very well
from what I have been told.
Test Fit in My Laramie

Close up on the Desk
Hole for Wires
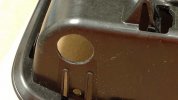
JBweld in Bumper Hole. Drill and Tap for #6-32 x 1 3/4 " Flat Head Machine Screw.
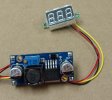
Panel Meter from Ailexpress. These come in a bunch of colors. It took three tries to get exactly what I wanted. I wanted the first digit to blank out.
I de-soldered the Decimal Pin so it doesn't light up at all. IE when the yellow wire senses 3.0V it will display _30 instead of 3.00 or _3.0. 3 volts would
be the equivalent of 30 PSI in my tanks and 20V would display 200 for 200 PSI. 5V power and 2-100V sense.
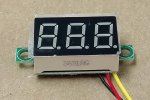
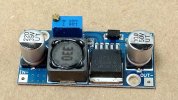
DC to DC Boost PCB from Aliexpress. It will take the Nominal 12V and boost it up to 31 Volts. Use the Pot to set the output.
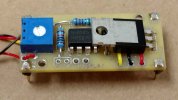
My Pressure Gauge PCB. LM7805 for regulated 5V out, LM 358 Dual Op Amp, 1n4007 Diode, 10K resistor, 56.2K resistor, 5K Pot.
This is sized to fit to the Back of the Boost PCB.
12V in goes to the LM7805. The 5V output powers the Display and the Sensor. The output of the sensor goes to the 1n4007
Diode for the Voltage drop. The Sensor signal now goes from 0 to 4 Volts ( 0 to 300 PSI) to the OpAmp. The OpAMP Multiplies
the Signal through the two resistors and Pot so the Voltage reading to the Display is 3-30 Volts. The Display would Show
30 to 300 PSI. My system has a max pressure of 235psi before a safety valve releases.
300 PSI Pressure Sensor from ALIEXPRESS. I took the connector apart and replaced the short Pigtail wires with longer ones.
Sensor needs 5 Volts in and outputs 0.5 to 4.5 Volts out.
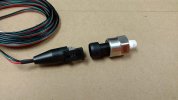
There are 5 wires to connect 12v Power and Ground, Sensor 5V power and Ground, and the Sensor Output return.
for my PSI Gauge and the other without. The ZIP file includes DXF format 3D CAD files
and STL format files for 3D Printing.
The Picture in the truck shows what it will look like. That one was printed with ABS like
Gray Resin on my Anycubic Photon Mono X resin Printer. It still needed some minor
adjustments for size and the Screw. The panel uses a 6-32 x 1 3/4" Flat Head Screw.
Two mods to the Overhead Console are a hole to bring the Wiring into the Console.
I suggest using a Male/Female connector Outside of the console for easy removal if
Needed. The other Mod is to pull the little Rubber Bumper out of the console. Put
some JB Weld on the top of the hole. Drill and Tap for a 6-32 Screw. The Plastic is very
thin there for Threads.
I am going to order some Black ABS Resin to print it in. The Resin takes Paint very well
from what I have been told.

Test Fit in My Laramie

Close up on the Desk

Hole for Wires

JBweld in Bumper Hole. Drill and Tap for #6-32 x 1 3/4 " Flat Head Machine Screw.

Panel Meter from Ailexpress. These come in a bunch of colors. It took three tries to get exactly what I wanted. I wanted the first digit to blank out.
I de-soldered the Decimal Pin so it doesn't light up at all. IE when the yellow wire senses 3.0V it will display _30 instead of 3.00 or _3.0. 3 volts would
be the equivalent of 30 PSI in my tanks and 20V would display 200 for 200 PSI. 5V power and 2-100V sense.

DC to DC Boost PCB from Aliexpress. It will take the Nominal 12V and boost it up to 31 Volts. Use the Pot to set the output.

My Pressure Gauge PCB. LM7805 for regulated 5V out, LM 358 Dual Op Amp, 1n4007 Diode, 10K resistor, 56.2K resistor, 5K Pot.
This is sized to fit to the Back of the Boost PCB.
12V in goes to the LM7805. The 5V output powers the Display and the Sensor. The output of the sensor goes to the 1n4007
Diode for the Voltage drop. The Sensor signal now goes from 0 to 4 Volts ( 0 to 300 PSI) to the OpAmp. The OpAMP Multiplies
the Signal through the two resistors and Pot so the Voltage reading to the Display is 3-30 Volts. The Display would Show
30 to 300 PSI. My system has a max pressure of 235psi before a safety valve releases.

300 PSI Pressure Sensor from ALIEXPRESS. I took the connector apart and replaced the short Pigtail wires with longer ones.
Sensor needs 5 Volts in and outputs 0.5 to 4.5 Volts out.

There are 5 wires to connect 12v Power and Ground, Sensor 5V power and Ground, and the Sensor Output return.

Malodave
Ram Guru
Probably going for $50. I am using $25 worth of resin, It is a 7 hour Print plus an hour to finish and cure it.
I will be ordering some Black ABS Resin, but final Painting and stuff will be up to you. Switches can be
had all over Amazon for Color, Legend, and if there is a small LED to light the switch when off and a brighter
one when on.
Malodave
I will be ordering some Black ABS Resin, but final Painting and stuff will be up to you. Switches can be
had all over Amazon for Color, Legend, and if there is a small LED to light the switch when off and a brighter
one when on.
Malodave
Users who are viewing this thread
Total: 1 (members: 0, guests: 1)

