5thGenRams Forums

Register a free account today to become a member! Once signed in, you'll be able to participate on this site by adding your own topics and posts, as well as connect with other members through your own private inbox!

Sun Visor broken

Just fixed my passenger side visor. I ordered the metal clips instead of the plastic ones...just being paranoid since the OEM stuff is plastic and I'd hate to have this issue on a road trip. I also just ordered one for the driver's side that I plan to preemptively install. Here's the link to the metal clips for any who are interested:
Note: the hardest part was getting the clip on the visor arm. I ended up opening my vise grips to the widest setting and snapped it on that way. I'd imagine there are more options, especially if you are willing to disconnect the visor wires....which I was not...lol.

Good luck!
I may switch my plastic clips out for the aluminum ones. How's the color match? Can you post a pic for reference?
 
My passenger side came completely off and the wires are hanging. since the wires are just hanging, does anyone know if this will drain my battery?
 
My passenger side came completely off and the wires are hanging. since the wires are just hanging, does anyone know if this will drain my battery?
Not unless there is there is a load on the wires.
 
My passenger side came completely off and the wires are hanging. since the wires are just hanging, does anyone know if this will drain my battery?
Take the screws out and unplug the wires until you get it sorted out.
 
From what I can tell this is a pretty common issue on both Jeeps and the Ram Trucks.

The connection to the hinge has broken at the stalk and now it hangs down on the electric cord.

has anyone else experienced this? My truck is a 2019, so I expect this is no longer covered under the standard warranty.
Yes, just ordered my second visor now. Metal of visor stops short, and plastic that continues and holds it to ceiling mount fatigues and breaks. Then it just falls from ceiling held by wire. Really pos ram! Looks like same visor on my 2019 goes to today's models too.
 
So far only my passenger side has broken. Keeps falling out of the socket whenever I use it. Waiting on replacement, part is on back order.
 
I'm glad I rarely use my visors. Just really have no need. Tinted windows and sunglasses FTW.
 
Mine broke on my 2020 Laramie. I don't even want to deal with the dealer after them telling me that FCA wouldn't cover my leaking rear window being 2K out of warranty. They wanted almost $2000! I'm not paying them to fix the same issue I had on my 2017! Now this! Seriously considering NOT getting the REV!
This is a covered warranty item now. I have the same issue on my 19. Taking it in this Saturday for that specific issue and I'm taking the letter I received with me (but I have an extended warranty as well)
 
Between waiting for my replacement EXHAUST MANIFOLD, and now the passenger side visor issue, this RAM is irritating the hell out of me. Heaven forbid you fail to notice the smallest item on the center console and open one of the spring loaded doors, that item (toothpick!?) falls down on the back side, well, it's not closing!!??! And a ***** to get whatever it is, out!?!! Wish I could really say I'm happy with this "Limited", but my good old "Dakota" was a BETTER truck!!!?
 
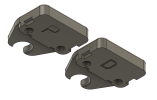
I saw some bad reviews about the Amazon clips so I drew up my own. If anyone here has a 3D printer, feel free to grab this and try it out. There's a passenger and a driver side; the two parts are symmetrical of each other. Open the little flap, remove the original screws (T-20), place the printed bracket and screw back on with the original screws.
I just installed mine; it works; we'll see how it holds.
(this is my first time sharing a Fusion360 drawing. If you have trouble using it, let me know)
 

Attachments

  • Visor Bracket.png
    Visor Bracket.png
    99.1 KB · Views: 33
I saw some bad reviews about the Amazon clips so I drew up my own. If anyone here has a 3D printer, feel free to grab this and try it out. There's a passenger and a driver side; the two parts are symmetrical of each other. Open the little flap, remove the original screws (T-20), place the printed bracket and screw back on with the original screws.
I just installed mine; it works; we'll see how it holds.
(this is my first time sharing a Fusion360 drawing. If you have trouble using it, let me know)

The problem I had with the Amazon clips may have been vendor related. They described as a "pair" of clips, but what I received was one (1) clip, one (1) spacer, and four (4) screws. There wasn't a pair of anything except the screws. There were enough screws to do both sides, but only clip parts for one side. When I complained, they said they would refund, but I would have had to send them back, so still out money for something that was fraudulently advertised. The people were idiots or crooks, or both. I just left a bad review and got on with my life.

As for the drawing, they look nice but I didn't see any provision to save the file. Is that a print-only online thing? Forgive my ignorance, but I haven't got into 3D printing, maybe that's something I can do when I retire.
Anyone know what size the normal factory screws for the visors are as I believe I have one missing
 
Well All,
I will be taking one for the team so to speak from the great and wonderful Amazon:

https://www.amazon.com/gp/product/B0CRGPP1ZY/ref=ppx_yo_dt_b_asin_title_o00_s00?ie=UTF8&psc=1

These are reportedly made of aluminum one piece and there are Left and Right sides. There are not any reviews and they are new to the market.

So they will be here middle of the week, but I will not have any opportunity until the weekend to attempt to install.
So, once I have climbed off the struggle bus, and gotten the parts installed, I will provide my experience of the installation. For me this is a preventative, hoping to save pounds of cure. We had a Dodge Caravan that kept breaking in the same manner.
I will also try and attach some cell phone pictures as well showing one side of before and after installation.
So tune in next week, same bat channel. Glad these are returnable :).

Thanks all for the collective wisdom and knowledge here, I have learned so much just by reading almost every post, my turn, to add to the wealth of information.

BlueHemi1500
All,
As promised here is my first-hand experience below.
  1. My apologies: no pictures as I was trying to beat the weather. :( I forgot to take the pictures.
  2. Today, the great and wonderful Amazon gave me a new product page that is cheaper than what I paid. :( The exact product I will drop the link below:
    https://www.amazon.com/ISSYAUTO-Vis...0CFQW94RC/ref=cm_cr_arp_d_product_top?ie=UTF8
  3. This link has a few ratings vs. the original.
  4. The installation is really easy. :) My lessons from my installation that I would add
    1. You need a very small flat-blade screwdriver then take your time to pry open the cover.
      1. Insert the screwdriver in the small hole and Gently press/pry the clip open.
    2. You will need T20 Torx to remove the OEM screws
    3. You will need a #2 Phillips for the new screws (supplied) - See the note below on replacement screws from a hardware store.
      1. Mine were not black as shown in the picture but appear to be stainless steel
        1. As noted in the comments/review section may be a bit small to get a firm bite.
          I will be making a Lowes/Home Depot expedition to investigate larger-diameter screws.
          1. New and Improved Parts Below:
            1. Sheet Metal Screws:
              1. #8 x 1 1/4 inches long
              2. Pan Head - Phillips
                1. Approx $2.00 for a pack of 8 screws - your mileage may vary.
      2. Get some help, I highly recommend it.
      3. Note the Right vs. Left side. (marked on the back)
    4. Open the cap using the very small flat blade to expose the screws.
    5. Swing the visor to the door, makes the access easier to see and use the tools and for the helper hold.
    6. Use the Torx T20 to remove the OEM screws, be careful they will drop, recommend closing the door and opening the window to contain dropping screws, easier to find later.
    7. Have the helper hold the visor up
    8. Place the proper plate in place, it will hold itself up so long as the visor is being held up with a helper. :)
    9. Place the new screws (potentially user-supplied replacements) hand-tight on both to confirm placement and allow for adjustment if needed. My experience - no adjustment was needed. The replacement screws are fully seated and have a firm grip and can be fully tightened to as tight as I dared.
    10. Repeat for side 2.
    11. Take helper/spouse out for a bite to eat for helping.
It took me about 4 to 5 minutes after the prep time on each side. This does not include time to work out the best placement of the visor and determine the tools for the job.
Total time less than 20 minutes to include assembling tools, testing tools for fit, installing, clean up tools.
My interior room is a Tan color, parts are black. Unless you take time to look, the new plates are not easily noticeable. I don't care as the seats are black, and the new plates are not noticeable to me. If you like, I guess you could take the time to paint plates in a different color of your choice.
I hope to avert the dreaded visor pivot failure in the future.
I hope future readers will find this helpful.

BlueHemi1500
 
Last edited:
Add both mine replaced around 30,000 miles under warranty. I am at 52,000 and the passenger broke again I’m going to request to fix during my next oil change at the dealer. I’m at 2019 ram 1500.
 
I saw some bad reviews about the Amazon clips so I drew up my own. If anyone here has a 3D printer, feel free to grab this and try it out. There's a passenger and a driver side; the two parts are symmetrical of each other. Open the little flap, remove the original screws (T-20), place the printed bracket and screw back on with the original screws.
I just installed mine; it works; we'll see how it holds.
(this is my first time sharing a Fusion360 drawing. If you have trouble using it, let me know)
Could you put this in an stl file?
 
I saw some bad reviews about the Amazon clips so I drew up my own. If anyone here has a 3D printer, feel free to grab this and try it out. There's a passenger and a driver side; the two parts are symmetrical of each other. Open the little flap, remove the original screws (T-20), place the printed bracket and screw back on with the original screws.
I just installed mine; it works; we'll see how it holds.
(this is my first time sharing a Fusion360 drawing. If you have trouble using it, let me know)
How can I get the file for this?
 
I reproduced the 3d part and created an STL file that folks can use to 3d print this part. I installed one in my 2020 RAM 1500 successfully.

The attached file is an STL, but the site doesn't allow that extension...so I renamed to be a PDF.
RENAME the file with extension .stl (MirrorClip.stl)

3d printer settings I used (for my QIDI XMAX3):
Filament: ASA
Infill: 100%
Support: Yes (to support screw holes)
Speed: 50-60 mm/s
Temp: 270c
Bed Temp: 100c
Layer Height: 0.2
Perimeters: 4
 

Attachments

Users who are viewing this thread

Back
Top