5thGenRams Forums

Register a free account today to become a member! Once signed in, you'll be able to participate on this site by adding your own topics and posts, as well as connect with other members through your own private inbox!

Rough Country Retract Powered Running Boards

They must have changed them because I got them yesterday and mine look like most of the other steps where they fold up and down. And there’s only 2 arms per side. Weird.


Sent from my iPhone using Tapatalk
 
They must have changed them because I got them yesterday and mine look like most of the other steps where they fold up and down. And there’s only 2 arms per side. Weird.


Sent from my iPhone using Tapatalk
You are correct. Looked at their website and it shows the new design with only 2 arms, which means they did away with the swing out deploy design. At the same time, it should be a much easier installation with the fold down design and just the two arms. Either way, a bit cheaper than other brands, and does the same thing. Good luck and enjoy your steps!👍
 
cd7ad089eaffb2ff8d0bc820a61192d6.jpg

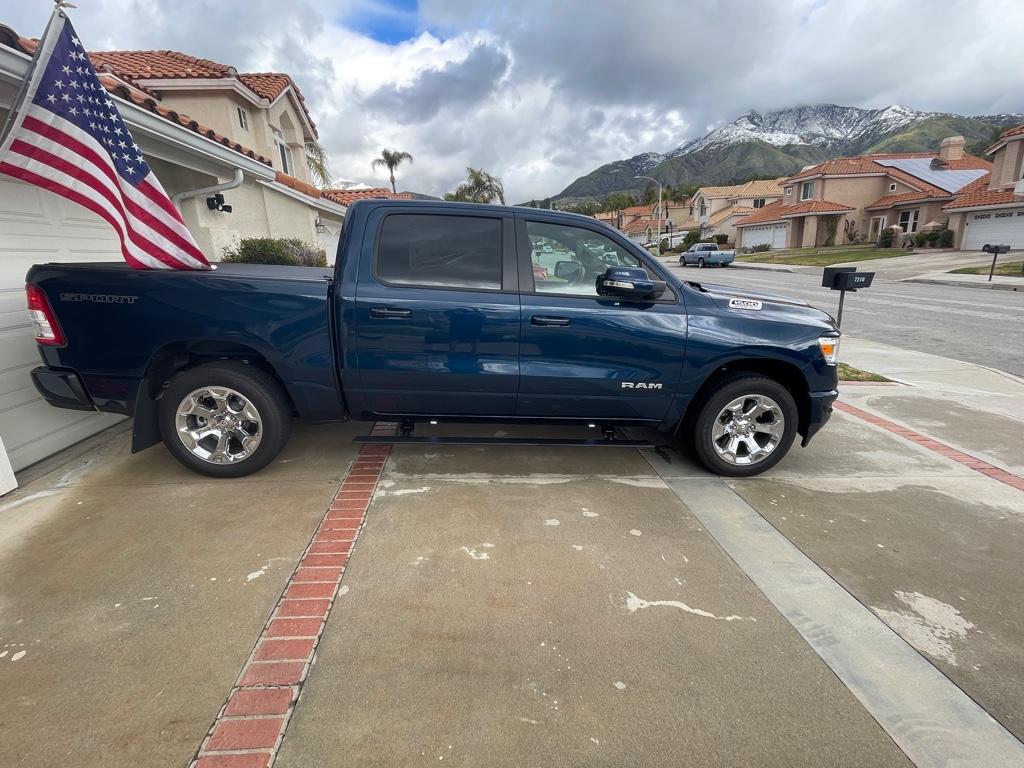
Here they are installed. Took me way longer than it should have. But it started raining on me and Im recovering from knee surgery along with just being all around beat up so i will take it.
I’ll start with this, the directions included were not that greatest. But coming on here and other sites helped me figure out what was missing. one. So id consider myself a beginner.
After mounting the arms and attaching the control module I noticed that something wasn’t adding up. After reading a review on the rough country site I realized I had to move the control module from the passenger side to the driver side. there is no way that cable is reaching the battery from the passenger side.
-I also decided to drill 2 holes in the mounting bracket and reverse how the control box was sitting. I just didn’t like the look of the stress and the way that the wires were pulling as it was basically going up and back over itself.
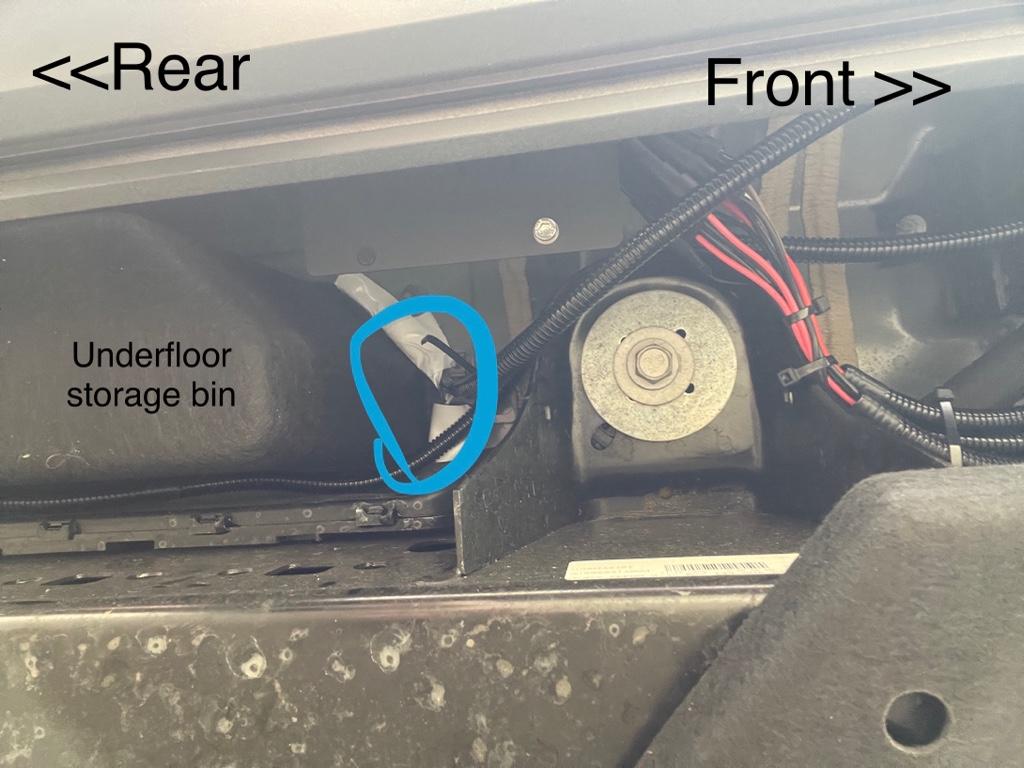
For the door magnets and the control switch I removed the underfloor storage bin on the driver side. I ran the wires through there and then secured the passenger side wire to a yard stick and slid it under the carpet. I protected the wires from being pinched at the storage box entry point using some foam from an pelican footlocker I had from a deployment. Much easier then drilling in my opinion.
The only thing I’ve installed myself anytime recently has been some fixed running boards for a 2020 ram & the Bak revolve X4S cover and Baxbox2 on this one. Being my first time installing these It wasn’t too hard. Just had to overcome my own inexperience and some incorrect directions.
Basically I’m just saying that I was able to install them and I am satisfied with how they look and operate so I would recommend them. hope this helps.


Sent from my iPhone using Tapatalk
 
94a4e2ed7b84d9e2fde3e57c757250a9.jpg

Pic of where I ran the control switch and magnet cabling through the underfloor storage bin area instead of drilling.


Sent from my iPhone using Tapatalk
 
cd7ad089eaffb2ff8d0bc820a61192d6.jpg

Here they are installed. Took me way longer than it should have. But it started raining on me and Im recovering from knee surgery along with just being all around beat up so i will take it.
I’ll start with this, the directions included were not that greatest. But coming on here and other sites helped me figure out what was missing. one. So id consider myself a beginner.
After mounting the arms and attaching the control module I noticed that something wasn’t adding up. After reading a review on the rough country site I realized I had to move the control module from the passenger side to the driver side. there is no way that cable is reaching the battery from the passenger side.
-I also decided to drill 2 holes in the mounting bracket and reverse how the control box was sitting. I just didn’t like the look of the stress and the way that the wires were pulling as it was basically going up and back over itself.
For the door magnets and the control switch I removed the underfloor storage bin on the driver side. I ran the wires through there and then secured the passenger side wire to a yard stick and slid it under the carpet. I protected the wires from being pinched at the storage box entry point using some foam from an pelican footlocker I had from a deployment. Much easier then drilling in my opinion.
The only thing I’ve installed myself anytime recently has been some fixed running boards for a 2020 ram & the Bak revolve X4S cover and Baxbox2 on this one. Being my first time installing these It wasn’t too hard. Just had to overcome my own inexperience and some incorrect directions.
Basically I’m just saying that I was able to install them and I am satisfied with how they look and operate so I would recommend them. hope this helps.


Sent from my iPhone using Tapatalk
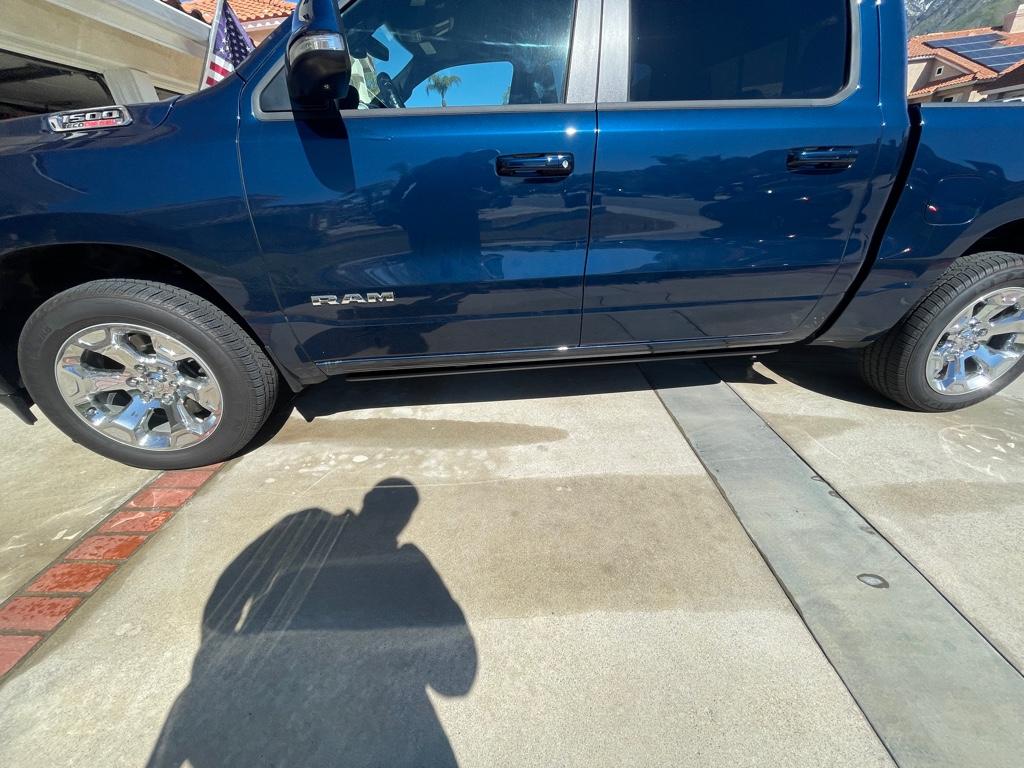
Thanks for the writeup they look good. Have any photos of them retracted?
 
0f8a95b5488cfacca45f4a67177c4226.jpg

I was planning on taking a better picture after I washed it but the pressure washer took a dump so… I’ll try to take a better one tomorrow now that it’s clean. I think they tuck up pretty nice.


Sent from my iPhone using Tapatalk
 
0f8a95b5488cfacca45f4a67177c4226.jpg

I was planning on taking a better picture after I washed it but the pressure washer took a dump so… I’ll try to take a better one tomorrow now that it’s clean. I think they tuck up pretty nice.


Sent from my iPhone using Tapatalk
Oh this completely changes everything. I hated the old ones that swung out. These look great and are quite a bit cheaper than amp or mopar
 
37d4b24a2ee8e13ddfacee445bfa644a.jpg

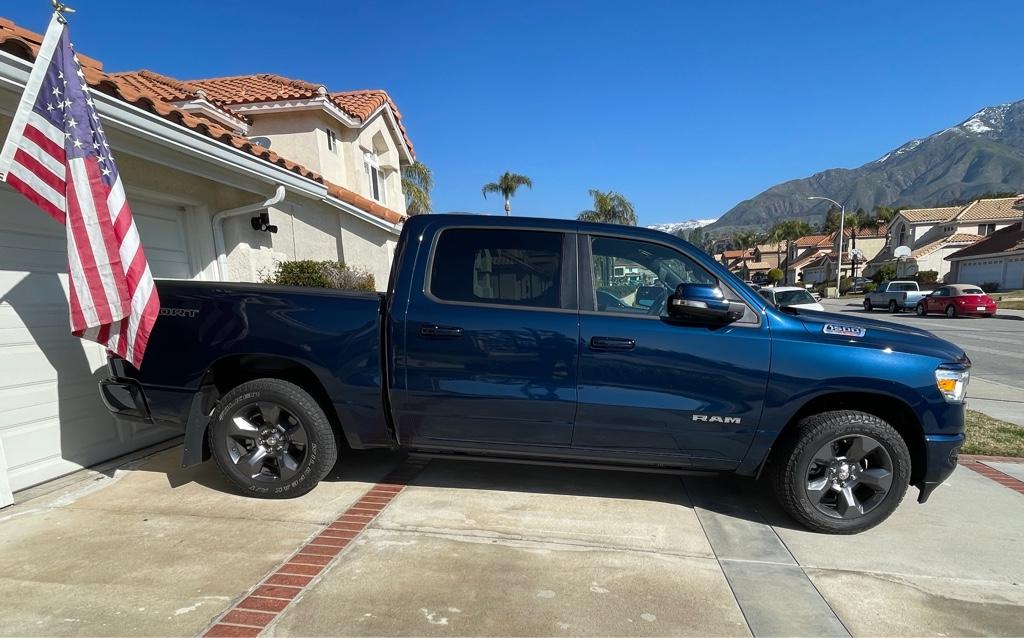
That’s a little better picture. At first I wasn’t sure how I felt about the change in design but after a few days I definitely feel like this is more streamlined. They’re pretty quick too.


Sent from my iPhone using Tapatalk
 
Oh this completely changes everything. I hated the old ones that swung out. These look great and are quite a bit cheaper than amp or mopar

Those are much better looking than the first version Rough Country was selling. They are cheaper than the Amp or Mopar boards, but not by much. The function of the Mopar boards can be integrated into UConnect, so that adds value for some.

 
37d4b24a2ee8e13ddfacee445bfa644a.jpg

That’s a little better picture. At first I wasn’t sure how I felt about the change in design but after a few days I definitely feel like this is more streamlined. They’re pretty quick too.


Sent from my iPhone using Tapatalk
Love em... thanks for the pics
 
Those are much better looking than the first version Rough Country was selling. They are cheaper than the Amp or Mopar boards, but not by much. The function of the Mopar boards can be integrated into UConnect, so that adds value for some.


I think your missing the shipping cost there.... 1375 for the boards then my quote was $229 for shipping so 1604
Also you would then need to either get an alphaODB ~$50 or having the dealer connect them to UConnect. ~$250 (based on what other members have reported in for the cost)

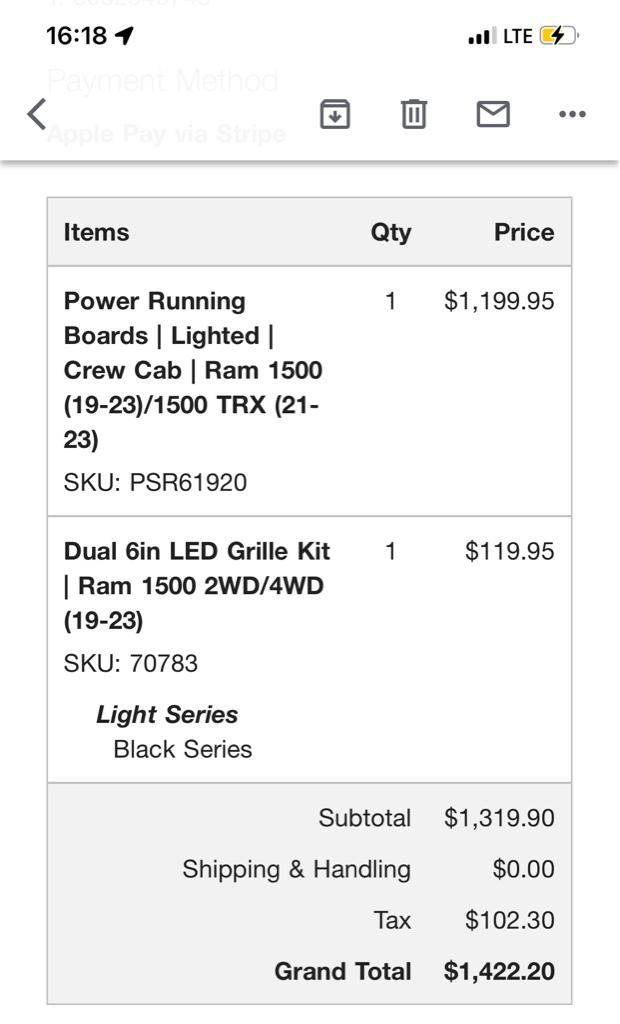
Where as the rough country are 1199 shipped and can install without needing to be hooked up to uConnect.

If it was the 1st gen of RC boards I would lean towards Mopar or Amp but these new ones look nice...
Exactly. I have Alfa so that wouldn't be a problem, but Mopar ones cost more and I really don't need a button in uconnect to open them.
 
I think your missing the shipping cost there.... 1375 for the boards then my quote was $229 for shipping so 1604
Also you would then need to either get an alphaODB ~$50 or having the dealer connect them to UConnect. ~$250 (based on what other members have reported in for the cost)

Where as the rough country are 1199 shipped and can install without needing to be hooked up to uConnect.

If it was the 1st gen of RC boards I would lean towards Mopar or Amp but these new ones look nice...

There are a few guys reporting similar discounts buying from their local dealer, but I didn't realize RC was shipping those for free. I just prefer OEM integration, even if it costs a little more.
 
I think your missing the shipping cost there.... 1375 for the boards then my quote was $229 for shipping so 1604
Also you would then need to either get an alphaODB ~$50 or having the dealer connect them to UConnect. ~$250 (based on what other members have reported in for the cost)

Where as the rough country are 1199 shipped and can install without needing to be hooked up to uConnect.

If it was the 1st gen of RC boards I would lean towards Mopar or Amp but these new ones look nice...

6c303037296f359e836d7f6b3055f7f8.jpg

Even with the light kit it was less than any other set I could find.


Sent from my iPhone using Tapatalk
 
Just completed installation of a set of RC Retract Powered Steps. Replaced a set of OEM wheel to wheel Stainless steps that came with the truck.
Went with the Rough Country for a few reasons:

1) About $500 cheaper than the Amp Steps
2) I like how they swing out
3) I like the look of how they sit when retracted

I would rate the install about a 3.5 out of 5. I had easier time with the passenger side than the driver side. For some reason the driver side step wouldn't fall into the channel nicely, so a lot of cussing ensued for the next 45 minutes. Seemed I had the idler arms on too tight at first, but even after loosening it all up, the step took a while to sit into the channel completely.
Instructions were decent, and not many videos available to reference. I did find one youtube video(he may be a forum member), and took notes where needed. I took my time, and basically installed these steps over 2 days, the last of it today just tying up the LED wiring under the cab and final tweaking to get them in time and tucked up as high as possible. If I had to estimate how long, I'd say about 6 hours, give or take an hour. I had to remove the OEM steps first, so it took a bit longer.

View attachment 121311View attachment 121336

View attachment 121332View attachment 121333
-Mounted the control box to the dash frame behind the center console
-Ran the power wire through the grommet in the firewall.
The wiring harnesses were well labeled, but there is a 2 pin connector that plugs into the factory harness behind the kick panel. That wire was tape wrapped to the passenger side LED wire, so it made for a difficult run across the cabin to the driver side.

View attachment 121312
Here is where it helped it helped to have the right tools. Instructions has you pull back the carpet to expose that floor plug that is about 2/3rds covered with sound deadening to run your wiring.
-I used my DREMEL tool to remove the sound deadening that was covering the plug in the floor. Then used a chisel to pop it out. Passenger side was even easier. This tool was a time saver. The sound deadening was way too thick to cut through. Using the proper blade attachment, I just scraped and leveled it until the floor plug was clear and I could pop it out freely.
-With the plug out it made it easier to drill the hole for the motor and LED wiring.
-I used clear RTV sealant to close the exposed hole in the floor plug before I replaced the carpet back down.
View attachment 121313
View attachment 121318View attachment 121320
Once I finally got both sides installed, each sided needed to be positioned so when retracted the step sits centered under the cab.
The built in LED's in the step, with my LED strips under the cab. It is pretty bright!
After adjusting idler arms, step is tucked up pretty good. Nicely centered on both sides.
View attachment 121321View attachment 121326
The RC steps, when fully retracted, tuck under the cab nicely. Do miss the wheel to wheel look, but the OEM steps stuck out a TON!
I like how the RC's sit under the cab retracted compared to the AMP step, and I dig how they swing out when activated, like wings, lol. Each to his own, I guess...:)

So far, so good. Happy how it looks and functions, will see how they hold up. Steps feel pretty robust, thick and sturdy. I have lost some shin skin to it already during this install.
Definitely changed the look of the truck, and only shiny parts left are my tailgate and grill emblems and lug nuts.
Last on the list, wheels and tires. Well, last on the list for this quarter, lol.
Where did you put the valet on/off switch? Trying to figure where to put mine
 
cd7ad089eaffb2ff8d0bc820a61192d6.jpg

Here they are installed. Took me way longer than it should have. But it started raining on me and Im recovering from knee surgery along with just being all around beat up so i will take it.
I’ll start with this, the directions included were not that greatest. But coming on here and other sites helped me figure out what was missing. one. So id consider myself a beginner.
After mounting the arms and attaching the control module I noticed that something wasn’t adding up. After reading a review on the rough country site I realized I had to move the control module from the passenger side to the driver side. there is no way that cable is reaching the battery from the passenger side.
-I also decided to drill 2 holes in the mounting bracket and reverse how the control box was sitting. I just didn’t like the look of the stress and the way that the wires were pulling as it was basically going up and back over itself.
For the door magnets and the control switch I removed the underfloor storage bin on the driver side. I ran the wires through there and then secured the passenger side wire to a yard stick and slid it under the carpet. I protected the wires from being pinched at the storage box entry point using some foam from an pelican footlocker I had from a deployment. Much easier then drilling in my opinion.
The only thing I’ve installed myself anytime recently has been some fixed running boards for a 2020 ram & the Bak revolve X4S cover and Baxbox2 on this one. Being my first time installing these It wasn’t too hard. Just had to overcome my own inexperience and some incorrect directions.
Basically I’m just saying that I was able to install them and I am satisfied with how they look and operate so I would recommend them. hope this helps.


Sent from my iPhone using Tapatalk
Where did you put the on off valet switch?
 
Where did you put the valet on/off switch? Trying to figure where to put mine

My steps never came with a valet switch. My version is the older version with three arms and they swing out. Newer version has two arms and folds out.
 
Where did you put the on off valet switch?

I wasn’t really sure what to do with it so i ran it into the drivers side storage area of the center console by my right knee.


Sent from my iPhone using Tapatalk
 

Users who are viewing this thread

Back
Top