Mechaero19
Active Member
- Joined
- Feb 25, 2019
- Messages
- 49
- Reaction score
- 47
- Points
- 18
- Age
- 41
Here is an update to the new design I am working on. I have been taking a slow approach at this. More so an engineering approach. I have some solutions to the water drainage. Its an exciting project I made for myself and I am up for the challenge.
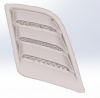
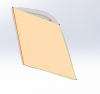
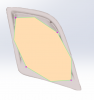
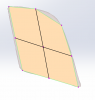
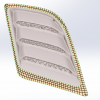
SO after some thought, in the previous posts, you can see I was trying to generate a mesh on the entire part. Problem with that, it is too complicated because of the diamond shapes, and the topology is very complex. SO....I asked myself, what DO I really need from the factory part, to design my own vent. And the answer to that...……..the perimeter of the part. I need this only, since the center portion will be redesigned, and it will hopefully guarantee a factory fit to the hood contours. So check out what I have come up with. The great part about this is if I get it 3D printed, I can manually hand sand the parts edges straight....or I can spend more time aligning the mesh. I think I will go with both, align the mesh more, and sand it. I will confirm the shape with a 1:1 print on paper just to see how things line up. I tried to get the sharp bend as close as possible.
So since the last post, ive learned a lot with power surfacing, with solidworks. I am going to take a crack at it with designing the vents from here. Its basically pulling points/surface/edges to conform to what you want.
Picture 1: Fresh restart imported mesh file
Picture 2: Manually drawin in mesh
Picture 3: Took picture 2, and shows the subdivision with smooth edges
Picture 4: Took picture 3, and subdivided further
With multiple subdivisions, and aligning the mesh as best as possible, you get Picture 5.
In picture 5 you can see the amount or surface area i need from the edges. Anything more than that, the mesh gets distorted, but then again, the center is up for new design.
Enjoy my Emoji wheel: