5thGenRams Forums

Register a free account today to become a member! Once signed in, you'll be able to participate on this site by adding your own topics and posts, as well as connect with other members through your own private inbox!

Reverse Engineering Hood Vents

Mechaero19

Active Member
Joined
Feb 25, 2019
Messages
49
Reaction score
47
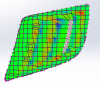
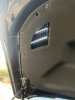
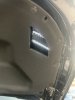
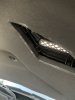
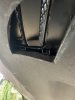
Nothing in the world bothers me more than seeing a nice ride, with fake vents. So with the resources available, I am going to reverse engineer the hood vents. I haven't decided on a final design as of yet.
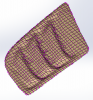
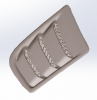
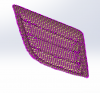
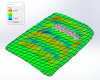
The first step was to scan the vents. The next step is to reverse engineer the vents to be compatible with the softwares I use, enough to extract the surfaces and then design my own style. Stat tuned. Its a challenging
project. Yes I can hand make, but that's no fun. plus I prefer a more uniform approach. The final goal is to have a mold that I can manufacture the vents.

I have a few other design ideas for some parts.

***I AM NOT AN ENGINEERING COMPANY***

I JUST KNOW HOW TO ENGINEER ****....
 

Attachments

  • snapshot_center00.png
    snapshot_center00.png
    188.4 KB · Views: 297
  • snapshot_left01.png
    snapshot_left01.png
    150 KB · Views: 290
  • snapshot_right02.png
    snapshot_right02.png
    158.1 KB · Views: 273

2019Ram64

Active Member
Joined
Dec 20, 2018
Messages
80
Reaction score
47
The small vents can be modified as they allow air flow into the engine bay once done. However modifying the top center one is pointless as there is not cut through under neath it in the hood.
When modifying the small vents which like I said is easy you just also modify the heat shield on the inside of the hood.
I have done this in my ram and you can feel the heat from the vents after a good drive.
 

Ellisstrong

Spends too much time on here
Joined
Sep 18, 2018
Messages
2,087
Reaction score
1,172
Location
Atlanta Ga area
The small vents can be modified as they allow air flow into the engine bay once done. However modifying the top center one is pointless as there is not cut through under neath it in the hood.
When modifying the small vents which like I said is easy you just also modify the heat shield on the inside of the hood.
I have done this in my ram and you can feel the heat from the vents after a good drive.
You installed a suede headliner on your truck already?
 

Diamondback

Ram Guru
Joined
Jun 9, 2019
Messages
1,282
Reaction score
587
Location
Midwest
I was working on the same thing as well. But, it appears we would have to cut the underside of the hood, too. There is only a small hole for the water to drip into the engine bay. After thinking about it longer, I was like, "I don't want rain water just running into the engine bay in those 2 spots (pass side is over(near) the air filter / driver side is over(near) the battery and fuse panel" :(

I did the same on my Cobra as well because, like you, I wanted AIR FLOW :) LOL


I haven't pulled the liner down yet myself - have you? do you have photos of the hood itself underneath?

PASS :
34925

Afraid if open aftermarket cold air filter and it rains --
34927

DRIVER:
34928
34929
 

DocWill

New Member
Joined
Jun 4, 2019
Messages
2
Reaction score
0
The small vents can be modified as they allow air flow into the engine bay once done. However modifying the top center one is pointless as there is not cut through under neath it in the hood.
When modifying the small vents which like I said is easy you just also modify the heat shield on the inside of the hood.
I have done this in my ram and you can feel the heat from the vents after a good drive.
How do you do this .
 

Mechaero19

Active Member
Joined
Feb 25, 2019
Messages
49
Reaction score
47
Sorry for the wait guys... been a bit busy, basement demo and planning, worklife, gym life, family life, intertwined with hood vents. So after playing with some software's, working with mesh files is no easy task. You have learn the new software's interface/environment. Processing the mesh life requires a lot of RAM (get it). Ok lame joke. SO here are some shots of the scanned part, with a Quad wrap, and some subdivisions of the original mesh. Now it is time to conform with new mesh surfaces, with the reference mesh.

A miner update, from the original post - I imported the original scan data in a mesh strictly software, smoothed the surfaces, and then imported in the software I am using now.

Capture1 - Imported scan data file
Captire2 - Quad wrap
Capture3 - Shrink wrap of the quad wrap, with more subdivisions.

List of software's I am using simultaneously

Solidworks
Meshmixer
MeshLab
Blender
3DSMax

It comes down to which one is more user friendly
 

Attachments

  • Capture2.PNG
    Capture2.PNG
    321.3 KB · Views: 89
  • Capture1.PNG
    Capture1.PNG
    146 KB · Views: 90
  • Capture3.PNG
    Capture3.PNG
    213.6 KB · Views: 86

Mechaero19

Active Member
Joined
Feb 25, 2019
Messages
49
Reaction score
47
Here is my last update for the night. Behind the scenes. The initial scan was a point cloud data. It was then converted to a mesh file. SO when you work with a mesh file, it is either all polygon (triangulated), and then converted to Quad. In my case, I was able to take the mesh file, and apply a quad mesh. Basically a net thrown over the file. Now each quad surface will be a planar surface, so if your part is curved, there will be quad surfaces tangent to the curves. SO what I forgot earlier, in my previous post. was to limit as much of the subdivided surfaces as possible, and work with quad mesh that conforms just enough to the part, but doesn't lose its shape. Below, you can see I restarted, the edges were a bit rough, and so I was able to pull and points and lines, to conform all around the parts edges. I am not done yet, but you can see the deviations from the reference mesh. Green is conforming, red is non conforming, blue is im below the reference mesh Basically there is space between my mesh, and the reference mesh. I also disregarded the "fake vent". That is an area I do not need for what am doing.
You can see how I pulled points to line up with the "fake vent" outline. After getting the mesh to where I want it, and as less deviation from the reference mesh, then I can apply more subdivisions, or shrink wrap the quad mesh.

I need a serious raise at my job.

I am looking for the panels underneath the headlights. Does anyone have a picture of there front bumper off. I want to see what is behind the whole front fascia. Good night Folks. I also got a request for a part on a Porsche
 

Attachments

  • Capture4.PNG
    Capture4.PNG
    675.5 KB · Views: 46
  • Capture5.PNG
    Capture5.PNG
    373.7 KB · Views: 45

Mechaero19

Active Member
Joined
Feb 25, 2019
Messages
49
Reaction score
47
in for updates. nice work dude


Thank you. This weekend I am having a new 3D scan done on the part, this time top and bottom. Beauty about CAD is if you have left and right, just do one, mirror the other side.
 

Diamondback

Ram Guru
Joined
Jun 9, 2019
Messages
1,282
Reaction score
587
Location
Midwest
List of software's I am using simultaneously

Solidworks
Meshmixer
MeshLab
Blender
3DSMax

Yeah I love 3D editing myself .. been doing it for 'years' .. :p
Take your time and don't burn yourself out :)

I am looking for the panels underneath the headlights. Does anyone have a picture of there front bumper off. I want to see what is behind the whole front fascia. Good night Folks. I also got a request for a part on a Porsche

I wish I woulda got some for you last weekend ..
I replaced the lower grille with the open one -- there is some AWESOME space behind it for a 3-stage intercooler!
 

Mechaero19

Active Member
Joined
Feb 25, 2019
Messages
49
Reaction score
47
Yeah I love 3D editing myself .. been doing it for 'years' .. :p
Take your time and don't burn yourself out :)


I wish I woulda got some for you last weekend ..
I replaced the lower grille with the open one -- there is some AWESOME space behind it for a 3-stage intercooler!

Cool, I have two design ideas for the panels under the headlight.
 

2019Ram64

Active Member
Joined
Dec 20, 2018
Messages
80
Reaction score
47
to modify the stock vents you literally just cut out the lower plastic. the vents are cheap. so if you end up not liking it oh well you can get new ones. I too was worried about water However many cars have vents such as this. I know the fuse box wasn't designed to handle the water however it is in the engine bay with out protection from the bottom. So if you go through a larger puddle it will probably get wetter than this modification will do to it. Plus the water will not sit there. If the fuse box cover is on the water will hit the cover and roll off. and fall to the ground. that fuse box is designed to be in that location and well over its life water will get to it. for the air filter area that box can get wet too (if using stock box. the water wont effect it. )

I will try to take a picture. I don't completely like the end results on the under hood heat shield however it is free and clear. for the small vents there IS NO DRILLING OF METAL REQUIRED. the modification is to the to the plastic vents and the Under Hood Heat shield only.

To cut the under hood head shield with the plastic removed I basically traced the pattern from the painted side of the hood. removed the shield and cut on the line with a razor. what i can do and or would of liked to do after the fact is do the same thing but do not cut all the way through the finished side of the head shield . (the side you see when you pop the hood) leave the black mesh. and then after the foam is cut cut a smaller hole through the black mess so i can stretch it over and glue it to the backside where you dont see. its hard to explain. but again the heat shield is cheap. but the clips are like 1.50 each or so and you need like 18 or so.
 

2019Ram64

Active Member
Joined
Dec 20, 2018
Messages
80
Reaction score
47
Here are some pictures. I 100 percent could of been cleaner on the cuts of the plastic. But at the time it was to see if I could do it. And I rushed it. By the way unless you look down it. You can’t tell anything was done from the painted side of the hood.
 

Attachments

  • AD7E6E67-D47A-4D01-B147-D01EC45FF0CB.jpeg
    AD7E6E67-D47A-4D01-B147-D01EC45FF0CB.jpeg
    92 KB · Views: 285
  • 4E2A4383-87D1-48C3-9B9D-DF78E1B30942.jpeg
    4E2A4383-87D1-48C3-9B9D-DF78E1B30942.jpeg
    96 KB · Views: 280
  • B2260DEB-F5D7-4196-AB63-3A423C790BFE.jpeg
    B2260DEB-F5D7-4196-AB63-3A423C790BFE.jpeg
    108.2 KB · Views: 270
  • 406EAFF8-84B5-4C52-B283-94BB33B3C4C0.jpeg
    406EAFF8-84B5-4C52-B283-94BB33B3C4C0.jpeg
    111.2 KB · Views: 276

Diamondback

Ram Guru
Joined
Jun 9, 2019
Messages
1,282
Reaction score
587
Location
Midwest
great first impressions .. let's hope no water can get trapped between the headliner and hood and cause rust later on :( - it should all run out either way, though.
 

Mechaero19

Active Member
Joined
Feb 25, 2019
Messages
49
Reaction score
47
great first impressions .. let's hope no water can get trapped between the headliner and hood and cause rust later on :( - it should all run out either way, though.


I work as a composites manufacturing engineer in the aerospace industry. Believe me, I see a lot of different ways to handle the water. That's one of the benefits of working where I work. You are exposed to many different composite parts, and how they work. I have some ideas.
 

Users who are viewing this thread

Top