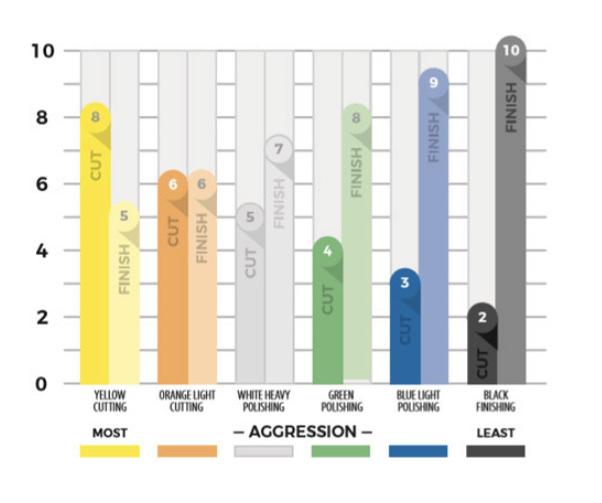
Keep one pad for each type of swirl remover. Do not mix and match.
It will take a bit of product at first to fill the pad then just a couple of dots to keep going. If you are in dry climate a spay bottle with water and a light mist every now and then will help.
Let the polisher do the work, do not apply any more pressure than what's required to keep complete control of the polisher.
Yes, start on the roof. I read your other post and honestly, I think you may be way underestimating the results you can expect. You have top-notch equipment and a good attitude (that's half the battle), you should be able to get rid of all the swirl marks and have a beautiful result. If your truck has not seen tunnel washes they will not be deep and come out rather easily with a DA polisher. I think you are going to be really surprised.
Master your skill on the roof, then the tailgate, then passenger side from the rear forward, then driver's side rear forward, lastly the hood. By the time you get to the hood, you will have it mastered, and that's what everyone is going to look at, even you.
Go easy around outside curves, far less of the pad will be in contact with the vehicle and it will cut faster use less pressure. Go slow up to inside compound curves you will see the edge of the pad wan to dig into the valley, that's a no-no, the same thing light multiple passes, lift the polisher, and rotate to follow the inside curve. If you find you are getting great results and worried about the inside curve use a pad by hand. When I started detailing cars nobody had a RA Polisher, wax on wax off.
Start with the least abrasive polish, that actually might take care of the marks. If not save that pad for later and start with the next least abrasive and so on.
I disagree with JAGopher. It is a LOT of work, take your time once you are truly satisfied ceramic coat it. Ceramic Coating will help reduce future swirl marks that you just spent so many hours removing. Two bucket wash and all that. Start the coating on the rooftop for the same reasons, follow around the truck the same way.
For glass don't be afraid to get a yellow really aggressive pad, and like someone above said use glass polish if you are trying to remove spots. Glass polish fling onto your paint, it is much to aggressive to use on paint so polish you windows first then was the truck to make sure none of that polish is on the paint. Then polish the truck.
I know it's been said, but stay away from trim, and you are new it this so tape it off, its 20 minutes and a roll of tape versus looking at your mistake for years.
Stay away from decals, get as close as you are comfortable but do not go over them especially the edges.
The White pads are probably fine I would not go more aggressive starting out, maybe even try a blue or green if you do not have many marks.
I love ceramic coatings but I do not use them on the glass I use griots garage glass sealant it's less than $10. Think rainx on steroids lasts long easy to apply no haze, just takes a lot of wiping off with clean towels.
You asked about glass polish, I use driven extreme duty glass cleaner shake well polish away cuts right through the crap. Its got acid and abrasives.
Buy Driven Extreme Duty Glass Cleaner, 16 oz Bottle: Glass Care - Amazon.com ✓ FREE DELIVERY possible on eligible purchases
www.amazon.com
The one thing I cannot say enough is to take your time and enjoy the process. If you get tired or frustrated that is not the time to be polishing your truck. And I think we all want to see pics! Remember some before pics too.
Congrats.