Franklin8618
Member
- Joined
- Apr 28, 2024
- Messages
- 21
- Reaction score
- 0
- Points
- 1
- Age
- 32
Camera is 68444540AB
Mirror is 68448641AB
Mirror is 68448641AB
You need to be a lot more specific in your posts. No one can help you if you aren't explaining your issues. Just posting part numbers tells us nothing of your issues.Camera is 68444540AB
Mirror is 68448641AB
You need to be a lot more specific in your posts. No one can help you if you aren't explaining your issues. Just posting part numbers tells us nothing of your issues.
You need to be a lot more specific in your posts. No one can help you if you aren't explaining your issues. Just posting part numbers tells us nothing of your issues.

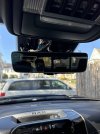
Do you have the cargo camera in the third break light?2021 1500 Laramie sport 12in screen 360 camera with collision warning I installed this parts and it doesn’t work
View attachment 185423
Okay, I think you are confused. Those parts are for the digital rear view mirror. Doesn't look like you have it installed correctly. Did you follow the guide I made? You should post over there.2021 1500 Laramie sport 12in screen 360 camera with collision warning I installed this parts and it doesn’t work
View attachment 185423
YesDo you have the cargo camera in the third break light?
Are you sure? Because that part number for the CHMSL doesn't have a cargo camera. I think you are confused.
The third break/camera is in and mirrior is connected but every time I turn it on I get that symbolOkay, I think you are confused. Those parts are for the digital rear view mirror. Doesn't look like you have it installed correctly. Did you follow the guide I made? You should post over there.
Did you follow my guide to adding the digital rear view mirror?The third break/camera is in and mirrior is connected but every time I turn it on I get that symbol
Yes the third break light 68444540ABAre you sure? Because that part number for the CHMSL doesn't have a cargo camera. I think you are confused.
Yes I bought the mirror and the third break light and ran the camera wireDid you follow my guide to adding the digital rear view mirror?
I disconnect the fakra on the mirror to see if it changes and it doesn’t but when I put the old mirror I get the dim option but when I put the mirror with the camera it doesn’t dimYes I bought the mirror and the third break light and ran the camera wire
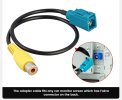
Would a analog wire to digital adapter workI decided to tackle adding a cargo camera to my 2020 Ram 1500. Based on the instructions that @Jimmy07 posted here, it seemed fairly straightforward. I purchased the following parts:
OEM LED Third Brake Light $372.68 Mopar Center High Mounted Stop Lamp 68444540AB | Auto Parts
2021 Ram 1500 68444540AB - Center High Mounted Stop Lamp | Auto Partswww.bamwholesaleparts.com
12V Backup Camera $21.66 12V Outlet Circuit Splitter $27.73 RCA Pigtail $13.32 Amazon.com: RED WOLF Backup Camera Wiring Harness to Factory Radio for Jeep 2007-2019, Dodge RAM 2007-2012, Chrysler 2007-2016 Reverse Rear View Camera Input Cable Plug RCA to OEM Stereo Display Adapter : Electronics
Buy RED WOLF Backup Camera Wiring Harness to Factory Radio for Jeep 2007-2019, Dodge RAM 2007-2012, Chrysler 2007-2016 Reverse Rear View Camera Input Cable Plug RCA to OEM Stereo Display Adapter: Radio Wiring Harnesses - Amazon.com ✓ FREE DELIVERY possible on eligible purchaseswww.amazon.comRadio Connector Terminal Sockets $9.07
The total cost for the parts, including taxes and shipping, was $444.46. I bought the RCA pigtail that plugs into the 4th Gen radio connector in the hopes that the terminal sockets would be the same for the 5th Gen. They're not.
The OEM LED third brake light has a molded feature that seems like it was designed for a cargo camera, but they don't (yet?) offer a version with a cargo camera built in. Consequently, the hardest part of this project will be installing the camera into the third brake light housing. Start by marking the exact center of the domed portion of the feature
View attachment 126997
Take an accurate measurement, ideally with calipers, of the width of the mounting collar for the camera. The collar for this specific camera measured at just over 17mm. The closest drill bit size I had, in a stepped drill bit, was 11/16", which is about 17.5mm. With the center of the plastic dome marked, drill it to size
View attachment 127002
Clean the hole up and test fit the camera collar
View attachment 127003
Now cut an access hole in the back side of the third brake light housing. I used a cutoff wheel on a Dremel. Don't worry about the fact that the third brake light will be open, if you cut within the boundary of the gasket. There are already other intentional holes in the back of the housing. This is what it looks like removing a rectangular portion of the back side of the housing, across from the hole that was just drilled:
View attachment 127004
You can see that there's a direct path from this now open chamber to where the LED elements are.
View attachment 127006
I found I had a lot of plastic dust in where the LED elements are, as a result of drilling and cutting the housing, and had to blow it out with compressed air.
View attachment 127007
Test fitting the full assembly looks like this
View attachment 127008
Everything looked good so I used marine adhesive to seal the camera collar in place and then threadlocker between the camera and the collar. This ensures a watertight seal.
View attachment 127009
When I tested the camera, after it was installed and the adhesives had all dried, I found that it was just slightly off from level. This is because I used the mark on the body of the camera that indicates which way is up. That turned out to be too imprecise. If I was to do it again, I would assembly everything with the adhesives, and as soon as it was assembled, test the camera and dial it in to make sure it was level before the adhesives dried. Because I used threadlocker between the camera and the collar, the camera can still be removed, the threads cleaned, new threadlocker installed, and then the level dialed in. That was too much effort for me, for how little the level was off.
This is the installed assembly
View attachment 127010
Unfortunately, this is where the project ground to a halt. I have a 1500 Limited, with the 360 Surround View cameras. @Jimmy07 and I discovered, frustratingly after I had finished the hardware, that there's no set of configurations with AlfaOBD that will actually allow me to view an analog cargo camera feed on my UConnect. If I didn't have the 360 Surround View cameras, this would have worked.
Thanks again @Jimmy07 for all your help!
Cheers.
Would it be able to work if u added a digital camera instead running a fakra connection to CVPM?I decided to tackle adding a cargo camera to my 2020 Ram 1500. Based on the instructions that @Jimmy07 posted here, it seemed fairly straightforward. I purchased the following parts:
OEM LED Third Brake Light $372.68 Mopar Center High Mounted Stop Lamp 68444540AB | Auto Parts
2021 Ram 1500 68444540AB - Center High Mounted Stop Lamp | Auto Parts12V Backup Camera $21.66 12V Outlet Circuit Splitter $27.73 RCA Pigtail $13.32 Amazon.com: RED WOLF Backup Camera Wiring Harness to Factory Radio for Jeep 2007-2019, Dodge RAM 2007-2012, Chrysler 2007-2016 Reverse Rear View Camera Input Cable Plug RCA to OEM Stereo Display Adapter : Electronics
Buy RED WOLF Backup Camera Wiring Harness to Factory Radio for Jeep 2007-2019, Dodge RAM 2007-2012, Chrysler 2007-2016 Reverse Rear View Camera Input Cable Plug RCA to OEM Stereo Display Adapter: Radio Wiring Harnesses - Amazon.com ✓ FREE DELIVERY possible on eligible purchaseswww.amazon.comRadio Connector Terminal Sockets $9.07
The total cost for the parts, including taxes and shipping, was $444.46. I bought the RCA pigtail that plugs into the 4th Gen radio connector in the hopes that the terminal sockets would be the same for the 5th Gen. They're not.
The OEM LED third brake light has a molded feature that seems like it was designed for a cargo camera, but they don't (yet?) offer a version with a cargo camera built in. Consequently, the hardest part of this project will be installing the camera into the third brake light housing. Start by marking the exact center of the domed portion of the feature
View attachment 126997
Take an accurate measurement, ideally with calipers, of the width of the mounting collar for the camera. The collar for this specific camera measured at just over 17mm. The closest drill bit size I had, in a stepped drill bit, was 11/16", which is about 17.5mm. With the center of the plastic dome marked, drill it to size
View attachment 127002
Clean the hole up and test fit the camera collar
View attachment 127003
Now cut an access hole in the back side of the third brake light housing. I used a cutoff wheel on a Dremel. Don't worry about the fact that the third brake light will be open, if you cut within the boundary of the gasket. There are already other intentional holes in the back of the housing. This is what it looks like removing a rectangular portion of the back side of the housing, across from the hole that was just drilled:
View attachment 127004
You can see that there's a direct path from this now open chamber to where the LED elements are.
View attachment 127006
I found I had a lot of plastic dust in where the LED elements are, as a result of drilling and cutting the housing, and had to blow it out with compressed air.
View attachment 127007
Test fitting the full assembly looks like this
View attachment 127008
Everything looked good so I used marine adhesive to seal the camera collar in place and then threadlocker between the camera and the collar. This ensures a watertight seal.
View attachment 127009
When I tested the camera, after it was installed and the adhesives had all dried, I found that it was just slightly off from level. This is because I used the mark on the body of the camera that indicates which way is up. That turned out to be too imprecise. If I was to do it again, I would assembly everything with the adhesives, and as soon as it was assembled, test the camera and dial it in to make sure it was level before the adhesives dried. Because I used threadlocker between the camera and the collar, the camera can still be removed, the threads cleaned, new threadlocker installed, and then the level dialed in. That was too much effort for me, for how little the level was off.
This is the installed assembly
View attachment 127010
Unfortunately, this is where the project ground to a halt. I have a 1500 Limited, with the 360 Surround View cameras. @Jimmy07 and I discovered, frustratingly after I had finished the hardware, that there's no set of configurations with AlfaOBD that will actually allow me to view an analog cargo camera feed on my UConnect. If I didn't have the 360 Surround View cameras, this would have worked.
Thanks again @Jimmy07 for all your help!
Cheers.