5thGenRams Forums

Register a free account today to become a member! Once signed in, you'll be able to participate on this site by adding your own topics and posts, as well as connect with other members through your own private inbox!

Exhoust Electric Cutout installed and sound

Smartmo5

Member
Joined
Dec 30, 2018
Messages
11
Reaction score
38
Points
13
Age
37
Hi
So i had my 2019 Rebel for 3 month now and loving it with no issue
Since day 1 i was planning to custom the exhoust sound , honestly stock sound is like locking a beast
So i looked for all options and my taste is i like the car sound to be quite most of the times
But some times i need that beast sound
So i ended up buying Electric cutout with remote swtich
Link for the product
Look what I found on AliExpress

UPDATE
So i loved the kit and the abiltiy to swich between quite and loud
But the only issue that made me angry is when i close the valve
There is some leaking and you can hear it, others wont notice it but you know how your car sounds
So i searched the web and found that all chinees cutout valvs have the same issue
So i ordered QTP wireless cut out Kit
And i installed it,, AND
Its 100% perfect , no leaking and so much better quality and it justified the price diffrince between the chinees kit and QTP
The chinees kit cost 50$
QTP kit cost 360$

So i dont recomend you to buy the cheap one

 
Last edited:
LOVE IT!!!!

The ability to turn if off and on...PRICELESS!!!!

I have the exhaust cutout on mine too now for about 6 weeks...still loving it.

Its definitely loud inside the vehicle and sounds sick (in a good way) outside the vehicle!!! If I could correct one area that would be the high tap tap tap sound at times. Best example would be in your video at the 1:35 time frame. This happens when coasting at certain speeds for mine, then it goes away. Let me know if you experience this with yours???

Smartmo5---if you can get some "drive by" video that would be great!!!

Here is link to some pointers that may help others as well:
https://5thgenrams.com/community/th...ler-delete-vs-axle-back-vs-full-catback.5703/


Smartmo5---wait till you drive around with it open for a bit then close it; feels like you are truly coasting without the sound!!!

LOVE IT!!!!!!!!!!!
Hi
It's really Nice feature

Does yours leaks when it's closed
You can barley hear it

Mine doese so i changed the kit with QTP kit
It doesn't leaks and i think it sounded better
I think that due to the difference in valves quality

I had the first kit installed for 10 days
When i removed it, it looked very dirty and the heat really made a marks in the electrical tube
I recommend you to check your part


Sent from my SM-G973F using Tapatalk
 
This is slick- been considering adding beast mode ability! Wonder what it would take to install a switch with the others- air susp, parking sensors, etc.
 
clazer,

I have been lazy with this project of permanent installation of the switch; but I use my exhaust cutoff daily!!!!

To make it look OEM or as noted to place it within one of the buttons on the panel, here are few reference links:

Here is link about the braker trailer diy; specifically it list the part numbers:

This link has MOPAR updated part number(s) for all items in panel area:


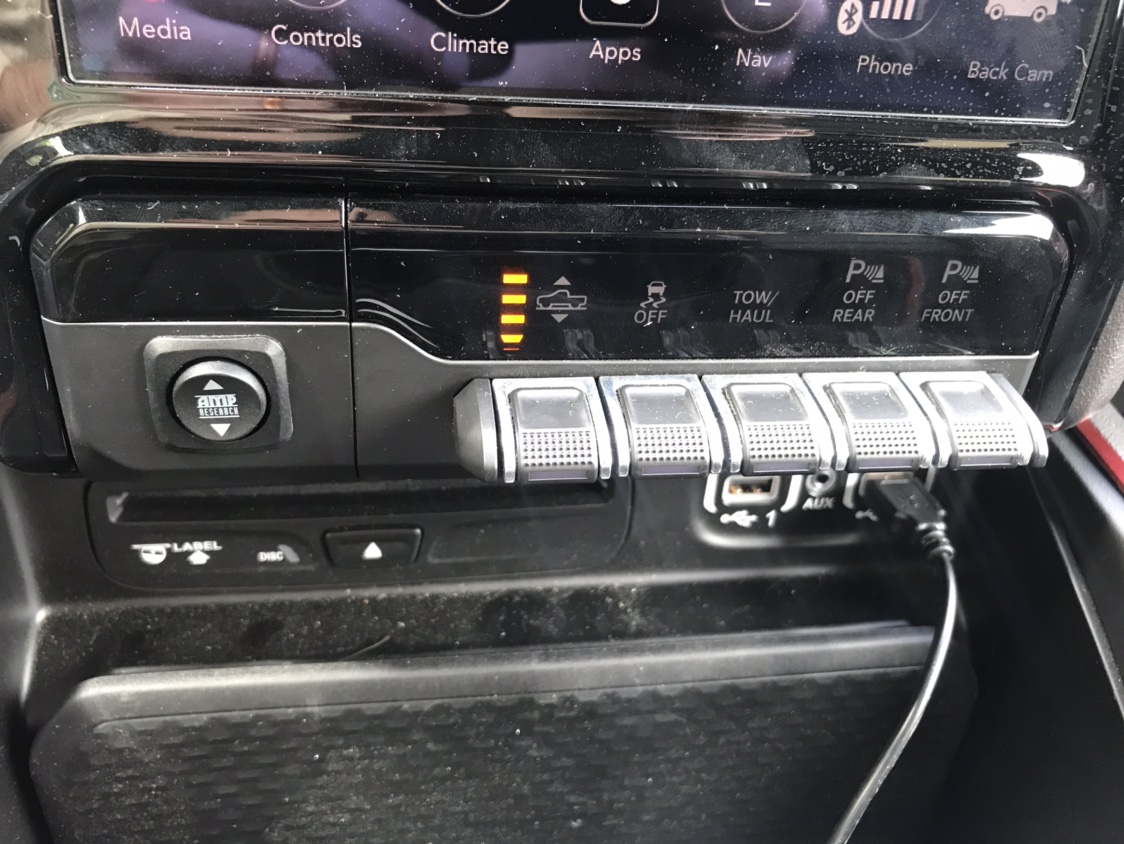
What I have found is there are 2 options on panel below radio to make it look "OEM", the trailer brake part and the multi-switch instrument panel which has all the other keys-->park sense, park assist, etc...each sold separately.

The trailer brake which in original thread above is listed as "68309259ab switch instrument panel $55.62 " this has now been changed to part number 68309259AC for $30.13

I didn't want to spend $100+ for the multi-switch instrument panel(#4 in MOPAR link). I purchased the trailer brake part in hopes to modify it internally to keep OEM look. It has the potential to work as it has a spring loaded lever that slides left to right. I am thinking I can remove the spring and have the switch move left to right for on/off of the exhaust cutoff switch. It is on my "to do" list. This works for me because I don't have the need for the actual trailer brake. I just need to get to it and see if there is space inside/behind the trailer brake for the hardwire install.

The other part (#4) was too expensive for me to justify purchasing it for this project. You can't purchase the keys/buttons individually for that part (to my knowledge from what I have tried).

Your other option for the exhaust cutoff would be to purchase the "remote" for it. This way you can hide the key/fob remote that switches it off/on. I have seen them on ebay for around $30 which is not bad if you don't want to hardwire the switch and go through what I am trying.
 
L2D, tons of great info. Really appreciate it- you’ve really been looking at it. I’m with you- trailer brake makes the best sense if it can work. Slider bar is ideal.
 
clazer,

I have been lazy with this project of permanent installation of the switch; but I use my exhaust cutoff daily!!!!

To make it look OEM or as noted to place it within one of the buttons on the panel, here are few reference links:

Here is link about the braker trailer diy; specifically it list the part numbers:

This link has MOPAR updated part number(s) for all items in panel area:


What I have found is there are 2 options on panel below radio to make it look "OEM", the trailer brake part and the multi-switch instrument panel which has all the other keys-->park sense, park assist, etc...each sold separately.

The trailer brake which in original thread above is listed as "68309259ab switch instrument panel $55.62 " this has now been changed to part number 68309259AC for $30.13

I didn't want to spend $100+ for the multi-switch instrument panel(#4 in MOPAR link). I purchased the trailer brake part in hopes to modify it internally to keep OEM look. It has the potential to work as it has a spring loaded lever that slides left to right. I am thinking I can remove the spring and have the switch move left to right for on/off of the exhaust cutoff switch. It is on my "to do" list. This works for me because I don't have the need for the actual trailer brake. I just need to get to it and see if there is space inside/behind the trailer brake for the hardwire install.

The other part (#4) was too expensive for me to justify purchasing it for this project. You can't purchase the keys/buttons individually for that part (to my knowledge from what I have tried).

Your other option for the exhaust cutoff would be to purchase the "remote" for it. This way you can hide the key/fob remote that switches it off/on. I have seen them on ebay for around $30 which is not bad if you don't want to hardwire the switch and go through what I am trying.

Can you share a link to this? Does it work with the qtp kit? I have heard some of these can be used with the garage door opener in the sun visor has anyone tried this with success?
 
Can you share a link to this? Does it work with the qtp kit? I have heard some of these can be used with the garage door opener in the sun visor has anyone tried this with success?
Binaryslave,

I have not made this work yet. I am trying to "rig" the just the trailer brake part (part number 68309259AC for $30.13) that fits OEM underneath our radio/screens so that it works as a ON/OFF switch for my exhaust cutout switch.

I too have read where some have had success pairing the key remote with garage door opener. I wanted to go old school style with a switch....just wanted it to look OEM-ish.
 
Bump. Can anyone chime in what you do about syncing the garage door visor opening with a wireless switch for cutout?

Thank you
 
Binaryslave,

I have not made this work yet. I am trying to "rig" the just the trailer brake part (part number 68309259AC for $30.13) that fits OEM underneath our radio/screens so that it works as a ON/OFF switch for my exhaust cutout switch.

I too have read where some have had success pairing the key remote with garage door opener. I wanted to go old school style with a switch....just wanted it to look OEM-ish.

Any luck with the trailer brake install? You gave me an idea for installing the switch for my AMP steps. Looks pretty clean in my opinion.

ab78f9738d959c5abbeac69845904f16.jpg
 
Any luck with the trailer brake install? You gave me an idea for installing the switch for my AMP steps. Looks pretty clean in my opinion.

ab78f9738d959c5abbeac69845904f16.jpg
Nice!!!!

I fooled around with the back of the switch, that is about as far as I got. Did you slice into power behind center console (if so where?) or through firewall to battery?
 
Nice!!!!

I fooled around with the back of the switch, that is about as far as I got. Did you slice into power behind center console (if so where?) or through firewall to battery?

Thanks! The control box sits next to the battery in the engine bay. I ran the switch line through the big firewall grommet that some other cables went through then fished it through the dash. In order to mount it there, I had to use needle nose pliers to snap the plastic reinforcement out from the back of the blank plate then drill the hole with a 3/4” bit.
 
I got my QTP installed today, took about 4 hours start to finish, since I hit a few hurdles along the way.

I used the Ram 1500 kit #520019 and the Remote Control #10900. Total shipped to me was $420 including tax/shipping after a $25 coupon from Jeg's.

Let me first say I had every intention of letting a local muffler shop do the install, but once I looked at it, I realized the reason I paid $400 was because it was easy to install.

I removed the entire exhaust midpipe w/resonator, since it was easier to cut that way. One of the forward nuts got misthreaded which added about 90 minutes to the job, including a trip to the hardware store Hit them with some lubricant first and they should come off easily. Removing the pipe SHOULD have taken 10 minutes.

I cut the tail section of the pipe off as indicated - I actually think I could have gone 1/4" longer. I used an angle grinder with a metal cutoff wheel.

Spliced in the QTP pipe and mounted the butterfly on the workbench. Then test fit and realized the QTP motor was in the wrong spot. Flipped it around so the motor was facing up as in their diagram.

Bolted everything up - in theory doing verything under the truck could have been a 60-90 minute job. The band clamp they supply seems pretty good - I didn't hear any exhaust leaks.

First I assumed the easiest place to mount the control box would be behind the rear seat. Wasted another 60 mins trying to find +12v there. Ended up giving up on that, and decided to go under driver's seat or inside the center console instead. Started by taking the Ram BIN out on the driver's side, drilling a small hole in the outer bin liner, and running the wire up through the drivers side bin, under the carpet, to the driver's seat next to the amplifier. I drilled a 1/4" hole at a 45 degree right at the top of the outer bin and the wire fished through with no issues and runs right through the carpet. When you put the Ram Bin hatch back on top everything is hidden.

I tapped 12v off the front amplifier red wire, unfortunately I thought it was ignition-on 12v, but looks like it may be +12v constant. So I'll need to redo that. Used one of the amp mounting bolts for ground.

Hooked up the wireless control box next to the amplifier, and YES - I was able to get the homelink buttons to record the wireless remote codes.

So now homelink 1 is open exhaust, and homelink 2 is close exhaust. The QTP unit (unlike my old one) is basically "hold down as long as you want the valve to open/close" so you can open it partway, but honestly it felt like either full open or full closed was the most likely setting.

Sounds great revving in park, very loud and boomy on the street but will get some more time with it. I did NOT go with the turn down tip, I doubt I'll have the exhaust "open" very often and just felt like a waste of $30.

Great mod overall though. Very happy that the homelink buttons worked so I don't have to carry the extra remote around.

Get your power and mounting location figured out first and it should be about a 2 hour job.
 
Last edited:
clazer,

I have been lazy with this project of permanent installation of the switch; but I use my exhaust cutoff daily!!!!

To make it look OEM or as noted to place it within one of the buttons on the panel, here are few reference links:

Here is link about the braker trailer diy; specifically it list the part numbers:

This link has MOPAR updated part number(s) for all items in panel area:


What I have found is there are 2 options on panel below radio to make it look "OEM", the trailer brake part and the multi-switch instrument panel which has all the other keys-->park sense, park assist, etc...each sold separately.

The trailer brake which in original thread above is listed as "68309259ab switch instrument panel $55.62 " this has now been changed to part number 68309259AC for $30.13

I didn't want to spend $100+ for the multi-switch instrument panel(#4 in MOPAR link). I purchased the trailer brake part in hopes to modify it internally to keep OEM look. It has the potential to work as it has a spring loaded lever that slides left to right. I am thinking I can remove the spring and have the switch move left to right for on/off of the exhaust cutoff switch. It is on my "to do" list. This works for me because I don't have the need for the actual trailer brake. I just need to get to it and see if there is space inside/behind the trailer brake for the hardwire install.

The other part (#4) was too expensive for me to justify purchasing it for this project. You can't purchase the keys/buttons individually for that part (to my knowledge from what I have tried).

Your other option for the exhaust cutoff would be to purchase the "remote" for it. This way you can hide the key/fob remote that switches it off/on. I have seen them on ebay for around $30 which is not bad if you don't want to hardwire the switch and go through what I am trying.

I've got the solution. I installed the Hooker Kit that has a toggle switch and control box (I know the valve is Chinese junk but it's for testing) . I cut the wires to the switch and installed them into a controller I made and programmed. It opens the valve at wide open throttle and cuts off when the throttle goes below 100%. If you tap the throttle to 100% and let off, it will go through a full open and closed cycle. I plan to spend more time in coding to find other CANBUS inputs to leave it on and others to turn it off completely. The controller needs power, ground, CANH, and CANL. I used T-Tap connectors to make the four connections behind the cluster, which was easy to remove. I made a post with a short vid, but should have the build process video done next week. I love the way it operates automatically. Makes it twice as much fun.

I'd really like to here some input on what buttons should do what, any suggestions?
Post pics please!!!!
 
Hi
So i had my 2019 Rebel for 3 month now and loving it with no issue
Since day 1 i was planning to custom the exhoust sound , honestly stock sound is like locking a beast
So i looked for all options and my taste is i like the car sound to be quite most of the times
But some times i need that beast sound
So i ended up buying Electric cutout with remote swtich
Link for the product
Look what I found on AliExpress

UPDATE
So i loved the kit and the abiltiy to swich between quite and loud
But the only issue that made me angry is when i close the valve
There is some leaking and you can hear it, others wont notice it but you know how your car sounds
So i searched the web and found that all chinees cutout valvs have the same issue
So i ordered QTP wireless cut out Kit
And i installed it,, AND
Its 100% perfect , no leaking and so much better quality and it justified the price diffrince between the chinees kit and QTP
The chinees kit cost 50$
QTP kit cost 360$

So i dont recomend you to buy the cheap one

Just wanted to show you the fix. Yes the China Valve leaks at start-up but the control is phenomenal.
 
SWEEEETTTTTT!!!!!!

I mentioned this in another thread but moving forward this will change the game on other companies exhaust control capabilities!!! Yes there are better exhaust products out there than the ebay product, the game changer is the ability to control them at will.

Buttons and options for me---

1. Button----Ability as is currently to hit switch and leave open or ON
2. Button----To close or OFF
3. Button---Sneaky peek as you just did in video---ON FULL THROTTLE then back to normal
4. Button---half throttle???


Long trips I love the ability to turn it completely off and enjoy the drive with no cabin noise; without the rumble or to have to turn music up to compensate for loudness.

Sitting at traffic light or when in the mood to switch it ON is sooooo beautiful. While I don't support street racing it is gravy to hear the deeper growl/notes as needed.

The sneaky exhaust note you programmed is so so SNEAKY!!! I like it! Calm until you punch it them GROWLLLL!!!!

I am curious on the half trottle to see if it gives different notes/sound than full open.
 

Users who are viewing this thread

Back
Top