Morning All,
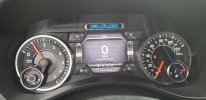
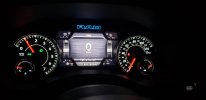
Just did a small modification last week that I thought I would share in case anyone was interested. I replaced my dash cluster lens recently as the original one was spotting bad and my warranty deductible was the same as the lens cost. I have a blue streak pearl Laramie and really loved the limited blue gauges but can't justify the cost for a little bit of blue. However it got me thinking that I wanted to see what I could do with the "RAM" lettering at the top of the cluster to bring a little blue in.
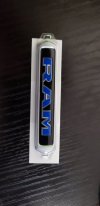
When I got the replacement lens I noticed the "RAM" at the top of the cluster was just held in with 2 small plastic clips. I lightly heated these clips with a lighter for just a second or two and popped the piece out easily. I then had a decal maker (Prajekt13 on FB or IG) for the 5thgens make decals for these letters in oracal reflective blue (matches some small blue interior pieces I have wrapped) off measurements I made. (He does have these dimensions and can make more in any color if anyone is interested in this). He sent those as well as ones I bought for the upper dash cubby and upper glovebox "LARAMIE" lettering over and I went to installing them. They all fit perfect and install is very simple.

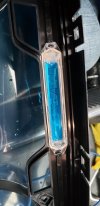
Once I had these installed on the "RAM" letters I really wanted some OEM looking blue backlighting as well (this doesn't have to be done together, if you only want the backlighting or only the lettering you can do one without the other). I purchased some blue "Gel Filter Colored Overlays" off Amazon (brand Pangda) which is essentially a colored plastic sheet that is meant to go over lighting to change the color output. I got a pack of 9 11.7"x8.3" sheets for $12, still have 95% of it unused (they sell these in blue, green, red, orange, yellow). I placed the sheet inside the RAM piece and cut to fit so it was tight but layed flat. I then used hot glue to help guarantee the sheet stayed flat and in place (may not be needed, but gave a sense of security). Then I placed the "RAM" piece back into the cluster (it snapped back in somewhat) and used a small drop of gorilla glue gel (important to use the gel) to make sure it stayed secure, though I'm sure you could use hot glue here also.

After taking the cluster and lens out (very very simple, took maybe 15 minutes max in the driveway with a screwdriver and plastic trim tool), I snapped the old lens off (8 or 9 plastic tabs) and snapped the new one on and reinstalled.


I know some may not like it, but figured I would show/explain how it was done and what it looked like in case anyone was interested. If anyone is worried about the ability to return it to stock with only the original lens (as you don't need to buy a new lens), its no problem as I did it. The vinyl lettering easily removes and the blue filter film would pop out with the hot glue with fairly minimal effort. I actually had to redo it as the film has a protective sheet on it that I forgot to remove and it was easy to do so without damaging anything.
Just did a small modification last week that I thought I would share in case anyone was interested. I replaced my dash cluster lens recently as the original one was spotting bad and my warranty deductible was the same as the lens cost. I have a blue streak pearl Laramie and really loved the limited blue gauges but can't justify the cost for a little bit of blue. However it got me thinking that I wanted to see what I could do with the "RAM" lettering at the top of the cluster to bring a little blue in.
When I got the replacement lens I noticed the "RAM" at the top of the cluster was just held in with 2 small plastic clips. I lightly heated these clips with a lighter for just a second or two and popped the piece out easily. I then had a decal maker (Prajekt13 on FB or IG) for the 5thgens make decals for these letters in oracal reflective blue (matches some small blue interior pieces I have wrapped) off measurements I made. (He does have these dimensions and can make more in any color if anyone is interested in this). He sent those as well as ones I bought for the upper dash cubby and upper glovebox "LARAMIE" lettering over and I went to installing them. They all fit perfect and install is very simple.

Once I had these installed on the "RAM" letters I really wanted some OEM looking blue backlighting as well (this doesn't have to be done together, if you only want the backlighting or only the lettering you can do one without the other). I purchased some blue "Gel Filter Colored Overlays" off Amazon (brand Pangda) which is essentially a colored plastic sheet that is meant to go over lighting to change the color output. I got a pack of 9 11.7"x8.3" sheets for $12, still have 95% of it unused (they sell these in blue, green, red, orange, yellow). I placed the sheet inside the RAM piece and cut to fit so it was tight but layed flat. I then used hot glue to help guarantee the sheet stayed flat and in place (may not be needed, but gave a sense of security). Then I placed the "RAM" piece back into the cluster (it snapped back in somewhat) and used a small drop of gorilla glue gel (important to use the gel) to make sure it stayed secure, though I'm sure you could use hot glue here also.

After taking the cluster and lens out (very very simple, took maybe 15 minutes max in the driveway with a screwdriver and plastic trim tool), I snapped the old lens off (8 or 9 plastic tabs) and snapped the new one on and reinstalled.


I know some may not like it, but figured I would show/explain how it was done and what it looked like in case anyone was interested. If anyone is worried about the ability to return it to stock with only the original lens (as you don't need to buy a new lens), its no problem as I did it. The vinyl lettering easily removes and the blue filter film would pop out with the hot glue with fairly minimal effort. I actually had to redo it as the film has a protective sheet on it that I forgot to remove and it was easy to do so without damaging anything.


