The next picture shows how the wiring of the back USB hub, you will need to disconnect each of these. The one with green wires if for your traditional outlet, while the other two are for the USBs.
View attachment 16430
Once everything is unplugged you will want to cut the original wiring harness at the location I showed in the previous picture, where the bundle of wires go to the lid USB. You will then discard the main part of the harness and the part that you see above. Then lay your new wiring harness in place of the old one:
View attachment 16431
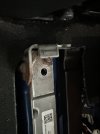
Now we start the fun in the back portion of the new harness to get it connected properly. I have made two pictures which detail how/where you will need to cut and re-wire. I think they are pretty straight forward so I'll let the pictures speak for themselves. I know it doesnt seem right to cut into the brand new replacement wiring harness that you just bought but this is what it took to make everything work and power up properly.
View attachment 16434
View attachment 16436
Once I made all the connections I re-wrapped the wires using all the wrap that I could pull from the discarded wires, making it look like factory again:
View attachment 16437
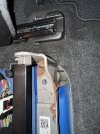
Again the 3 plugs you see go to the back USB hub and power port, the next strand of wires above that are what go to the lid UBS and the main harness snakes back under the HVAC vents and back towards the front of the seat. Next, you need to make sure the USB plugs go back through the proper access point to reach to back USB area, so you need to pull that back through the access hole that they originally came through, as shown below:
View attachment 16438
Now the rest if easy and pretty much do everything in reverse order, reconnect the 3 plugs above to the USB/power connections, re-attach that back panel. I did not attach the wiring harness to any anchor points under the seat because I actually needed the entire length of the harness to reach the plugs that it connects to in the center console, so I could not afford any slack in the line. Once you plug your main harness to the dash wiring harness, you will have left over ports to connect to your new front USB ports and new power switch that you got as part of the kit to close out the big gaping hole that was left in your console after removing your dash.
View attachment 16439
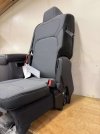
Then make sure you new jump seat is bolted down properly. You will need two bolts in the front and 3 in the back, one on the driver side and two on the passenger side.
View attachment 16440
Once your seat is bolted down you can pat yourself on the back and enjoy the finished product (after you turned your car back on and made sure all our new power ports/USBs power up properly:
View attachment 16441
I have to say that I would not have tacked this project if there was not another forum member to swap parts with, it looked to be prohibitively expensive if trying to buy all the parts new/online. So be confident and swap out those parts in confidence because it can be done and everything can work 100% like its supposed to.