5thGenRams Forums

Register a free account today to become a member! Once signed in, you'll be able to participate on this site by adding your own topics and posts, as well as connect with other members through your own private inbox!

Cargo Cam input - Car PC/Telemetry project.

derp

Well-Known Member
Joined
Oct 7, 2019
Messages
367
Reaction score
193
Location
FL
When I was a kid I was promised a computer in my car, with a live display and it would be... useful.

Now I have the display and it is time to get this computer jamming. the long term goal is to have a working PC in the truck that can pull telemetry data from the CAN or OBD2 and respond to events, upload telemetry back to a offsite storage, relay storage from an onboard 360cam DVR, and have a pretentious british voice.

Voice optional.

Bill 'O Materials:
Zauto Composite video input cable.
Zauto Secure Gateway module
Alfaobd on android
Bluetooth OBD2 reader (I used the mx+ as a second try. ELM327 didn't jive),
Raspberry Pi 4 4g
Raspbian on 16g microSD card.
Rii 2.4ghz wireless keyboard and mouse.
Raspberry pi TRRS to composite video cable adapter
scrap composite RCA male to male cable
Ferrite bead noise supression
USB C to C cable to power Raspi
30AH Lipo Battery for raspi to prevent main battery drain.

In-progress
DVR
high/low speed CAN bus interface for pi.
two way touch integration (may never happen)
LVDS intercept to use full HD native aspect ratio of 12 inch display. (also very unlikely to happen without an angel assist)


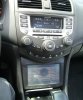
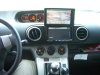
Step 1. If you see this when you are starting, you are in the wrong seat. Get in the passenger seat. It will pay off.
20200214_154357.jpg

Step 2: be smarter than me and remove all your USB devices from below the screen area lest they be broken.

Step 3: What are you hiding under that useless rubber mat?
20200214_154402.jpg
Lets get nekkid! I'll bring the screwdriver (phillips)
20200214_154446.jpg

4: Grab it by the top and bottom and give it a little tug. Somewhere between stuck door handle and a shoe that won't come off easy.

5: This is why you are at the passenger's seat. The lighter plug wires require a tab depressor on the right hand side to be pushed all the way in before it will come out. Very difficult from the driver's seat.
20200214_154757.jpg
20200214_154801.jpg

6: Gently remove the LVDS cable and the rectangular black plug. Both are retained by push-click in place type tabs.
20200214_154805.jpg
20200214_154814.jpg
20200214_154827.jpg

7: Keep doing what you were doing for the switches and tow controller wires. Same deal.
20200214_154833.jpg


8: Take the whole display unit away now and maybe set it on the driver's seat face down so it isn't in the way. Relax. There's no rush. If there is a rush, you may have chosen a bad time to do this.

9: look at the rectangular metal box held in place by 4 screws. Take those out. it was too easy for me to take a picture.

10: Gently pull the metal box out. it has lots of wires in the back. be kind. this is the brains of your poor stereo.

11: There's a lot of wires back here. Thankfully the wires are color coded to the outlets they go into. Unfortunately I am colorblind. I label things.
There was a pic here. trust me. it had some info I don't want to share yet. I'll repost a cleaned up version.
 
Last edited:

derp

Well-Known Member
Joined
Oct 7, 2019
Messages
367
Reaction score
193
Location
FL
Behind all the color coded connectors there is a big honking 52pin connector that is held in with a retaining lever on the left side. unclick that lever's push lock tab and rock it from parallel to the head unit over to perpendicular.
20200214_155658.jpg

this Red part is what I call the doomed to break plastic bit. it holds in place to block the pins from accidentally being released and backing out of the harness connector. that would suck.

to add new pins to this, you are supposed to gently pry it away with a thin flathead screwdriver. Don't do it on the center of each end. that's how stuff gets broken. very weak there. pry gently at the corners towards the center. You don't have to get it off, just not putting pressure on the pin retainers.
20200214_155409.jpg

20200214_155414.jpg

20200214_155409.jpg

Use the install guide from Zauto on how to install your composite video input cable to pins 21 and 22. the pin banks are numbered 10, 20, 30, 40 on the back of the connector where the wires go in. that's 1 on the far right lower corner to 10, start "11" 1 over from "1" , 21 on the third bank on the spot adjacent to 11 and so on.

IMG_7311-L.jpg
Pretty sure the pic above was a google image search find that I used to make the point.

21 and 22. polarity is important. unfortunately my quality control, less important right now. I plugged it in wrong the first time and it looked like old pay per view scrambled. I thought I saw a boob. While exciting, not what I was aiming for. To fix this I swapped the pinout. Once that was done it went from looking like scrambled pay per view to just plain old crappy TV. No more accidental boobs, but now I think I can get intentional boobs if I really wanted it.

20200225_072420.jpg
 
Last edited:

derp

Well-Known Member
Joined
Oct 7, 2019
Messages
367
Reaction score
193
Location
FL
REASSEMBLY
Do... the opposite of what you did to take it apart.
When bringing the screen back to the dash to re-mount, be extra careful. The sharp edge of the display digging into the leather wrapped dash leaves marks... or so I been told.
Stuffing wiring back in to re-seat the head unit control module can be a bit cramped. while you are doing that make sure you fish out and have the 12v lighter plug feed coming out the top instead of below the head unit.

Video Quality and Accessory Power
I found that the composite video cables I was using from head unit to dash were garbage, and the inside of a truck with RF everything is a noisy place.
  • I used less crappy cables, routed them away from the charge pad. for testing purposes I have been keeping the pi in the center console space, which is just awful for RF interference.
  • I have looped my AV cables through a clamp on style ferrite bead. This makes a noticeable and very positive improvement in video dot crawl and audio static suppression.
  • I moved the Raspi for my video source to a DC power bank instead of the AC powered inverter to usbc adapter that came with the pi. using a constant charge/discharge power bank has also smoothed out a lot of electrical noise from the cheap pi AC power supply I was using.
    • 30AH is a LOT of power for a pi (12.5W peak)= 9.6h between charge runtime at full tilt. more like a couple days of idle on secondary battery alone.
    • The DC power bank gets charge from the power only USB on the back of the center console, may change this to a USB PD high rate charger to improve the balance of charge vs discharge times. I'd like to stay within a 40-80% state of charge for longevity
  • The wireless keyboard/mouse gets charge from the bank as well.
    • By using the non-data usb charge we don't get the "device not supported" errors on every boot for a USB keyboard, raspi, USB fed HDMI converter, Amazon Fire TV stick or whatever USB powered junk doesn't need to talk to the head unit.
OVERSCAN - Borders
I had this annoying overscan issue where most of the video was not in frame of the window for the display on the dash.
  • For a Raspberry Pi, this was as easy as adjusting the overscan settings in the config.txt to cut the window to fit the input.
    Settings were changed, Feelings were hurt, and eventually things worked out.
  • My cheap HDMI to composite video adapter for testing is not as fortunate.
  • My DVD player from 1998 also is not able to overscan compensate by itself, so be careful on what video sources you use.
  • My amazon Fire TV stick 2 does not do overscan compensation on the dongle itself. the Fire TV stick guides you to adjust the monitor to compensate which is out of bounds here.
I have it on good intuition that there is a third pin for the camera wires I am not using that acts as a shield continuity for the composite cable so that an outer sleeve of foil or double braided wire will really cut down on the signal intrusion from the truck's nearby electricals. I'll tell you more about that when I am sure I didn't just fry my stereo.
 
Last edited:

derp

Well-Known Member
Joined
Oct 7, 2019
Messages
367
Reaction score
193
Location
FL
I had to make a lot of adjustments to the video settings for the pi, but that was just the beginning. I also had to get the pi talking to my bluetooth OBD2 reader that I am using for now. That is still in progress. I did bluetooth pair my phone to it, but they didn't have any BR profiles in common so it didn't do much yet. this is where wireless AA/Carplay will fit in eventually if I care enough to try. in the mean time I can use RCA to 1/8 TRS stereo audio cables to connect it to my stereo for listening to my sweet sweet chiptunes MP3 collection.
 
Last edited:

derp

Well-Known Member
Joined
Oct 7, 2019
Messages
367
Reaction score
193
Location
FL
This stuff will be about looking up sensor data from CAN bus and then replying back with other cool stuff so we can make things happen that FCA didn't include from factory. Lots of "if this then that" type of stuff.

Edit: The pi4 bluetooth onboard doesn't talk well to my bluetooth obd2 reader or my samsung android phone. I have a extra Bluetooth usb adapter from earlier pi projects that I will try with this to get audio and the obd2 working until I get a USB CAN bus attachment.
 
Last edited:

derp

Well-Known Member
Joined
Oct 7, 2019
Messages
367
Reaction score
193
Location
FL
Then I am gonna talk a lot about the DVR install here. this is going to be a standalone posts worth of mess. I may end up just linking over to another thread for that. what stays here is the USB capture card integration to allow for DVR UI passthrough from the camera controller to the head unit of the car via the pi.
 
Last edited:

RangerZ

Active Member
Joined
Sep 9, 2019
Messages
42
Reaction score
28
Wow derp I have no idea what you’re doing or trying to do as I dont know what any of those parts are that you listed but I’m subscribed lol
 

derp

Well-Known Member
Joined
Oct 7, 2019
Messages
367
Reaction score
193
Location
FL
to polish things up I'll get cheeky here with a bit of a telemetry dashboard to show off the cool stuff you don't get with your main dashboard display.
 

derp

Well-Known Member
Joined
Oct 7, 2019
Messages
367
Reaction score
193
Location
FL
And down here I'll keep versioning information, maybe some links to package downloads, links to contributing projects like can linux, shopping links. after that we can all talk about what a terrible idea this was and how I should just be happy with what FCA sold me.
 

derp

Well-Known Member
Joined
Oct 7, 2019
Messages
367
Reaction score
193
Location
FL
Wow derp I have no idea what you’re doing or trying to do as I dont know what any of those parts are that you listed but I’m subscribed lol
Some folks do liftkits. some like mud. I want a talking car that will kill the ignition, call me on the phone, play skinny puppy on the radio at full blast with the heat set at max for when my truck is stolen.

I'd also like to have a irrefutable telemetry log of the running of the truck with a matched time index of the DVR cameras to show yes in fact, I do know how fast I was going.

I think it would be pretty awesome to have a live streaming to remote storage dashcam product with telemetry to fight off the driving while black problem that my friend gets with his trucks in "dont drink the water" country. If we are gonna do that, it's going to need to be fully automated so that the police can take the local media, but the record will already be offisite.

I want whatever I do to look 100% stock when complete and challenge even FCA to spot what I did and where. If you can't tell it is there while servicing the truck, I did something right.

I'd like to be able to bundle this all up for my effort and ultimately be able to sell the kit to others with my own custom work included to maybe pay for some payments on the beast. maybe even a tank or two of 89 unleaded.
 

derp

Well-Known Member
Joined
Oct 7, 2019
Messages
367
Reaction score
193
Location
FL
Following. Great stuff.
you haven't seen anything yet.

Mostly because I forgot where I put the drive with those pics on it. I may have to break out the potato cam again for documentation purposes.
 

john94si

Active Member
Joined
Apr 17, 2018
Messages
115
Reaction score
56
I've had a few carPC's in the past. This was many years ago.
2007 accord
scion XB
 

Attachments

  • CIMG0023.JPG
    CIMG0023.JPG
    162.8 KB · Views: 208
  • CIMG2168.JPG
    CIMG2168.JPG
    114.4 KB · Views: 205

derp

Well-Known Member
Joined
Oct 7, 2019
Messages
367
Reaction score
193
Location
FL
I've had a few carPC's in the past. This was many years ago.
2007 accord
scion XB
Nice! This is the first time ive had a good built in display for it.

I'm also frustrated with fca warranty service and the sgw lockouts. So the things dove together neatly.
 

derp

Well-Known Member
Joined
Oct 7, 2019
Messages
367
Reaction score
193
Location
FL
camera wires I am not using that acts as a shield continuity for the composite cable so that an outer sleeve of foil or double braided wire will really cut down on the signal intrusion from the truck's nearby electricals. I'll tell you more about that when I am sure I didn't just fry my stereo.
I've not found anything that I am really certain will do what I want. I am likely going to make my own double braiding and connect to the aluminum case for the pi4 and the head unit, making for a rough shield around the pi and back to the head unit, making it effectively sheathed.
 

derp

Well-Known Member
Joined
Oct 7, 2019
Messages
367
Reaction score
193
Location
FL
I've had a few carPC's in the past. This was many years ago.
2007 accord
scion XB
care to share more? did you go into telemetry or was this pure media player fun?
 

CNC_Geek

New Member
Joined
Jul 16, 2020
Messages
3
Reaction score
0
Then I am gonna talk a lot about the DVR install here. this is going to be a standalone posts worth of mess. I may end up just linking over to another thread for that. what stays here is the USB capture card integration to allow for DVR UI passthrough from the camera controller to the head unit of the car via the pi.
I'm attempting to install a 360 birds eye view camera system to be displayed on my 8.4" screen. I have the camera system installed and video feed to my Z automotive RCA Aux video add on. The Tazer DT seems to work as expected after I became familiar with their button menu configuration. I can display my 360 video feed on an old desktop display with RCA video input. However I can not get the 8.4" display to accept the same video feed. I can switch the Tazer to where the Aux input should be but it reports "none". I have wired the RCA video connector where Z auto indicated, Pins 21, 22. I read here that pin 23 is also involved? Z automotive is not responding or at least hasn't in the last 2 days. Any assistance is greatly appreciated.
 

starbai

Active Member
Joined
Apr 21, 2020
Messages
26
Reaction score
11
How's this progressing? Super excited to see the final results.
 

Users who are viewing this thread

Top