More reading, careful inspection of the install sheet, checking part orientation, I’ve verified a few things: 1. My front lifted nearly 1.5” more than anyone else using the same setting (#6 lifted over 3”). 2. The spring seat is not upside down. 3. The spring seat adapter is installed correctly and seems to be bottomed out.
Wondered if the Mopar UCAs changed geometry, but everything I’ve read leads me to believe they do not. They only only provide more ballpoint travel. The rust belt mechanic youtube video suggests they are different.
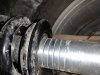
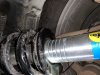
I don’t know if the guy bounced loose then torqued on the ground. I’d hope so, but that’s not going to hold it up after driving around. I do notice the dust covers are fully in tact and not running concentric down the strut. Not even close. It nearly hits the strut at the end of the dust cover. I asked the mechanic if he marked the top assembly to make sure it was properly aligned/clocked and he said “no, there’s no way to install it wrong.” Is this right? The top spring seat is cut out to accommodate the end of the coil and that looks correct. Still, I’m wondering if something else is “clocked” wrong???