5thGenRams Forums

Register a free account today to become a member! Once signed in, you'll be able to participate on this site by adding your own topics and posts, as well as connect with other members through your own private inbox!

BellTech 1060SP lowering kit review

Svt40

Active Member
Joined
Mar 24, 2021
Messages
131
Reaction score
118
Location
NE Texas
I waited for Belltech to release their kit for the 5th gen Ram for at least two years. It's finally here as of a few months ago in several flavors and options.

1060SP
2/3-4 drop using lowering spindles
1060SPS
2/3-4 drop with lowering spindles and swaybars
1061SP
An adjustable kit that gives you 1-3/3-4 using struts rather than spindles
1061SPS
An adjustable kit that gives you 1-3/3-4 using struts rather than spindles and swaybars.
1062SP
3/5 drop with spindles and adjustable struts.
1062SPS
3/5 drop with spindles, adjustable struts and swaybars.
1063SP
3/5 drop with adjustable struts.
1063SPS
3/5 drop with adjustable struts and swaybars.
1061HK
1-3/3-4 drop with performance coilovers in the front and swaybars
1061SPC
1-3/3-4 drop with performance coilovers.
1062HK
3-4/4-5 drop with performance coilovers and drop spindles with swaybars

The list keeps going and you get the idea. They have a wide selection to choose from depending on your requirements. I'll be covering just the 1060SP kit here.

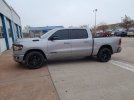
The vehicle the kit went on is a 2021 Ram 1500 Lonestar, 2wd, crewcab shortbed with the 5.7 engine.


Control Arm install instructions.
 
Last edited:

Svt40

Active Member
Joined
Mar 24, 2021
Messages
131
Reaction score
118
Location
NE Texas
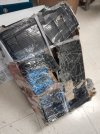
First off, when the parts arrived the rear part of the kit was very well boxed and arrived safely. The drop spindles came in a separate box that was mangled to hell and back. It was also missing the hardware kit that comes with it.

20221222_083755.jpg
Now began the fun. For reference I repair welders in a tire shop that does lift kits quite often as well as various suspension repairs. So, they have a good idea of what they are doing.

First things first. We put the truck on a two-post lift. We began in the front since that would be the easiest starting point. The wheels came off and we removed the factory spindles (knuckles). We installed one drop spindle and tested it for fit with the factory 20" wheel. The lower ball joint was too long. The instructions do cover this so we cut the ball joint down to fit. The factory 20 will just barely fit. Too close for my taste but it would probably be fine for someone not as OCD as I am.

20221222_113933.jpg

We ended up putting the stock knuckle back on and I drove her home that night. I contacted Belltech and discussed it with them as well as sent pictures.
To solve this issue I ended up just buying the wheels and tires I had planned to get later down the road and installed them. With 22" wheels there was much more clearance as to be expected.
PXL_20230109_154749956.jpg

BT then sent us the missing hardware from the spindle kit and we installed the spindles and began the back end of the kit.
 

Svt40

Active Member
Joined
Mar 24, 2021
Messages
131
Reaction score
118
Location
NE Texas
Here is where it got fun. Let me preface this with the quality of the kit. The build quality is very high with strong well made parts and a nice powdercoat finish. The instructions however are not so good. When I say that I mean they cover what is needed to be done with good pictures. But each part of the kit comes with it's own set of instructions. The drop brackets, springs and shock all have their own set. So you will have to go through all three at once using common sense to decipher what to do next.

The instructions I will be referring to will be for the control arm relocation brackets.
Disassembly is pretty straight forward. You will need to cut the bottom brace off the factory upper control arm bracket. A cut-off wheel was good for most of it, but it also required a sawzall to complete the task due to other brackets being in the way.
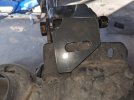
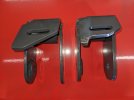
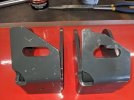
The upper brackets are specific to each side of the truck. Match up the part numbers during the install. This was the first hurdle. The upper brackets did not fit and were not even close to working as per the instructions. thumbnail_PXL_20230109_220557843.jpg thumbnail_PXL_20230109_220614364.jpg

We consulted with BT and they sent a new set of upper brackets. The new set was identical to the old. So after more discussion we took a grinder to the upper brackets. We then sent the pictures to BT to show the mods we had to do to make them fit.

PXL_20230111_182832314.jpg PXL_20230111_193608444.jpg

The grinding and notches got the brackets to sit flush on the axle flanges. We then had to drill a new mount hole into the drivers side axle flange so we could bolt the brackets down properly. If these brackets do not sit properly it will affect the control arm angles and possibly make your truck unstable.
 

Svt40

Active Member
Joined
Mar 24, 2021
Messages
131
Reaction score
118
Location
NE Texas
Once the upper brackets were installed and secure, we began to install the lower brackets. These fit with no issues and bolted up exactly as the instructions suggest.

Another issue we had was the kit did not come with the hardware specified in the written instructions. Specifically, the M8 bolts and nuts.
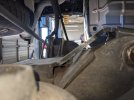
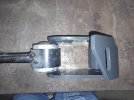
Back to the lower brackets. Once they were attached we tried to install the Z brackets. This was a big ol nope. We could only get the lower two bolts in or the upper bolt in. Not all three at once. The Z bracket ties the upper and lower relocation brackets to each other. The tech installing it offered to notch the Z brackets and BT agreed. So we notched the upper holes in the brackets to fit.

In the first picture you can see how far off the upper mount hole was when the lower three bolts were installed.
PXL_20230111_172503750.jpg PXL_20230111_193629506.jpg
Once this was done, we installed them. Now this pic is the test fit before the modification, but it gives you the idea of how it all fit together.

PXL_20230111_172452058.jpg
 

Svt40

Active Member
Joined
Mar 24, 2021
Messages
131
Reaction score
118
Location
NE Texas
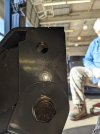
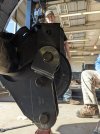
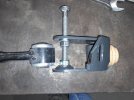
Now to get the control arms installed into the brackets we had to remove the upper brackets and spread them apart with a homemade spreader. The control arm head was larger than the brackets were wide.
20230112_090535.jpg 20230112_090520.jpg

Once this was done and the brackets installed back into the truck we found it was just so much easier to remove the control arms completely and use a hammer to get them into the brackets. By this time the axle was on three jackstands. One on each end of the axle tube and one on the pinion to maintain the angle. We then lowered the truck till the control arms reached the frame mounts and we installed the bolts loosely.

Next was the trackbar relocation bracket. This was not even possible to install per the instructions as the holes were not close to lining up and once the bracket was in place it made the bolts impossible to get to put nuts on them. So, we did not use it at all. We re-installed the factory track bar, for now.

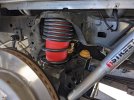
We then installed the Durango airbags into the springs and lowered the truck down until the springs were seated properly.

PXL_20230113_200909344.jpg

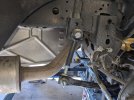
We then installed the sway bar and it went on as per the instructions. Well until it came to the end links. The instructions say to use the factory hardware to attach the new adjustable links to the old sway bar. Well, the factory upper link bolt was an 8mm bolt. The new link required a 12mm bolt to not just flop around. The lower had no hardware as it was a ball joint. So, a set of four 12x100mm bolts, washers and locknuts were required to install the links. We then had to drill out the upper link anchor nut to 1/2" so the M12 bolt would fit through it. The links were also not long enough to set perfectly parallel to the ground.
PXL_20230113_200918057.jpg

The next step was to install the shocks. They fit fine up top. At the bottom you will need to cut the bolts shorter or they will hit the control arms.

Rear tires were installed and we then slowly lowered the rear axle to the ground. Once on the ground all the control arm bolts were tightened.

The truck was then driven onto a conventional rack and all the bolts were torqued.

Then to the alignment rack she went.
Three runs on the rack got her in spec. The tech is a perfectionist with alignments so that's why he ran it three times. Everything was in except for the thrust angle, which was off by 12º. The rear axle also visibly stuck out from the passenger side. So we ordered a Spohn adjustable trackbar. Once it came in it went back onto the alignment rack where he got everything perfect.
 
Last edited:

Svt40

Active Member
Joined
Mar 24, 2021
Messages
131
Reaction score
118
Location
NE Texas
Conclusion
While the kit was well made it was obvious it was not made properly to fit a 5th gen Ram without a bunch of modifications. For the price of the kit this was not acceptable to me. The kit should have been simple plug and play. It still can be if Belltech makes some minor changes to the kit.

Ride quality is still on par with factory. The rear will bottom out on sharp edged bumps even when going over them slowly but that is to be expected with a lowered truck. I did have a slight rub on full lock turns to the left but that was easily remedied with a heat gun and a splash of water to move the inner liner a touch.

The springs and shocks seem to be quality made and match the kit very well. This is one of the reasons I went with BT over less expensive kits as I had more faith in BT getting the spring rates correct on the lowered truck.
Now would I recommend this kit to someone else? Yes and no. Yes it worked out for me and did everything I wanted it to do. No, it was not a simple install and sat in our shop for five days and required a more money to be spent to deal with the shortcomings of missing hardware and trackbar. But for the cost of the kit I was disappointed.

I would not recommend this kit unless you are willing to do a lot of modifications to the kit to make it work. If the kit was $1000 then it would be worth it.

If you have this kit feel free to msg me with issues you have. I have quite a bit of pictures of the things wrong and things we had to mod to make it all work.
 

vincentw56

Spends too much time on here
Joined
Aug 5, 2020
Messages
3,138
Reaction score
2,234
Thank you for the write up. I'm still interested in this. But it will be this summer before I get it.
 

GMetal

Well-Known Member
Joined
Jul 20, 2022
Messages
241
Reaction score
222
Wonder if its bad QC where they sent out files to be manufactured by a third party and they bent the parts wrong? Someone isnt verifying the parts. Bell Tech seems like they, like many companies, send out prototype parts that have not been tested since that is very expensive to make all the necessary corrections. The customer then becomes the test mule and after a few years the company has a perfected product.
 

MC6533

Member
Joined
Feb 25, 2022
Messages
10
Reaction score
5
Location
North Georgia
Thanks for the write up and keeping the posts going on the last thread. I have been watching the progress on this and I can say it probably pushed me back to the plans I had before. I had posted early in the year asking about these parts and anyone's experience with them.
Your truck turned out very nice after all the headaches.
Do you think the bags help on the rear any?
 

Svt40

Active Member
Joined
Mar 24, 2021
Messages
131
Reaction score
118
Location
NE Texas
Thanks for the write up and keeping the posts going on the last thread. I have been watching the progress on this and I can say it probably pushed me back to the plans I had before. I had posted early in the year asking about these parts and anyone's experience with them.
Your truck turned out very nice after all the headaches.
Do you think the bags help on the rear any?

The bags as they sit right now are at minimum required pressure of 5psi. I tow my jeep to events all over Texas and Oklahoma so I added them specifically for that reason. I have yet to take the jeep anywhere since lowering it. I do not imagine they are doing much at the moment.

Once I get the CC payed off again, I do plan on getting the Wireless air pump.

Wireless One EZ Air
 

BadTrooper_345

Active Member
Joined
Sep 19, 2021
Messages
73
Reaction score
69
Im disappointed in all the companies that made a half *** kit for the 5th gen! but yet they make good solid kits for ford and chevy and gmc? maybe it was the way ram made the frame? cant really make a decent c notch due to the shocks are where a c notch would go? seems the only way to drop the rams are to send them to the companys like phat phabs, jimmys rods and customs for a proper build? but you will pay the cost of a new car to have that done! now they make some beautiful trucks but i just dont have the money to give them and say go for it, i wish i did! but ya live and ya learn, anyway nice post!
 

familywagon

Active Member
Joined
Dec 28, 2022
Messages
77
Reaction score
106
Wow I just checked out their site. I really like that performance handling kit they got. Part # 1061HK.
 
Last edited:

Rock Crawler

Ram Guru
Joined
Sep 17, 2020
Messages
945
Reaction score
1,144
Location
Lone Star State
Glad to hear you finally got it all done and got the kinks worked out. I’m with you in your disappointment with BellTech. It’s really sad that a company that has been doing this since the 80’s can’t produce a kit that actually works without the consumer having to do a ton of mods to make it work.
 

ferraiolo1

Spends too much time on here
Joined
Aug 18, 2021
Messages
2,307
Reaction score
3,599
Location
North Central PA
Wow this is sad. Maxtrac is a fraction of this cost, and works perfectly as is. But even when options are added it’s still less than the bell tech kit.

I would have expected much more from this company, one would have thought they would have done more research before putting it out.
 

vincentw56

Spends too much time on here
Joined
Aug 5, 2020
Messages
3,138
Reaction score
2,234
Wow this is sad. Maxtrac is a fraction of this cost, and works perfectly as is. But even when options are added it’s still less than the bell tech kit.

I would have expected much more from this company, one would have thought they would have done more research before putting it out.
Agreed. I'm thinking of using their drop spindles and the rest like your setup.
 
Joined
Jul 23, 2023
Messages
5
Reaction score
0
Now to get the control arms installed into the brackets we had to remove the upper brackets and spread them apart with a homemade spreader. The control arm head was larger than the brackets were wide.
View attachment 151028 View attachment 151029

Once this was done and the brackets installed back into the truck we found it was just so much easier to remove the control arms completely and use a hammer to get them into the brackets. By this time the axle was on three jackstands. One on each end of the axle tube and one on the pinion to maintain the angle. We then lowered the truck till the control arms reached the frame mounts and we installed the bolts loosely.

Next was the trackbar relocation bracket. This was not even possible to install per the instructions as the holes were not close to lining up and once the bracket was in place it made the bolts impossible to get to put nuts on them. So, we did not use it at all. We re-installed the factory track bar, for now.

We then installed the Durango airbags into the springs and lowered the truck down until the springs were seated properly.

View attachment 151031

We then installed the sway bar and it went on as per the instructions. Well until it came to the end links. The instructions say to use the factory hardware to attach the new adjustable links to the old sway bar. Well, the factory upper link bolt was an 8mm bolt. The new link required a 12mm bolt to not just flop around. The lower had no hardware as it was a ball joint. So, a set of four 12x100mm bolts, washers and locknuts were required to install the links. We then had to drill out the upper link anchor nut to 1/2" so the M12 bolt would fit through it. The links were also not long enough to set perfectly parallel to the ground.
View attachment 151030

The next step was to install the shocks. They fit fine up top. At the bottom you will need to cut the bolts shorter or they will hit the control arms.

Rear tires were installed and we then slowly lowered the rear axle to the ground. Once on the ground all the control arm bolts were tightened.

The truck was then driven onto a conventional rack and all the bolts were torqued.

Then to the alignment rack she went.
Three runs on the rack got her in spec. The tech is a perfectionist with alignments so that's why he ran it three times. Everything was in except for the thrust angle, which was off by 12º. The rear axle also visibly stuck out from the passenger side. So we ordered a Spohn adjustable trackbar. Once it came in it went back onto the alignment rack where he got everything perfect.
So did you install the spacer that came with the new link or no
 

Svt40

Active Member
Joined
Mar 24, 2021
Messages
131
Reaction score
118
Location
NE Texas
Do you mean the sway bar spacer? If so then yes we installed that.

The trackbar did not come with any spacers so It went in as factory. We did however have to flip one end of the trackbar heim joints so we had access to the zerk fitting.
 
Joined
Jul 23, 2023
Messages
5
Reaction score
0
Do you mean the sway bar spacer? If so then yes we installed that.

The trackbar did not come with any spacers so It went in as factory. We did however have to flip one end of the trackbar heim joints so we had access to the zerk fitting.
Yea the sway bar spacer. It couldn’t fit through the bolts so i ended up not using it but do you think it will cause any problems later on in the future?
 

Users who are viewing this thread

Top