5thGenRams Forums

Register a free account today to become a member! Once signed in, you'll be able to participate on this site by adding your own topics and posts, as well as connect with other members through your own private inbox!

A bit of my 2022 Limited Night Edition SQL Build and a Question on System Audio Routing in HK System

Ceri

Active Member
Joined
Apr 25, 2023
Messages
49
Reaction score
23
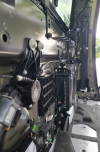
Hey all. I'm wrapping up an audio install in my 2022 Limited Night Edition with the 19 speaker Harmon Kardon system, so I thought I'd share. My install involves mostly replacing the HK system, but uses factory locations for all of the speakers/drivers (other than the subs) for now. One of my main compromises was not permanently altering the interior of the vehicle in a visible way. I’ve done the “cut the metal” stuff in the past, but I tried really hard to not drill holes and cut things more than I have had to. That said, plastic panels can be replaced, and I’ve already checked on what it would cost to buy a backup set of A pillars and sail panels (not terrible), so never say never!

Here's my truck around the time I bought it. I'll randomly throw a few pictures in throughout this post to break up my walls of text. Some of the pictures I found on here were super helpful to me for planning my build.

1690023541275.png

First some comments on the Harmon Kardon system. When I drove it home from the dealer, I wondered if I was going to invest the time (and money) in replacing it. It sounded pretty good at regular background listening levels. The midrange is decent to provide a good listening experience for the majority of truck buyers. The treble is lacking in intensity and detail, but the entire system is tweeterless, so it’s to be expected, and rolling off past 12 kHz is okay for normal listening. What really started grinding on me within my first week was the quality of the bass response in the system. I don’t expect huge output from any factory system, and I could totally live without quantity. It’s not meant to rattle the vehicle apart, and shouldn’t be. But the quality of the bass and midbass regions is pretty much crap, and it took me listening to some of my favorite 90s rock for a while to realize how bad it was. If you’re turning it up past 18 or so on the factory volume, you’re probably experiencing 5-10% distortion from the factory 6x9s and subwoofer in the bass/midbass region. If you’re pumping up the EQ for the bass, it’s probably worse than that. Loud sells trucks, and they get loud enough so test drivers can walk away with the “wow factor”, but the fidelity is missing, and you don’t know how badly until you’ve replaced it. The truck is literally made for audio. Ram put a lot of thought into road noise and the overall acoustic environment. As I was tearing apart my Limited for a full acoustic treatment it painted a picture of how much effort went into making it a quiet ride, and a rich audio environment. All of the luxurious interior treatments that go into making it look so sharp are beneficial to the acoustics of the vehicle as well. Hard, thin plastics make for bad listening. Leather wraps and padding make for excellent stage and image by reducing reflections. All that to say that if the HK system sounds bad in this truck, it’s Harmon Kardon’s fault. Not the truck. For the price point to upgrade to HK, the speakers aren’t constructed well. There’s always going to be compromises due to budget and manufacturing scalability. Ram’s going to make their money on the bells and whistles and I don’t fault them for that. If you spend $2000 on an upgrade package, it’s likely only costing them $400-600 to install it. The HK system is the best factory system I’ve ever bought, but it still wasn’t good enough to live with for the long haul. I’ve been a Toolhead for decades. When Tool didn’t sound good on the HK system, I knew I’d have to take the dive as I’ve done on the my last 4 vehicles over the past 20 years.

I knew when I was buying the truck that I’d need to have the 12” Uconnect for my starting point. Replacing factory source units has become almost insurmountably difficult as they keep integrating more and more features into the touchscreen displays. Overall, I give the 12” Uconnect5 an A-. Mainly the points off are for glitchy software behavior in an OEM unit, which should mean you’re at least guaranteed it functions as designed. Obviously things have gotten super complicated in factory source units, but it still counts for points off. Loving the wireless Android Auto functionality, and very happy that they aren’t fighting against the industry to put out their “own version” to the exclusion of the smarter people in that realm. Let the Samsungs/Apples/Googles take care of that sort of stuff, and Ram can focus on designing nice trucks. Kudos for that. With the availability of a PAC module to handle OEM integration, and especially because they allow digital to optical TOSLINK output without ever entering the analog domain, the source question is an easy answer. The input to the system is noiseless, with plenty of options at your fingertips through your phone, USB, etc. I might spend stupid amounts of time and money on car audio, but I still spend a fair share of my drive time listening to talk radio. HD Radio used to only be available for aftermarket head units as an expensive upgrade module. I spent ~$200 for an HD tuner module on one of my old decks. These days it’s a built-in assumption. It’s scary not having a CD player, but I get it. I went through that when I built my last PC and some of the best cases on the market no longer have front accessible 5.25” expansion bays for any sort of hard format inputs. Anyway. I targeted an option package that would get me a 12" UConnect, and held out for a 2022 to get UConnect 5. No regrets on the decision, and hopefully it keeps getting better with driveway updates.

Looks like there's a 10 picture limit per post, so more to come below the fold.
 
Last edited:

Ceri

Active Member
Joined
Apr 25, 2023
Messages
49
Reaction score
23
Equipment/Commments:
1690024856166.png
OEM 12" UConnect 5 - Buggy, but beautiful. When it's working right, it's a FANTASTIC source. I've never used a factory head unit before, but now that I'm on the other side of the install, I'm very satisfied with the final results. Everything about it plays well with the truck, and streaming from Android Auto has quickly become my go to source compared to USBs, bluetooth, CDs, and other older formats. The buggy part has nothing to do with my audio install. The UConnect seems to suffer from peculiar graphical glitches and proclivities occasionally, that would affect anyone with a UConnect. I very much appreciate how minimal my efforts had to be behind the dash with this install. Add in the PAC. Done.


PAC Audio AP4-CH41 (w/ CH42 harness for my 2022 and the APA-TOS1 TOSLINK add-on) - I've dealt with and troubleshooted plenty of ground loops on previous installs. Optical is so much nicer. ZERO noise from my source. No alternator whine. The noise floor of my finished install is definitely the lowest I've ever dealt with in an amplified system. One word of advice though is to set the chime setting in the PAC before you close up the dash. The cross path detection chime was ridiculously loud and annoying at first. Optical doesn't carry the fader control from the UConnect into it. It's passing a raw 2 channel digital source (left and right only). Any front/back fading has to be handled (in my case) via the processor (or your amp gains if you don’t have a processor) for anything that isn't part of the factory audio system. More on that down below. Also, while you’re at it, install the remote knob with the PAC and hide it somewhere convenient. You can make adjustments to chime volume, minimum volume settings, etc. through the truck’s steering wheel controls later if you want/need to, without pulling the dash back out. Check the manual for a how-to, but you need to have that knob available to you for it to work.

1690024882817.png 1690024904726.png 1690024923440.png

C DSP 8x12 DL processor - Dirac Live makes things a little complicated, and if I chase some rear fill in the near future it's going to present some challenges from the way I've done my first pass “course tuning”. Dirac only has 8 channels of processing, and I expect to have 11 channels in different locations (2x3 way in the front, 2x2 way in the rear, plus subs). Luckily it has the RCA pair count I need for separate amplification to each, and manual tuning capability in addition to the automatic. It's done an 80% job out of the gate with the 3-way plus sub configuration with each driver having a separate Dirac channel. I haven't done any sort of hours long "fine tune" driveway session yet, which would be coming regardless of any other plans. If I end up with additional rear fill, I may use Dirac as a tuning aid to help me manually tune drivers, and when I get to the end, I can set it up so that the FL, FR, RL, RR, and sub will each have a Dirac channel for a combined EQing.

1690024987760.png Ignoring Dirac Live, it has all of the capabilities of my previous Helix DSP, short of only having 10 bands of parametric EQ per channel. Since they're completely adjustable in frequency, Q, and magnitude, and running an active system means you aren't playing 20-20k through any one driver, 10 bands per driver should be plenty for even super-tweakers. I've never messed with a remote controller that came with a processor, and didn't expect I would for this install either, but the remote is so nicely built, and I've been using it for master and subwoofer volume control. It might find a permanent home around the dash area somewhere. I wish I could say the software is intuitive, but it's not. I was able to figure it out without reading the instructions, and the UI is fine, but it seems that a lot of people get goofed up between the routing, dirac, and mixer tabs. I discovered that you can even apply high and low passes to your input stage, ahead of any routing, etc. and somehow had a 100 hz high pass filter applied that was killing my bass on my first start up. I don’t think I did that, so it might have come out of the box that way to protect anyone that was going to accidentally push 20 hz through some tweeters. There are tons of guides and how-to walkthroughs online, but to me, that says it’s not easy enough. A good design shouldn’t require a guy like me to go looking for how-to guides and reading a 60 page user manual. I say a guy like me because I became an electrical engineer due to my passion for car audio. I’ve wasted way too much of my life reading about crazy car audio installs, etc.

My previous Helix DSP had a built in Real Time Analyzer program that I miss, but MiniDSP leans on REW to handle that. My tablet didn't have enough USB outputs to connect everything necessary (DSP, measurement mic, and source into the truck), so I had to grab my laptop. I'll likely end up playing pink noise on a loop off a thumb drive rather than try to jack into the truck directly from the laptop, but that's TBD based on what REW needs. I’ve collected an array of tuning tracks and ripped old IASCA CDs over the years to do it all manually. An integrated RTA (or even embedding REW into the C DSP) would be a nice feature for something I spent $900+ on. I’ve heard people say “Helix > C DSP” on forums. I’ve used both. I don’t see what a Helix gets you that a C DSP doesn’t, but I DO see what a C DSP has that Helix doesn’t, which is Dirac. My Helix had a bad turn-on pop that I spent quite a bit of time trying to troubleshoot, including designing some op-amp delay circuits and various grounding fixes. I lived with it for a long time. Hopefully that got better with later products they put out. I’ve played around with plenty of autoEQ software packages before. Dirac has produced the best results but it’s heavily “behind the curtain” processing. I would prefer to be able to see behind that curtain to tweak everything to my heart’s content. I appreciate that it comes with a UMIK-1 for the price. I had a Dayton UMM6 already, so now I can have calibrated microphone wars with my college buddies if we want to nerd out on the weekend.


Zed Audio Leviathan 6 channel amplifier - 190W x 6 @ 4 ohm for my front midbass, 1690025028498.png midrange, and tweeters. I've had these Zed amplifiers for ~15 years. I had them customized by Steve Mantz (owner and 80s/90s competitor). The footprint is a little big by modern standards, but Zed did Class D right before most companies were. Plenty of power, and everything else related to signal shaping is bypassed to be controlled by the processor anyway. Still love them. Still love the manuals that came with them, which were a 70 page collection of Steve Mantz’ opinions on all things car audio, full of juicy, next level electrical know-how, plus a couple of pages of specifications. They read like a stern lecture from Dad, with choice highlighting, color changes, and bold letters. “STOP RUNNING YOUR SUBS AT 0.5 OHMS!!” etc.


1690025092480.png

Zed Audio Minotaur mono amplifier - 1300W x 1 @ 2 ohm for my subs. Matches the Leviathan in styling, and similar to the Leviathan it delivers plenty of power for anything I'll ever want in an SQ/SQL system.
 
Last edited:

Ceri

Active Member
Joined
Apr 25, 2023
Messages
49
Reaction score
23
Audiofrog GB60 - Currently crossed from 70 hz up to 300 hz (Linkwitz Riley 1690025161653.png 24dB) in the factory front door location (with an MDF adapter baffle I cut). I had a Dynaudio MF172 8" midbass in my last two vehicles that required some metal cutting, etc. Due to install locations, and aiming for a stealth install, I decided to switch from the Dynaudios for Audiofrog. In my early impressions, the GB60 is more capable than the MF172 was in the midbass region, despite less cone area, and I attribute that to the xmax and sensitivity numbers. It's the same amp for all three installs, and the same attention to proper install methods, though different vehicles. I'd even used 12 AWG wire to squeeze out every last bit in my last install with the Dyns, and the new GB60s are only using 16 AWG wire. Hoping to continue dialing things in, and getting a better understanding for the acoustics I'm working with to chase more midbass, but is there ever enough midbass? I give credit to Ram for the interior of my ’22 Limited. It’s definitely a better starting platform for a car audio installation. I’ll never hear it with the Dynaudio Esotec 362 system installed for an apples to apples comparison. In my early stages of tuning (which has mostly been running Dirac Live on the C DSP) I think there’s a need for more tweaking to my house curve EQ and possibly time alignment. I think there’s more quality on the table than I’m currently experiencing, and I’ve also got the factory rear door 6x9s playing at around 60-80% of the front doors until I get more time to mess with things, so I’m likely hearing the bleed through from the crappy HK rear midbass.


1690025208656.png Audiofrog GB25 - Currently crossed from 300 hz up to 4,000 hz (Linkwitz Riley 24dB) in the factory dash corners (with a masonite adapter plate I cut). Absolutely beautiful sound and detail. Far surpasses the MD142 3" dome midrange from the Dynaudio set as I have them installed. I had this Dynaudio driver in my 2011 Challenger in custom A pillars relatively on-axis (aimed at the opposite seat), and a 2005 Ram 1500 mounted directly to the dash firing up. I always wondered if there was more detail to be had in the midrange from the MD142, and the dome shape on the Dyns was my main reason for changing to Frogs in the new truck. I remember when I got the Dyns that I was disappointed in the midrange when I hooked them up for a burn in session in a spare bedroom, but hoped that they’d sound better in a vehicle with proper tuning. The Dynaudio setup in my last two vehicles never felt like it had enough up top, and I always had to cut something off in the 2,000-4,000 Hz region to tame "S"s ripping my ears off in the upper presence, lower sibilance range. Of the whole 3 way set, the GB25 is the star of the show, before I’ve done any deep dive tuning. They have a certain delicacy, even at higher output levels, that makes vocals shine. I would find it hard to expect anything better from any other car audio midranges at any price point. If you’re on the fence about GB25s versus anything else, you won’t regret the GB25s in the corners of a 5th gen Ram’s dash.


Audiofrog GB10 - Currently crossed from 4,000 hz up (Linkwitz Riley 24dB) in the upper door location. I was 1690025254112.png worried (and still am pending more fine tuning time) that these might pull the sound stage down as I'm used to having tweeters above the plane of the dash. TBD. My last truck with the Dynaudio MD102s had tweeters in the sail panels, and my Challenger had them in the pillars aimed on axis (cross eat, near the mids). So far so good with the GB10s, but it's something I'm going to be watching for in my future driveway sessions as I get more listening time in with various music and pink noise. As I mentioned above, I’ve already priced backup sail panels and A pillars, and figured I could be out the door for under $300 if I end up breaking out the fiberglass. Compared to the rest of the interior, the pillars aren’t particularly fancy, other than the grab handle, and covering them in some sort of leather/vinyl could blend well with my night edition Ram interior. Dirac Live cut the tweeters more than the other drivers, and I've already adjusted to a flat tuning curve after trying a rolloff from the upper midrange to 20k. I'm liking it flat from 250 Hz up so far, with some boost rolling down to 20 Hz. I might try a perfectly flat tune out as well, or reduce the boost from 9 dB to ~3-5 dB rolling down into the substage. I was deciding between Audiofrogs and Focal's K2P line. I want more sparkle, and I suspect that the soft surfaces in the truck are absorbing upper treble too much.


1690025343555.png Audiofrog GB10D2 (x2) - two dual 2 ohm subs (wired to 4 ohms) in parallel for a net 2 ohms presented to the Minotaur, low passed at 70 hz. Tough to speak to these yet as I haven't put them through their paces in too many SPL heavy bass songs, but my early impression is that this pair of 10s sounds cleaner/tighter than the (2) 12” JL 12W6v2s I had in my last truck, and is right at home, timbre-matched in this all-frog install. I need to play with my infrasonic filter a little bit, and visually watch for overexcursion. I think I might be a little too conservative as I did put on some of my wife’s gangsta girl rap tracks to test things out. The low lows are lacking, but I might be chasing sub-30 hz and expecting it to sound/feel as good as the 40-50 hz range. My wife’s a fan of some music made for a trunk full of 18s. When I retire someday, I might build us a concrete filled minivan bass box to scare kids and dogs, but today I’m still after a pleasant sound and these GB10D2s have that in spades.


MTI ported enclosure - The box is ~1.85 cu ft, physically tuned in the low 30s, polyfilled to simulate lower tuning and large volume. It took awhile to get to me, but the craftsmanship is obvious. I upgraded some of the aesthetics aiming for a factory-ish appearance that blends well with this luxurious interior, but no neons or plexiglass as I'm aiming for a fairly stealth look to would-be criminals. I went with the upgraded speaker terminals, but one thing to note for future readers is that if you do go for the large bolt type connections, finding an O-ring that will physically lug onto these large bolts might require a special order. I had some spare 4 AWG o-rings for mounting on battery terminals that I managed to make work by stripping off enough to triple over the ends, crush in place with my various compression crimp tools, vice, a hammer, and cover in solder. I only used 12 AWG wire, which is quite a bit smaller than the 4 AWG ring terminal is designed for.

1690025382145.png

1690025402484.png

T-Spec Power/Ground Distribution Block - so neat compared to what I've used in the past. It's a combination power/gr 1690025436999.png ound block with 1/0 inputs and 4 sets of 4 AWG outputs for both power and ground. I'm using 3 of the outputs (both amps and the DSP) with the potential to add another amp that I may be exercising shortly for rear fill. It’s a little bulky, and my amp rack was definitely a long list of compromises to make everything fit with the eTorque battery taking up the entire driver’s side rear wall. Luckily there’s a pretty good gap between the vertical portion of the amp rack and the subwoofer box where I could mount the processor and a potential future 4 channel (with a sufficiently small footprint). There’s a lot of space between the rear sheet metal (and various widgets mounted back there) and the upper rear seat backs. Way way more than my old 3rd gen Ram.


2" LMI Seat Riser kit - This didn't come with instructions, and the LMI website is short on installation details. I was trying so hard not to do anything permanent to the truck for the eventual day that we part and I pull everything out, but I did have to cut some sheet metal to modify the upper seat bracket connection point for the included extenders. I don't know if I was being stupid and couldn't figure it out, or if this is the only way to do it. Honestly, if you can avoid using seat lifts, your rear passengers will thank you. Having spent a few hours sitting back there messing with the processor, the headroom is diminished. No regrets from me as I wanted the airspace and full access to the floor bins. It's the compromise I chose, and the rear seats are still okay for my 6' 0" self, especially when reclined. I don't have rear passengers very often, and nearly any subwoofer worth it’s salt that isn’t a special purpose shallow mount is going to need all the top-mount depth you can squeeze out. If your truck is a work truck, and you regularly have dudes over 6’ 0” stacked deep, consider the crown of their head before you pull the trigger on risers. With the downsides stated, the machining is great. The bolts that came with it are great and pretty straightforward to install on the bottom. As mentioned, the upper seat connector bracket required me to notch out the existing holes vertically a little bit to make them fit. I used an oscillating tool to make the cuts (with eye protection and a wet towel to catch metal shavings). I’m used to stacking ¾” MDF to lift my seats, and the seat back connector never working quite right in all my previous trucks. I’d throw CLD and CCF onto the brackets to minimize rattling, etc, but with the LMI connector extenders in place the seats latch snug and there’s no question it’s as strong as factory. Because the lower brackets are C shaped, it also allows you a lot of room to route wiring behind a sub box if that’s where your amps will be located. No obstructions below the seats with the brackets elevated.

Knukonceptz wire and accessories - I've used Knu for over 15 years and never had a problem with anything they've sold me. I bought 100' of their 16 AWG Karma series speaker wire for this install, and regretted spending extra for it since the outer jacket made wire stripping more difficult for me. Nothing wrong with the product, I didn't think through it much and ended up tediously spiral stripping the jacket off of every connection with an exacto knife. The Kolossus Flex 0/1 is worth the expense to get a more flexible, high strand count cable. I philosophically don't like aluminum products, even for non-signal power wire, so tinned Oxygen Free Copper for me. I also tend to oversize all of my current carrying wiring to minimize losses as much as practical. 16 AWG for tweeters and midranges probably leans a bit excessive, but I wanted at least 16 for the midbasses that would actually see the high wattage output. 12 AWG for the subwoofers that I had left over from previous installs.
 
Last edited:

Ceri

Active Member
Joined
Apr 25, 2023
Messages
49
Reaction score
23
Acoustic Treatments

Before jumping into the products, I wanted to 1690025861926.png throw out a few concepts/theories of acoustic treatment for the future DIYers reading this. Use the right tool for the right job, and understand what each type of material is doing for you before you waste a lot of money or effort on sound deadening inefficiently. I used five different products/materials for five different acoustic challenges. CLD, CCF, MLV, cloth tape, and an absorber. Don’t try to use CLD to create a noise barrier. It’s use is to reduce resonance. Don’t try to use CCF as an absorber. It’s use is to decouple surfaces to prevent buzzing. MLV is a noise blocker. Absorbers absorb. Cloth tape is special use for places where you need to decouple, but can’t sacrifice the thickness of a CCF type product. You have to keep in mind that everything you add to the vehicle is weight. It’s not too significant in comparison to the overall truck, but things like gas mileage, acceleration, towing capacity, etc. certainly won’t get better.

I treated all of the pillars from floor to ceiling, rear wall, headliner (other than the sunroof), floorboards, doors, In floor storage cubbies, center console, and interior plastic panels to varying degrees. I did not pull the main dash or the front seats. I had the rear seats out anyway to install my amp rack. I decided against pulling the front seats after I determined how well Ram had already taken care of the floors, but I applied 25-50% CLD and one layer of MLV to the places where feet touch by pulling back the carpet. MLV works best if it’s a continuous barrier, but my “after” results don’t suggest that the floor is a major source of noise. The factory already has a pretty serious layer of underlayment. I was going to skip adding any MLV when I saw that, but had it handy, and the carpet was easy to pull up. I haven’t done the wheel well liners, and I would like to do those still because there’s noticeably more tire noise without the ANC system active. It’s not crazy loud, and I was worried I’d regret no longer having ANC. My tire noise is more pronounced than outside environmental noises. I’m on passenger rated Pirellis. I may lift this truck down the road, and throw on some 35” offroad tires, so tire noise is definitely enemy number one in my mind, especially given that my noise floor from the audio system is so fantastically low. I’m also thinking I’ll stick with factory exhaust, or do electric cutouts, because it seems like a shame to introduce exterior noise when the truck sounds so quiet on the inside.

1690025883460.png 1690025901191.png

1690025932455.png 1690025952889.png

1690026044956.png 1690026116254.png

1690026095279.png 1690026140935.png
 
Last edited:

Ceri

Active Member
Joined
Apr 25, 2023
Messages
49
Reaction score
23
I had an opportunity/necessity to drive my truck with all but one of the doors fu 1690026232075.png lly treated. My back passenger door was 100% stock and the other three were fully treated. I had it up on the highway, and all around town. Without exaggerating, having an apples to apples comparison happening before my ears, it was a pretty big difference. As a car would zip past me on the highway, there was a major leakage point coming through the untreated door that wasn’t there for the other side of the truck, or even the front door as the car went by. The back wall already had an MLV barrier in place as well (though the rear seats weren’t installed at the time). It was the door. If you wanted to skip the floorboards, headliner, panels, etc. and focus your effort on making the most difference, do your doors and the rear wall. I watched a lot of videos of people using little SPL meters to measure before and after treatments, and most of them are very disappointing, to the point that you really wonder if doing anything is worth the investment. I’ve done varying degrees of acoustic treatment in my last 4 vehicles. It’s a lot of effort, expense, and sweat equity, and unless you’re rolling in dough, it’s not the kind of thing you can realistically pay someone else to do for you like installing speakers. Something to keep in mind watching those YouTube videos is that they’re taking an overall SPL measurement, regardless of the frequency spectrum that it’s measuring. Acoustic treatment does a really good job of eliminating a lot of the frequency spectrum from upper bass through treble, but not so much on the lower bass, which contains a lot of energy and extremely long wavelengths. If you bang on the wall of a recording studio, you’ll still hear the thud from outside, but you won’t likely hear a vocalist in perfect clarity. A standard SPL meter can’t show you the reduction in in those upper frequencies. You’d need a real time analyzer to show that. It’s worth the effort to establish a quiet ride, even if you aren’t focusing on the audio fidelity aspects. This truck was the quietest vehicle I’ve ever driven BEFORE acoustic treatment. After treatment, it’s really mind blowing at how quiet a rolling 6,000 lb truck can be, and it makes an enormous difference in the clarity of my audio system when I’m driving around. It also makes an enormous difference in how loud I’m rocking out at a stop light knowing that my red light neighbors aren’t having to put up with my choice in music. You can hear the bass when I’m rocking out at full tilt, but at 75% “almost uncomfortable” levels you would be hard pressed to tell what song I’m playing from 10 feet away if the windows are rolled up.

1690026252008.png 1690026266382.png

1690026278322.png

I picked up a couple of rolls of cloth tape for wire wrapping and fastener decoupling. I wrapped most of my wire, especially where it had to dangle like inside the doors and dash, in cloth tape to avoid any tapping if it wiggles around. I also used it on the mounting points where the plastic pegs/rivets hold the interior door panels onto the door metal since they could potentially rattle.

If you're not a complete nut for extreme audio SQ, I'd tell you it's not worth the effort to treat most of the cabin. The doors ARE worth it. In my Limited with the panoramic sunroof, the headliner was not worth pulling down to treat the roof (even though I did) as reinstalling it was difficult without a helper, and there are a ton of wires up there that have to be disconnected in weird ways. The CLD and MLV on the floorboards wasn't very noticeably different (although I never heard the subs playing without the floors done). I had to tear out most of the back wall area anyway to build up and install my amp rack, but the factory carpet/liner panel was likely doing a pretty good job. That carpet piece already had some factory MLV installed on the backside for about 40% of the overall carpet pad. I always block off one of the pressure vents on the back wall, and my amp rack goes over the top of the one I didn't block, with a layer of MLV between the two. It isn't "air tight" and it can still do its job of relieving pressure in the cabin, but it’s definitely not a major source of road noise for me anymore as I’ve seen some folks try to troubleshoot on other threads.

1690026297003.png 1690026313772.png 1690026330141.png

1690026344817.png 1690026362851.png 1690026382984.png
 
Last edited:

Ceri

Active Member
Joined
Apr 25, 2023
Messages
49
Reaction score
23
1690026628166.png 1690026640830.png
1690026711982.png 1690026726956.png 1690026743214.png
1690026755337.png 1690026771359.png
1690026814992.png
 

Attachments

  • 1690026684963.png
    1690026684963.png
    1.1 MB · Views: 25
  • 1690026788176.png
    1690026788176.png
    887.1 KB · Views: 24
Last edited:

Ceri

Active Member
Joined
Apr 25, 2023
Messages
49
Reaction score
23
1690026884372.png 1690026922383.png 1690026937791.png

Kilmat and Second Skin 80 mil Compressed Layer Damper (CLD) Sheets – This is similar to your Dynamat that you might have seen in big box retailers or car audio shops. I ended up using about 45-50 sq ft total, aiming for a goal of ~25-50% coverage applied on mostly flat areas, including the metal behind the headliner. I bought Kilmat and had some Second Skin leftovers from previous installs. I had a spreadsheet I used to estimate my need and expected to use about 78 sq ft, so I likely could have skipped the second box of 36 sq ft if I'd been a little more judicious in my application. I didn't end up putting any behind the eTorque battery on the rear wall, and I think I overestimated how much metal would be available with the panoramic sunroof, behind the headliner. I slapped some on the backside of most of the interior plastic panels, but Ram built in patterns and contours to most of them, which was likely a means of controlling resonance.

It became apparent to me that Ram put a lot of thought into noise control even beyond the Active Noise 1690027025075.png Cancellation (ANC) system, at least in the Limited trim level that I now have experience with. I’d done the “two layers everywhere” thing before in my Challenger. I’m convinced that the only thing it was really doing for me over the 25-50% coverage approach was making my door heavy AF. Those doors were heavy from the start, and when a wind gust would catch them, and you were still crouched down in the ****pit, those things were weapons. I had an incident where my driver’s door slammed into a concrete wall when some wind caught it just right. Took a lot of paint off the door edge, and put a minor ripple in the main surface. Do not waste your time throwing 100+ sq ft of CLD into these trucks. Research what CLD is for. It’s not what most people think it is. You’re trying to control resonance by lowering the resonant frequency inherent to all materials. It’s not a noise blocker. You wouldn’t use a screw driver to hammer in a nail. Don’t try to use CLD to block noise. Even the manufacturers, who have a vested interest in upselling you, don’t recommend 100% coverage of things. I also wouldn’t recommend spending more than you need to on CLD. There are products out there that charge 2-3x what Kilmat costs. It’s diminishing returns. There’s an insignificant difference in everything except how much it costs, which really isn’t making the difference to your overall audio experience compared to the other products I’m listing below. Second Skin got way more expensive than the last time I bought it, and this install gave me a chance to compare side by side the difference between Second Skin and Kilmat. I’ve also used a few other brands in the past. Kilmat is now my favorite. It has the embedded bubbles to let you know when you’ve press/rolled it enough. It’s more flexible than the SS. It wasn’t particularly messy with butyl getting all over me as I’ve experienced with other products. Easy to cut. Easier to roll onto the panels I was applying it to. I bought a ~2” smooth metal roller at Home Depot in the carpet section that weighed ~2 lbs. It had a rolled edge on one side. It was the perfect tool for rolling the CLD onto metal and plastic surfaces. It worked so well that it might as well have been in a dedicated car audio deadening section. I cut the CLD with a box cutter on top of the cardboard box the CLD came in.

1690027045795.png I stuck to mostly rectangles/squares, and tried to use the largest piece I could to achieve 25-50% coverage of flat areas. A bunch of tiny squares isn’t as effective as one large one in a given area. Make sure it’s pressed in good. I’ve gone inside the doors of previous vehicles when I was pulling out audio equipment when I sold them, years after my install, and found where I didn’t press the CLD on well enough. If you’re going to do it, take your time and do it right, and use a roller instead of your fingers/thumbs as much as you can. One of the worst ways to mess it up is to leave a pocket where water can get trapped and pool. Keep that in mind if you insist on 100% coverage. Doors are designed to drain water that sneaks in through the window cracks, etc. This will rust your truck. For my doors, I did ~50% coverage to the inside of the outer metal skin, ~25% coverage to the large plastic divider panel (lots of contours already), and ~50% to the backside of the interior panel. Word of caution on the doors, know where your connection points are. Don’t cover the places where plastic pegs or bolts will go, and in particular watch out for the bolts where the grab handle goes. You want a factory fit without goofy bulges when you’re finished. Also, when you’re pulling the plastic door panels off, be careful at the joints. It takes force to pop the plastic rivits, but the backside of the door panels use a lot of plastic welds to hold individual pieces together. I broke two plastic welds after reading/watching advice that you need to use a lot of force. Pick your pull points with care and avoid the joints between two different materials (both my breaks were where the upper leather meets the lower plastic panel). If you break one of the plastic welds, you can use a soldering iron and a black plastic zip tie to melt new plastic onto the weld point. It was good enough to fix both of my breaks as good as the factory.

1690027142780.png 1690027170730.png 1690027184565.png 1690027198480.png 1690027210657.png
 
Last edited:

Ceri

Active Member
Joined
Apr 25, 2023
Messages
49
Reaction score
23
Siless 157 mil Closed Cell Foam (CCF) – This product also impressed me. The goal of CCF is to 1690027454076.png decouple materials from one another. It also has some minor absorbing and barrier-like properties for very small wavelength sound waves, so the thicker the better in my opinion, but that’s not its main purpose and it isn’t super effective at absorption. That’s a side bonus and not the direct intent of the product. I applied it liberally to the backside of most surfaces, and ended up using it to help seal small factory holes in various metal panels (like the B pillars, rear wall, seatbelt recesses, etc.) that didn’t directly contribute to a panel reattaching there later. I added this to the outer door metal, front of the plastic inner door card, and backside of the interior door panel pretty liberally (~75-90% coverage). I didn’t treat the floorboards as I didn’t want to add thickness, and the OEM underlayment was already doing much better than any added CCF would do. I used around 65-70 sq ft total. I applied it in larger sheets on top of CLD and straight to metal or plastic. It’s squeaky when you rub it (similar to Styrofoam), which had me terrified I’d end up with a squeaky truck when my main decoupler likes to make squeaky noises. Results are in. No squeaky. I liked it because it is so thick. It’s pretty easy to cut, but I’ve got 4 different pair of garage scissors, and found one set that was exceptional at working with this product. Your mileage may vary, but it’s worth it in my opinion to find the right tool for the job before you go too crazy with this stuff. Crap scissors lead to crap cuts and tearing. The Siless was a super sticky peel and stick application. I’d almost call it too sticky, but it does instill confidence that it’s not going to come off when the Texas heat gets these metal panels up past 130*F in the summertime. I’ve used other CCF in the past. Siless is a winner, especially for the cost. I accidentally ordered one roll with the foil liner and one without, but it did let me compare the two. My preference is the “no liner” mainly in case you can see through a speaker grill, etc. I’d rather it be “not seen” AND “not heard”. Most CCF I’ve encountered from other manufacturers don’t come in 157 mil thickness.


1690027501688.png 1690027521894.png
1690027546458.png 1690027565531.png 1690027586320.png
1690027609029.png 1690027617795.png
1690027633591.png 1690027648653.png
 
Last edited:

Ceri

Active Member
Joined
Apr 25, 2023
Messages
49
Reaction score
23
Soundsulate 1 lb Mass Loaded Vinyl (MLV) – I bought 100 sq ft (4’ x 25’ roll). I wasted a lot to 1690027851130.png make sure I had a continuous sheet for each application location, and I still have some leftover. I used some of the larger scraps to make toolbox drawer liners. Of all of the products involved in acoustic treatment, this is the workhorse doing the most good for a “no compromises” build. The 1 lb/sq ft version is 1/8” thick. You can also find a 2 lb/sq ft ¼” thick version. It won’t do twice as good, but the returns don’t diminish as much as a few other examples I mentioned above like the CLD coverage. Relatively speaking, if the 1/8” is doing a 100% job, the ¼” is probably doing a 170% job. MLV is your noise blocker and will make the biggest difference in cutting down outside noise and minimizing rear wave reflection cancelation for your midbass. I ended up using factory bolts to fix it to most of the vertical panels. None in the headliner, as I didn’t want to possibly have something that would slide around loose.

Some people like to use Velcro to attach MLV, and that’s a good way to do it if you can. I started out that way, but my Velcro wasn’t liking to stick to the hot metal in the 100*F+ Texas summer sun. I ended up fitting all of the bolts loosely in place (a few threads), pressing the MLV against the truck surfaces where there were factory bolts to “cut” a small hexagon shape into the MLV surface, drilling a hole a little smaller than the bolt’s diameter in the center of the hexagon, and then running the bolt through the MLV (kind of like it was a huge washer). It’s most effective when it’s not touching things, and not held 1690027954726.png down to things. There’s a lot of mystery floating around the internet about various ways to install MLV, and several products that build it up on a CCF or CCF/CLD layered sandwich or using a spray on adhesive, but it’s best if it’s not coupled to anything at all, so that the MLV is able to absorb the offending sound wave through slight movement, like smacking a towel pinched on a clothes line with a broom. The towel makes it difficult to “complete the follow through” because the movement of the towel absorbs so much of your broom’s energy. In application, the goal is a 100% barrier, and you lose effectiveness for every little bit of area that isn’t covered or blocked. I saw a good analogy online about picturing it like a window that you can open or close, with your neighbor running their lawnmower next door. With the window wide open, you’re letting in 100% of the sound. With the window halfway closed, you’re still letting in almost all of the sound. With the window barely cracked, you’re still letting in most of the sound. With the window fully closed and latched, you’ve blocked the sound as good as you can. That last little bit makes a huge difference. Is it worth it to only have 60% coverage? In my opinion, that’ll be better than nothing, but you’ll really see the difference if you can have a continuous and uninterrupted barrier as much as practical. Hence a lot of wasted material aiming for no seams. Side note, you can cut down on your washer/dryer noise levels by slipping a piece of MLV under each of the feet. It decouples it from the floor pretty well. You can also hang some MLV on the inside of your laundry room door if you don’t mind the aesthetics. MLV wasn’t “invented” for car audio. It’s mostly a construction material in buildings for acoustic isolation between walls. You can get creative with it in many applications where you’re trying to block noise.

Thinsulate SM600L Acoustic/Thermal Insulation – I bought 100 sq ft (5’ x 20’ roll). 1690027938935.png I bought way too much for what I actually installed. It was my first time using it, so I was a bit optimistic about how many places I could install it. My guess is I’ve only used around 25-30 sq ft total. This is the same sort of material used to line heavy winter coats, but it comes with a black fabric backing layer that makes using it with spray adhesive easier (or it can be flipped around so the black side faces out). It happens to be a very good acoustic absorber in addition to it’s thermal benefits. It’s a little bit like fiberglass insulation that goes into walls, except not itchy and treated with a hydrophobic coating for water exposure. It’s very popular in the camper van and RV crowd for its thermal insulation properties. MLV blocks noise and creates isolation between boundaries. Thinsulate (and similar insulators/absorbers) kills noise that’s already inside your boundary. I managed to get some above the headliner, mainly near the overhead console in front of the sunroof. I had two cans of 3M adhesive spray, but barely ended up using it anywhere. Above the headliner I laid it in loosely before reattaching the liner. It’s held in place by friction alone. It expands a good bit when you unroll it, and it benefits the most in its absorbing duty when it’s allowed to expand and sit loosely. I also managed to use a bit inside the plastic door skins to fill in voids, being careful not to block attachment points or let it get to close to the speaker area where the white color would show through the grills. I used adhesive on the first door I did (back driver’s side) and then had to cut a bunch of it off when the panel wouldn’t go back on correctly. After that experience, I didn’t try to line the entire door with it and instead focused on filling the voids around the armrest and lower door areas. I can’t say exactly how much the Thinsulate helped the overall acoustics as I didn’t have any opportunities to listen to an A/B comparison. All I can say is that the overall results are the best I’ve ever had in my previous four vehicles (where I didn’t use any Thinsulate). I would use the SM600L again, but I wouldn’t buy as much as I did for sure. I don’t doubt that it does what I expected it to do, which is to absorb acoustic energy that goes in between panels rather than into the cabin. You can make a nice warm quilt with it if you end up with leftover.

1690027970469.png 1690027985999.png
1690028005578.png 1690028021175.png
 
Last edited:

Ceri

Active Member
Joined
Apr 25, 2023
Messages
49
Reaction score
23
Install Stuff

Amp Rack
– I’ve made several for my previous pickups, so even 1690028103885.png though there are premade solutions out there now (how cool is that?) I went ahead and made my own out of ½” MDF due to space constraints/concerns due to the amount of equipment. One trick I’ve used in the past is to recess mount my amps from behind so that I don’t have to add the MDF thickness to the amplifiers. I cut out the entire footprint of the amp, other than the mounting tabs, and drop the amp through the hole. Then I can screw the mounting tabs directly to the rack, and I save ½” of thickness. I don’t really think that was necessary in this install, but since it’s difficult to know that ahead of time, I went ahead and did it here. I had a layer of MLV behind the amp rack already, but having a big sheet of MDF would definitely help block noise from coming in through the back wall. I mounted mine on top off all of the various widgets that are tucked back there from the factory by bending and cutting some Simpson straps from Home Depot to suit my purpose. I had to bore out some of the holes a little bit to fit the bolts from the factory subwoofer and whatever the big black circle thing is around the middle. I was guessing it related to the rear window motor. If I have to replace anything back there, I’d have to pull out the amp rack, but it’s not too terrible to do if that ever comes up, and I’m thankful that there were so many factory bolt locations there. The eTorque battery was a design constraint, and it took away about 40% of the space I was hoping for before planning things out. With two ~15 year old amplifiers, a beefy power/ground block, and a DSP to mount, I had to cut out a cardboard template and play with the layout for a while. Eventually I copied an idea I saw on the internet and mounted the DSP to a separate plate of MDF on the bottom that mounts to the factory subwoofer lower attachment points. It’s convenient to access all of the wires going into the DSP, including the USB connection for tuning. There’s still some pretty decent space next to the DSP for a possible 4 channel amp if I’m careful with the footprint. To finish it, I wrapped it in some black vinyl I had on hand from previous projects, mainly to make it disappear if it were visible for some reason, and also to protect the MDF from stray drips of liquids. I spray painted the one I did in my last truck, and 7 years later, the humidity had begun to cause minor warps and delaminating of the MDF in a few places. I ended up having to slide my power distribution block up higher while it was in the truck because I hadn't accounted for the middle seat belt holder recessing some. It's tall. Luckily I had space to use an oscillating saw and a drill to extend my wire slots up a few inches higher than the picture below.


1690028132481.png Baffles – I made adapter plates for my tweeters, midranges, and midbasses. The tweeter and midranges use Masonite because depth was a constraint. I traced the factory speakers as my template and then cut out holes in the middle to mount the speakers. I used the same outer shape for both, but noticed that the upper door tweeter location is recessed down a little lower than the actual grill itself, so I offset the hole for the tweeter to help bring it up closer to the grill. For the midbass baffles I had to convert the mounting location from a 6x9” opening to a 6.5” so I traced the factory speaker, drill holes at the screw mounting points, and then cut circles in for the inner diameter of my midbass ID. I then routered a recess using a bearing bit the same thickness as the speakers OD mounting ring so that the midbass is flush mounted into the baffle.


Terminations – I’ve been lazy and cheap in most of my previous builds and didn’t put too much time into cleaning up my wire terminations. For 1690028145376.png this build, I used ferrule connectors for every wire connection (including power/ground/REM) going into an amplifier or other compression type terminal, and a male/female spade connection near each driver that are reverse keyed so there’s no potential to accidentally cross polarity. This allowed me to make sure I didn’t have any stray strands that might short to other nearby terminals (which I’ve had happen before). It also helps keep crud from finding its way near the terminals and causing a short (or getting gummed up generally). For the speaker connections, I used ferrules to terminate on the actual speakers, but also added a set of male to female connectors for each positive terminal and a female to male connector for each negative terminal. This way, if I ever have to pull out a driver, I’ll know easily which wire goes to which wire. For additional belt and suspenders, I also used red and black heat shrink to color code each wire. Once the connections were all made, I added electrical tape on top of each connection (to keep positive and negative separate) and then wrapped them in cloth tape for noise abatement.

1690028157819.png Wiring – I’ve run power wires underneath the cab of trucks before by drilling a hole near the back wall with an appropriate grommet. I used zip ties to keep the cable affixed to the frame rails. It worked out okay, but I did have a zip tie come off and the power wire ended up touching the exhaust pipe and burning insulation. It never caused a problem for me, but I caught it while I was down there messing with other stuff, and it went all the way to bare copper. I decided to do it more traditionally this time by running it through the footwell area of the driver’s side, near the center console under the carpet, and back to the rear wall. I can my TOSLINK, REM, and DSP remote controller wires on the opposite side of the center console from the power wire, under the carpet, making sure to avoid crimping them when I reinstalled the console. I kept my speaker wires in the raceways at the bottom of the doors, which were super cool to see. It was enough to fit some pretty thickly jacketed 16 gauge comfortably for the front three way setup. I passed the new wiring through the boots in the door jams by pulling off the rubber protector, popping the white plastic out of the truck body, and sneaking them between some existing holes in the plastic connector piece. I routed the midrange wiring from the hole in the dash downward using a straightened coat hangar and electrical tape. My RCAs come out of my DSP, route behind the amp rack, and over to the amps to keep them tucked away from damage.
 
Last edited:

Ceri

Active Member
Joined
Apr 25, 2023
Messages
49
Reaction score
23
Future Plans

I'm also game-planning another 4 channel amplifier for the rear door and headliner speaker positions. With every build I’ve done, I tend to go “one step further” than I have before, and for this build I want to play with two new concepts to me. I want to try adding additional midbass drivers to the rear doors to supplement my fronts. I also want to try adding a midrange driver to perform differential L-R and R-L rear fill with the goal of enhancing stage depth. I’m not holding out any hope that I could find a Zed to go with what I already have, so I’m picking up a Focal FPX 4.800. It seems to have a small enough footprint to go on the horizontal plane below the middle seat.

The headliner will get a pair of Audiofrog GS25 2.5" midrange drivers with an R-L and L-R differential signal. The Focal 4 channel says it’s good for around 120 watts at 4 ohms, but hopefully these will never see anywhere near that much output. The GS25’s will be bandpassed somewhere around the 300-5,000 hz range (TBD), reduced in output to the boundary of audible from the front seats, and time delayed around 15-20 ms to hopefully increase staging presence/depth for a one seat tune. I haven’t done a full-blown rear fill supplement before, so this will be an experiment for me, but the C DSP has the capability to mix a differential signal easily, so I’m going to try it out and see what I think. If I don’t like the affect, I can attenuate them even more to make them disappear from the front seats.

I'll also have some Audiofrog GS series 6x9s (GS690), and I’m going to play with them as a midbass supplement somewhere in the 70-300 Hz range. I’m figuring I’ll match these and time align them to be in phase with the front door midbasses (per side). Their physical location puts them pretty close to equidistant to the driver’s seat per side. Most vehicles have a cancelation null from the driver's seat in the midbass region. They will be intended as a booster for midbass SPL to help supplement cancelation nodes and comb filtering effects. This one might end up being a boondoggle, and if that’s the case I’ll lower their output to be inaudible from the front (or feed them a differential rear fill signal and see if it enhances staging any).

Both the GS25s and GS690s arrived this week. The Focal to power them is in the mail.
 
Last edited:

Ceri

Active Member
Joined
Apr 25, 2023
Messages
49
Reaction score
23
Questions

So this leads to my question for anyone that's using a PAC for their aftermarket system. Are the system audio signals (non-music) like bluetooth calling, etc. gone if you've gotten rid of the factory center channel, or interrupted it's factory signal flow through the factory amp, etc? I'm pretty sure it's not coming through my aftermarket signal flow. When I take calls in my truck right now, the center channel plays the caller's voice, even though I have the fader fully to the rear, so it seems like the factory amp is handling the routing of the call. The center takes over the rest of the audio system, muting the music content even through the TOSLINK, until the call is over.

I currently have the HK center channel dash speaker and all 4 rear speakers connected to the factory amp. In all previous installs I've done, I've been able to leave the rears stock, and easily overwhelm them with amp gain on the fronts, or disconnect them entirely, but I've always avoided the "premium audio" systems on my vehicles since I knew I'd be ripping it all out. It was unavoidable on this one since I wanted the Limited Night Edition package with the 12" display. The frogs are getting a signal that starts from the OEM headunit, goes to the PAC, goes to the DSP via TOSLINK, goes to the 6 channel amp via RCA outputs, and the new speaker wire I ran from amp to each driver. That TOSLINK signal is unaffected by fader (but left/right balance still works) as it is a raw 2 channel, left/right signal.

My "work around" concept is to leave the center channel speaker connected to the factory HK system (factory HK speaker sounds fine for calls), but tackle this by swapping out everything in the rear. If I bypass the factory amplifier for the rear door and headliner speakers, then the signal will be coming from the TOSLINK, which should allow me to control their levels, delay, EQ, etc. through my DSP (but kill Uconnect’s fader control). While not as convenient as simply tweaking the fader controls on the OEM display, I should be able to cook up a "set it and forget it" setting through the DSP after a few weekends of listening/tuning. The factory center could live it's normal life as a phone speaker only, so long as I keep the fader 100% to the rear at all times. I can turn the rears on and off through the DSP’s remote controller by switching presets if I have to. That’s my plan anyway.

*edit*
I've figured out that phone calls are coming through the aftermarket system, and the factory speakers aren't necessary to keep at all. Also, even fading entirely to the rear, the center channel still plays very faintly when I turn the truck on. I can hear it before the remote turn on wire/delay brings the amplifiers online.
*/edit*
 
Last edited:

Ceri

Active Member
Joined
Apr 25, 2023
Messages
49
Reaction score
23
Impressions/Summary

I've finished with the main hardware, deadening, etc. and have been driving the truck around for a couple of weeks now. I have some future plans, but I’ve got what most people would considered a finished install at this point. I listen to a lot of different music, and want my system to play all of it well, and be able to do it at high volume. It’s never going to be an SPL monster, but I still like heavy, low bass hip-hop tracks (my wife loves Iggy Azalea, BIA, and Cardi B). I like County spanning the decades back to the 60s/70s (Waylon Jennings, Merle Haggard, Willie Nelson, David Allen Coe, George Jones) through the modern stuff (Luke Combs, Sturgill Simpson, Tyler Childers, Brent Cobb, Jason Isbell). I’m a huge fan of Tool, Alice in Chains, Audioslave, and grew up on Grunge (Pearl Jam, Nirvana, Sound Garden). I’m still trying to figure out a few words from Eddy Vedder in Yellow Ledbetter without cheating. I love demoing on Nora Jones, Sarah McLachlan, Celine Dion, and Alanis Morrisette. Some days I need my Van Morrison, Bob Seger, The Doors, and Pink Floyd to shake off a mood. Other days I need Metallica, Pantera, Black Sabbath to get me charged up.

Each time I run a Dirac tune and play with something else I can hear the potential in the Audiofrog GB series, but each time I mess with something, something else sounds off to me. The GB25 midranges have been the all-stars of the system every time. Everything comes down to the installation, and I went all out on that part (at least audibly). I have no intention of competing in audio competitions, or else I would have done more creative things to show off the installation itself, but I am trying to achieve a system that could compete well in the audio aspects of judging for my own enjoyment. Once I play with some band limited pink noise tracks and some more RTA time, I may be able to determine if the upper door locations will remain for my GB10 tweeters, or if I need to get out the fiberglass to raise them up. They’re not sharp, but they’re not laid back either. They have an impressive response, and I think I can get them dialed in with work on my TA and EQ, but compared to the GB25 midranges, there’s work to do to get things right. The GB60 midbasses are good. I feel like it can always be better in every system I’ve heard. I need to get into some Danny Carey tracks to figure out the staging and EQ, but I’m going to wait for the new rears to get installed before tearing into that since I’m currently stuck with OEMs stepping on the frog’s frequency ranges (without TA). I’m pretty sure it’s my “existing conditions” that are bothering me, and not the GB60s themselves. The subs are super clean. I need to test out their lower limits as I mentioned above, but in the narrow band they’re responsible for, they’re beautiful SQ/SQL subs.

I'll still have some hurdles to overcome on the DSP side as the C DSP 8x12 is limited to 8 Dirac channels, and adding the L-R and R-L signals into the mix will mean I'm grouping front stage drivers in some manner. I’m still toying around with how I'll accomplish that, whether it be to manually adjust the signals post-Dirac, buy more processing hardware, etc. I need to spend some time in the truck “going deep” with pink noise tracks to get the best possible outcome for the fronts by themselves before I mess around with anything in the rear, but I need the new rears hooked up to cut the factory rears out of the equation first. I also heard a faint buzz today driving back from a fast food joint, so that’s going to consume me until I find the culprit and destroy it.

I also want to throw a shout out to Ram. Not only are the interiors made well compared to my previous 3 Rams and Challenger, but the soft touch materials make this acoustic environment a dream to work with. Having pulled just about everything in the interior to bare metal for acoustic treatments I can see how much attention was put into designing the plastic panels and noise control in the cabin. Halfway through my CLD, CCF, MLV, and thinsulate installations I was really wondering if it was worth the effort to rip a nearly brand new truck apart. The plastic that makes up the pillars and trim have all had attention placed on making them non-resonant, and the plastic fasteners are much improved compared to everything before it. It used to be 50/50 on destroying a plastic rivet for me, even using the proper tools, and even if I didn't destroy it, it often wouldn't fit back quite as snug. Without the ANC active the truck is still pretty quiet compared to anything I've driven before, even before my acoustical treatment was finished.

I can hardly wait to rip the back seat area apart again to get the rear speaker situation fixed up and continue tuning. I picked up a mic stand to see if I can do more with Dirac without stacking up crap to get the mic up to head height. I also ripped all of my old tuning files to my PC to make manual tuning easier.

Sorry for all the pictures. I wanted to document everything as I went for anyone else that might be curious about what's behind all the panels before they start shelling out money on stuff. I scrounged around various forums ahead of my build to figure out my plan of attack so hopefully they are helpful to future DIYers. Also, unfortunately, my phone's camera crapped out on me during the install, probably from leaving it in the hot Texas sun in the middle of summer. I didn't get to take too many pics as everything was going back in.
 
Last edited:

Ceri

Active Member
Joined
Apr 25, 2023
Messages
49
Reaction score
23
07/30/23 Update: My GS690s and GS25s came in, and I've finished installing them in the factory rear door and headliner locations and putting everything back together. I'm still waiting on the amplifier to drive them, but they're receiving an amplified signal from the factory HK amp for now.

The GS690s are pretty impressive on their own off the factory amplifier. I dropped the needle on some BIA, which has a lot of overwhelming bass heavy tracks. The back doors are resonating pretty good with the music up around 22-25 on the UConnect, but it gets so loud that you can't really hear the resonance from the front seat. It's pretty audible from outside the truck, but I have a suspicion that the factory amplifier is letting the rear doors play all low frequencies. I wouldn't be too surprised if there is no high pass filter protecting them from <50 hz. For fun, I cut the subwoofers out of the mix through my DSP, and most non-bassheads would be totally satisfied with the bass output for regular listening. The GS690s are causing pretty obvious rear door flex from outside the truck. I don't plan to keep them playing low bass, but I'll definitely be checking back on this when I have them properly bandpassed at around 70-300 hz. In the meantime, the door is so well sealed from the factory design and the MLV treatment, etc. that I can feel a gust coming out of the door latch when I have the door open on heavy bass. It's about as much air movement/velocity as a ported subwoofer box.

The GS25s are hard to hear from the front seat due to the way I have the gains set on my amplified fronts. I suspect a rear seat passenger would be getting a good dose from them, but I haven't spent any time sitting in the back seat to listen to them. Another case where I'll be waiting to get them connected to a DSPed amplifier channel on the new rears amp before I worry about them too much.

I'm looking forward to getting the rears a DSP signal through the Focal amp that is in the mail so I can play around with the tuning. My front stage is suffering on the coherence of off-center imaging. The lead vocals are rock solid across every track I've played and they're located a fair bit beyond the windshield (roughly 12-18" ahead of the factory center channel). Extreme left and right are pretty good, but might be pulling down a little bit based on the midbass and tweeters being in the doors. I won't know if I'm keeping the tweeters in the upper door locations or switching over to a custom mount in the pillars. It might be psychological, but placing the tweeters on the left and right of my head, around ear level like in the pillars or sail panels, has always kept my stage high and wide in previous installs. Left and right feel more like they're coming from the sail panel/AC vent areas on everything except the most crazy stereophonic recordings (like Pink Floyd, Radiohead, etc.). Center is above the windshield wipers and further forward. I can't determine if these are artifacts of the rears muddying things up since they aren't DSPed yet, or if my fronts have installation location issues that need to be fixed.

I'm into it for about $7,200 total, minus the cost of my sub amp and front amp that I already had, and all of the speakers and the new Focal amp were bought through forum classifieds (I actually saved about $2,100 buying used). The PAC, plus PAC accessories, ran about $430. The DSP was $1100 after import duties. The new Focal amp I picked up for about $400 (~$700 retail). All of the speakers add up to $2,700 (used) but would have retailed me around $4,200. The sub box was about $1250, including the seat lifts, but it's obvious where the money went and I have no regrets on that one. The acoustic treatments were only about $600 total and I ended up with quite a bit of leftovers. There's another $700 in wiring and installation accessories like the power distribution block and a 2'x2' sheet of ABS plastic I was experimenting with for baffles. There were a few other dead ends rolled in on the installation accessories that didn't end up inside the finished install, like some new crimping tools, way too much 3M spray adhesive, velcro, etc.

Generally speaking, the truck sounds amazing. It blows away any other car audio install I've done. I think at this point I'm trying to squeeze out another 5-10% improvement with the rears and a deep dive tuning session. My cousin hopped in my truck to listen for a song or two with the new install, and we ended up sitting in the parking lot for about 3 hours while she asked me to play song after song. Taylor Swift sounds phenomenal, but now I have to sort through a pretty large catalog of music for the best tracks to listen to from her.

I think that I tracked down a small buzz that might be coming from inside my sub box. That or it's the jack kit under the passenger seat. It's hard to tell when I'm pushing the subs hard to create the buzz to distinguish where the sound is coming from. It'll annoy me until I find it and kill it.

I think my plan of attack for the DSP Dirac tuning is to run a "rears and midbass only" tune to pull some RTA correction curves, TA, etc. and then inputting that manually into the individual output channels. I might play with running the left midbasses together on a single Dirac channel and the right midbasses the same and see exactly how Dirac will treat that with the time alignment for both being done manually. If I can get the impulse response "good enough" by letting Dirac show me the way and then setting it through manual tuning, Dirac might be able to take care of the final EQ with each side pair playing together. The hope is that I'll avoid the typical midbass cabin drop by having two different sources of sound for each side. The midbass is already really good, but I'd like to get to "heart stopping" impact at moderate/loud listening levels. If my plans goes sideways and the midbass situation gets worse, I'll see what it sounds like running an L-R and R-L signal to them to see if there's any benefit to stage width in the midbass region. Worst case, neither midbass experiment works out and I'll drop the gain down to make them disappear. I've also been reading some miniDSP posts talking about theories on microphone aiming and other tips and tricks.
 
Last edited:

Ceri

Active Member
Joined
Apr 25, 2023
Messages
49
Reaction score
23
8/06/23 Update: I ran into a conceptual problem with my plan to reuse the factory wiring for the rear doors and the headliner speakers, so I thought I'd share, and I haven't found a product that solves this problem easily for me. The PAC APH-CH42 that is required to make the connections behind the factory head unit also provides the option to either retain the factory speaker connections, or to bypass the factory speaker connections (wholesale). I had purchased a PAC APH-CH01 speaker connection harness thinking I would be able to change out the connections at the factory amplifier under the driver's seat, sending the factory center channel through to retain bluetooth calling, etc. The APH-CH01 does NOT replace the connections on my 2022 HK system. One plug matches, but two others have no equivalent connection harness to this PAC harness kit. I don't want to hack up the factory harness, especially since it's a rather short bundle under the seat, so I've decided to run new speaker wire from my rears amplifier to the rear doors and headliner. That wasn't a fun realization, since I've already reinstalled the headliner, and that wasn't the most fun part of my install previously.

*edit*
As I mentioned in a previous edit, there's no reason for me to keep the factory center channel connected anymore, since discovering that system notices and phone calls are getting routed through the aftermarket signal path by the PAC. The truck still wants to "see" the factory amplifier on the CANBUS network, but the speakers don't have to remain connected if you have everything bypassed and replaced with aftermarket.
*/edit*

I built an amp mounting plate that I plan to bolt to the seat riser bolts on the "60 side" of the 60/40 split in the middle. It's convenient to my power/ground distribution, and a short jog over to my DSP for the RCA connections. My Samsung Galaxy S20 Ultra's camera has decided it would quit on life, so I had to purchase a new phone. Apparently fixing the camera would require a new motherboard for the phone, and the cost is nearly the same as a new phone. I don't have the ability to take photos until that arrives on Monday. I've assembled an octopus on the rears amp mounting plate by preinstalling all of the wiring. I may have to unhook the speakers wires depending on their install path and length required. Not looking forward to pulling all of the pillar pieces to access above the headliner.

1691323876911.png I also tracked down my annoying buzz. It's the passenger rear door HK speaker grill. It seems like there's a resonance that really gets the HK grill buzzing in the 50-60 hz range, which might be solved once I get it high passed above 70 hz, but rattles and buzzes need to be destroyed. A few choice placements of some CLD deadener near all of the connection points should cure it.

There's also some slight buzzing coming from where the door panel meets the metal of the door back there. Less noticeable on that second one from the front seat, but since I'll be taking the door panel off anyway, I'll throw some of the CCF or cloth tape on that plastic bit to get rid of it.

I still maintain that Ram has done a good job of trying to address acoustics in the truck, but I'm finding some places they missed. You can see the little foam pad on the right side of my image (and all along that plastic bit hanging out), which is obviously an attempt to stop that panel from buzzing. I chalk it up to manufacturing tolerances that it's not quite up to the task with an aftermarket 6x9 running without a high pass filter.

Also, the ANC is trying to pump cancellation frequencies through the rear midbass doors still. I was surprised by the sound of my exhaust when coasting down to a stop light, until I remembered that others have mentioned the ANC not behaving well with aftermarket speakers powered by the factory amplifier. It's a little annoying since the interior of the truck is otherwise so quiet. Another reason I'm happy to press on with going aftermarket for the rear amplification, although working on the truck in my driveway in this constant 105*+ Texas heat is getting old. I break a sweat before I've even brought all of my tools out to the truck.
 
Last edited:

Ceri

Active Member
Joined
Apr 25, 2023
Messages
49
Reaction score
23
I've finished getting the rear speakers installed with the new Focal 4 channel amplifier. I also have a new phone, so here's a few pictures of that process.

It was a vast improvement by "going around" the factory amplilfier, mainly due to the crossovers and getting DSP on the rears. The rear midbass was rattling the doors because it was playing super low frequencies that are reserved for sub duty. While I was in each door, I added some more spot treatments for the buzzing I'd been hearing, mainly on and around the Harmon Kardon speaker grills. It seems like I've got the buzzing subdued. It's hard to say if it's having a proper high pass on it, or the extra CLD and CCF decouplers.

1692530363303.png For routing the new speaker wires, the rear doors have a wire harness where half of the grommet/harness is used, and the other half is wide open. I ran a 1/2" drill bit through the connector to make a pathway for the new wiring, and "deburred" it a little bit with a box cutter to avoid fraying wires in the future. I've done something similar on my last three vehicles, and I've also gone the "drill new holes in the door" approach when the factory harness didn't have enough extra space. I much prefer it this way, where nobody can see my work, and everything is behind rubber weather protectors. First I had to pull the rubber boot off of both sides (truck side and door side). A little tugging and contorting was all that was needed. Then there's separating the black harness from the truck. Mine had two tabs located on the bottom side at about 45* off the centerline. I worked those first with a tiny pick tool, but a small screwdriver could work too. Be careful if you go the screwdriver route because you're directly touching paint if you slip, and you will likely slip a number of times. Once the bottom two were loose, I pushed down on the one tab on top, directly on the centerline, and it released the harness out. It's also a little easier than the front doors were because if you take the interior trim off, you can physically touch the inside of the harness to persuade it out, and there's more room between the door jam than the front too, but I didn't find the front to be very challenging on this truck either. I spent several hours on my 2011 Challenger because the door jam area was so small.

1692530398690.png With the harness out, I drilled out the hole to pass the wires through, passed the wires through, and then used a clothes hanger wrapping the wires to it with tape to fish them through the boot and into the door cavity. Once through, I pulled in a bit of excess, back-wrapped the wire with cloth tape to avoid any tapping sounds in the future, and pulled some of the excess back into the truck. Same thing on the other side. I didn't want to wrap it before fishing it through the rubber boot as it can makes a mess and bind up.


1692530426106.png 1692530453055.png 1692530481148.png


It was a similar approach for the headliner speakers. I pulled the speaker grills out of the headliner, removed the full C pillars, and snaked a coat hangar through from the grill toward the outside of the truck. There's a little bit of traffic up there, with the airbag and various wires. I studied my earlier pictures with the headliner down to be sure this wasn't going to accidentally damage anything else up there first. Once it was through, I again pulled in several feet of extra, back-wrapped it with cloth tape, and pulled it back up into the space above the headliner so that the full run had cloth tape. Along the C pillar, I wrapped the wiring around an existing wiring bundle, used cloth tape on it in a few places to make sure it holds, and routed it down/around my amp rack to the 4 channel's location.

1692530528830.png 1692530576711.png
 
Last edited:

wegasque

Ram Guru
Joined
Jan 5, 2022
Messages
833
Reaction score
1,962
Location
Goodyear, AZ
This is an awesome write-up. Excellent documentation. Thanks for providing lots of photos. I haven't planned any audio upgrades s of yet, but have thought about it.

With your extensive experience behind the rear seats, did you think about including any type of shielding from a potential leaking rear window? Folks have talked about shielding the rf hub and etorque equipment to prevent shorting out after their rear window develops the leak. I wonder if you did anything to prevent it from happening to your amps.
 

Users who are viewing this thread

Top