2021 Rear Antenna Install
For the 2021 models, there is a new connector utilized for the rear fascia harness. The basic concept of adding wires to it is the same, however the process to do so is a little bit different.
Start by locating the connector, which is in the same location as the 19-20’s, but does not look the same. There is a connector that looks similar to the previous trucks in the general location, but this is for the tail light jumper harness and is not what we are looking for.
View attachment 79426
It may be helpful to remove the connector from the bracket it is clipped to so you can get a little slack and be able to see the release mechanism a little better. I also advise undoing the first clip which retains the harness to the side of the trailer hitch, this will allow you to sit comfortably behind the truck and work on it once it’s unplugged.
Once you are ready to disconnect the harness, refer to the photo below and follow the steps indicated. First, slide the red tab towards the rear. It should only move about ¼” give or take. Next, depress and hold the small serrated black tab. Finally, lift up on the white locking bar which will pivot up and over the connector shell, releasing the fascia harness from the body harness.
View attachment 79427
Once the connector is free and you have room to work, the black cover needs to come off to gain access to the wire-insertion side of the connector. Use a small flathead and carefully lift the little tabs around the cover while working it apart. They are only thin plastic, so be careful.
View attachment 79428
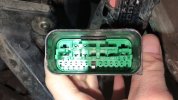
Once the cover is removed, you will be able to see the wire-insertion side of the connector. You will be looking for positions 33 and 34 as indicated in the photo below. Since this truck already has passive entry, it has the factory wiring in these positions. When you look at your connector you will see 2 orange plugs like the other vacant positions.
View attachment 79429
Just like on the 19-20’s, the rubber plugs need to come out before your terminals go in. This is where the ’21 differs again. Looking at the face of the connector as shown below, you will see a small white peg protruding above the green plate. This is connected to the plate that locks the terminal pins into the housing. You will need to insert something small into the opening and slide the peg towards the black housing as indicated in the 2 photos below. It doesn’t move much, but you should feel and/or hear it click slightly once it moves, and also notice the gap on the outside of it goes away.
View attachment 79430
View attachment 79431
Once you have moved the locking plate over, use a de-pinning tool/small paperclip/piece of wire to push the rubber plugs out the other side of the two terminal positions you will be using (circled in red above).
After the plugs are out, simply insert the new pins into the correct position from the wire-insertion side of the connector. (see photo below) The wire from pin 1 on the antenna connector (signal) will go to pin 33 on the rear fascia connector, and the wire from pin 2 on the antenna connector (return) will go to pin 34 on the rear fascia connector. They should only go in one way and will click in place. So if they aren’t going in easily, don’t force them. The seals may be a tight fit, so a small dab of dielectric grease may help them slide in, or you may need to gently pull the pin in all the way from the face side of the connector.
View attachment 79433
Once both are in all the way, you can slide the white peg back over to lock them in place. Then just reinstall everything in reverse order from how you took it out.
Mounting the antenna is the same as it is on the ’19-20 models. Just find a way to secure it in the small cubby on the inside of the bumper behind where the license plate mounts.