eTorque MGu removal, 5.7hemi. There are some youtube videos that show this pretty well.
1. Most instructions say to disconnect the 12V battery lead. I did not. Up to you to risk this or not. Treat all connections as if they are LIVE.
2. There are 2 belt tensioners on the MGU belt system. One is a standard rotary style tensioner positioned clockwise under the MGU. This tensioner can be locked out with a pin or allen wrench when it is fully rotated out of the way. This one is easy. The 2nd tensioner is kind of counter clockwise to the left of the MGU and it is mounted down low. It is a straight line style hydraulic tensioner. It is a pain to release in single digit weather hopefully for those of you in a warmer climate it is easier. There is a half inch drive square hole directly under the idler pulley. I recommend a second set of hands to hold the tensioner out of the way while the belt is removed. It can be done solo (I did) but it sucks.
3. Remove the belt once tension is off. This is still not much fun in the cold (belt shrinkage maybe). In my case, I loosened the MGU mounting bolts to give a little bit more slack in the belt to remove it.
4. With the belt off I went after the electrical connections. There is a harness on the top passenger side of the MGU electronics module. This has a little clip the is pulled towards the passenger side to release the lock. This is a tricky harness, but be patient and it will unclip. Then undo the 48V main power cable on the driver side of the module. Use a fine blade screwdriver to pop the cover open on this connection. Then I believe it was a 10mm bolt to release the terminal off the stud. I have every reason to believe this connection is LIVE. DO NOT touch any grounded metal points while working on this terminal. Make sure this 48V wire is put off to the side in a way that cannot short out.
5. There are 5 bolts that hold the MGU on (pretty sure its five lol). 4 on the front and one on the divers side. That 5th bolt on the drivers side is not much fun due to the fuel injection wire harness guide in the way. I snipped the zip tie holding that harness in place to get a little more play to sneak a socket under.
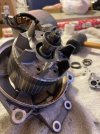
6. With all wires, belt, and bolts removed the MGU can be removed. Mine needed a little persuasion with a dead blow hammer. Just light taps to loosen it side to side. Be careful, it and the module can be damaged. Once removed you will see the two main bolts (long ones) go into a couple nuts that are captured but allowed to move. These pinch the bracket thus requiring the dead blow. I recommend that after removal you thread the bolts back into these nuts and give each a good hit with a hammer to drive that nut out very slightly. This will make install easier because you will have a bit of clearance. They tighten back up when you torque down the bolts on reinstall.