
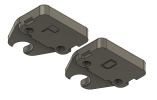
Just fixed my passenger side visor. I ordered the metal clips instead of the plastic ones...just being paranoid since the OEM stuff is plastic and I'd hate to have this issue on a road trip. I also just ordered one for the driver's side that I plan to preemptively install. Here's the link to the metal clips for any who are interested:
Note: the hardest part was getting the clip on the visor arm. I ended up opening my vise grips to the widest setting and snapped it on that way. I'd imagine there are more options, especially if you are willing to disconnect the visor wires....which I was not...lol.
Good luck!
Note: the hardest part was getting the clip on the visor arm. I ended up opening my vise grips to the widest setting and snapped it on that way. I'd imagine there are more options, especially if you are willing to disconnect the visor wires....which I was not...lol.
Good luck!
") .
.


