
5thGenRams Forums
You are using an out of date browser. It may not display this or other websites correctly.
You should upgrade or use an alternative browser.
You should upgrade or use an alternative browser.
What did you do to your Ram today???
- Thread starter 19BlkRam
- Start date


jamie.howlett
Active Member
Install was fairly straight forward & easy. Took me about an hour and half start to finish because I decided to do it in 32 degree weather after dinner in the driveway. I ordered the liners from a Ram dealer near my work so I could pick them up on lunch.
OuachitaAdventure
Active Member
- Joined
- Nov 2, 2018
- Messages
- 94
- Reaction score
- 87
- Points
- 18
- Age
- 43
mhb1638
Well-Known Member
I don't know where you live but damn thats gorgeous!View attachment 10224View attachment 10225View attachment 10226View attachment 10227View attachment 10228View attachment 10229View attachment 10230
Went for a little off road to the trail head for a hike today. So glad I got this Pano roof!
MikeHoncho
Member
- Joined
- Sep 29, 2018
- Messages
- 14
- Reaction score
- 7
- Points
- 3
- Age
- 43
Winch??I added R-A-M vinyl decals for front of my Rebel ordered off internet. Do you like it? Just added pic with tow hooks matched to factory paint color. Really puts cherry on top to me. Do you guys like it?View attachment 10062View attachment 10180
How's the fit?Added the flat black Mopar hood bug guard this morning.
Santa came early, what a guy!
View attachment 10222


The fit is very good.How's the fit?
It’s best with two people to help hold the part up and use a pencil to lightly scribe the locations of the mounting hardware.
I did not have that luxury I made due.
The worst part is removing the 6 push pins holding the rubber seal to the bottom of the hood. They are very brittle and actually snap. Wear eye protection. The heads break off but the small tabs get lost in the hood. I will try an see if I can blow the small pieces out while running my small dyson vac.
The install kit should have some replacement push pins for the two outside ones you remove for ease of placing the outside metal mounting tabs. I am going to order a few to replace those. I’ve put some 3m double sided tape to hold the outside edge of the seal in the mean time.
Take your time , clean the hood, place the protective paint stickers as directed. Lining up the screws to the holes on the mounting tabs is another challenge, again take your time. I took an hour. I placed the protective plastic the guard was wrapped in on the hood to help keep any scratches from being applied as I did the test fit and mounting the guard.
Sorry to be so long winded. It really is a nice product, instructions are clear and understandable.
Jhill
Ram Guru
Looks good ! Is the green filter a more efficient filter? Does it use an oil treatment like K&N?I installed a set of Rough Country flares and a Green Filters air filter.
View attachment 10252
View attachment 10253
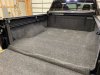
Installed the cargo rails and bedrug today.
Nice.. how much of a pain was the install on the rails? They are on my 'to get' list...
Lateralus
Active Member
- Joined
- Nov 25, 2018
- Messages
- 86
- Reaction score
- 74
- Points
- 18
- Age
- 52
It is a high-flow filter like K&N. It is oiled, and is woven cotton.Looks good ! Is the green filter a more efficient filter? Does it use an oil treatment like K&N?
The fit is very good.
It’s best with two people to help hold the part up and use a pencil to lightly scribe the locations of the mounting hardware.
I did not have that luxury I made due.
The worst part is removing the 6 push pins holding the rubber seal to the bottom of the hood. They are very brittle and actually snap. Wear eye protection. The heads break off but the small tabs get lost in the hood. I will try an see if I can blow the small pieces out while running my small dyson vac.
The install kit should have some replacement push pins for the two outside ones you remove for ease of placing the outside metal mounting tabs. I am going to order a few to replace those. I’ve put some 3m double sided tape to hold the outside edge of the seal in the mean time.
Take your time , clean the hood, place the protective paint stickers as directed. Lining up the screws to the holes on the mounting tabs is another challenge, again take your time. I took an hour. I placed the protective plastic the guard was wrapped in on the hood to help keep any scratches from being applied as I did the test fit and mounting the guard.
Sorry to be so long winded. It really is a nice product, instructions are clear and understandable.
Thanks for the pro tips!
Cmoar
Active Member
I was sitting in my wife's car about to back out of the driveway. I gave one last loving gaze back at my truck, almost trying to reassure her she was still my favorite, and I see this. Several cracks in my taillights where the clear part of the lens meets the red. After looking closer, sure enough. It's on both sides in the same spots. Not the best thing done today for sure.


Update 12-11 Some too the service department today, and here was their response.
I GOT THE PICTURES YOU SENT. IF YOU CAN STOP BY AT YOUR CONVIENCE ILL GET A REPAIR ORDER STARTED AND WE WILL GET YOUR TAILIGHTS ORDERED.WE LOOKED AT A COUPLE 2019 RAMS AND THEIR ARE A COUPLE THAT ARE STARTING TO DO THE SAME THING .SO WHENEVER ITS COVIENT FOR YOU STOP BY WE WILL GET THIS FIXED FOR YOU. THANK YOU SIR.
So you all might want to check your trucks.
Last edited:
OuachitaAdventure
Active Member
- Joined
- Nov 2, 2018
- Messages
- 94
- Reaction score
- 87
- Points
- 18
- Age
- 43
Not bad. The 16 nutserts took a little while but they compressed well and seem very sturdy. Just had to take my time lining up the holes and cutting the bed rug.Nice.. how much of a pain was the install on the rails? They are on my 'to get' list...
S
Smashy71
Guest
Filled it up again...
blownout1500
Well-Known Member
- Joined
- Sep 17, 2018
- Messages
- 260
- Reaction score
- 291
- Points
- 63
- Age
- 50
Replacing my TOW package mirrors with OEM Power Folding:
Ordered this package from INFOTAINMENT - 10% off Cyber Monday
https://www.infotainment.com/collections/all/products/19-20-ram-truck-power-folding-mirrors-package
How’d the install go? Really want to pull the trigger on those...

SMS Limited
Active Member
- Joined
- Aug 19, 2018
- Messages
- 114
- Reaction score
- 196
- Points
- 43
- Age
- 42


Pnorth
Active Member
Installed the Hellwig sway bar, exchanged the cargo light and third brake light bulbs for LED, ordered the OEM slush mats, a retrax tailgate seal, a pair of bd s2pro flat mounts to install in the rear bumper, got the rails and the cargo divider and waiting for the step, bedrug, retrax xr, Magnaflow catback to arrive,booked an all around tint, as well as got the switch pro 9100 and finally ordering a bd OnX6+ 20” tomorrow... Wondering about where to place the switch pro push button panel - any one with a panoramic installed one?
Jsvt3
Well-Known Member
Installed the Hellwig sway bar, exchanged the cargo light and third brake light bulbs for LED, ordered the OEM slush mats, a retrax tailgate seal, a pair of bd s2pro flat mounts to install in the rear bumper, got the rails and the cargo divider and waiting for the step, bedrug, retrax xr, Magnaflow catback to arrive,booked an all around tint, as well as got the switch pro 9100 and finally ordering a bd OnX6+ 20” tomorrow... Wondering about where to place the switch pro push button panel - any one with a panoramic installed one?
What bulbs did you use? I was looking on Amazon but wasn’t sure which to grab.
Site Vendors


