5thGenRams Forums

Register a free account today to become a member! Once signed in, you'll be able to participate on this site by adding your own topics and posts, as well as connect with other members through your own private inbox!

Rough Country wheel well liner install thread

jdmartin

Ram Guru
Joined
Jan 25, 2019
Messages
1,103
Reaction score
1,211
Location
Southeast
OK, as promised in another thread here's my post on putting on the Rough Country wheel well liners. I paid $98 shipped for these from Rough Country. They came zip tied together without a box. The only hardware was two push pins and a set of instructions that were marginally useful.

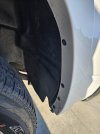
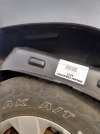
First thing is to completely take out the bolt that goes from the partial liners into the frame area. All other bolts can be left on the truck. Once that bolt is out, loosen up all the bolts along the wheel well. If you have a mudflap - I have Huskys I think - that has to come off.

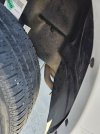
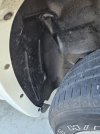
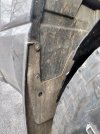
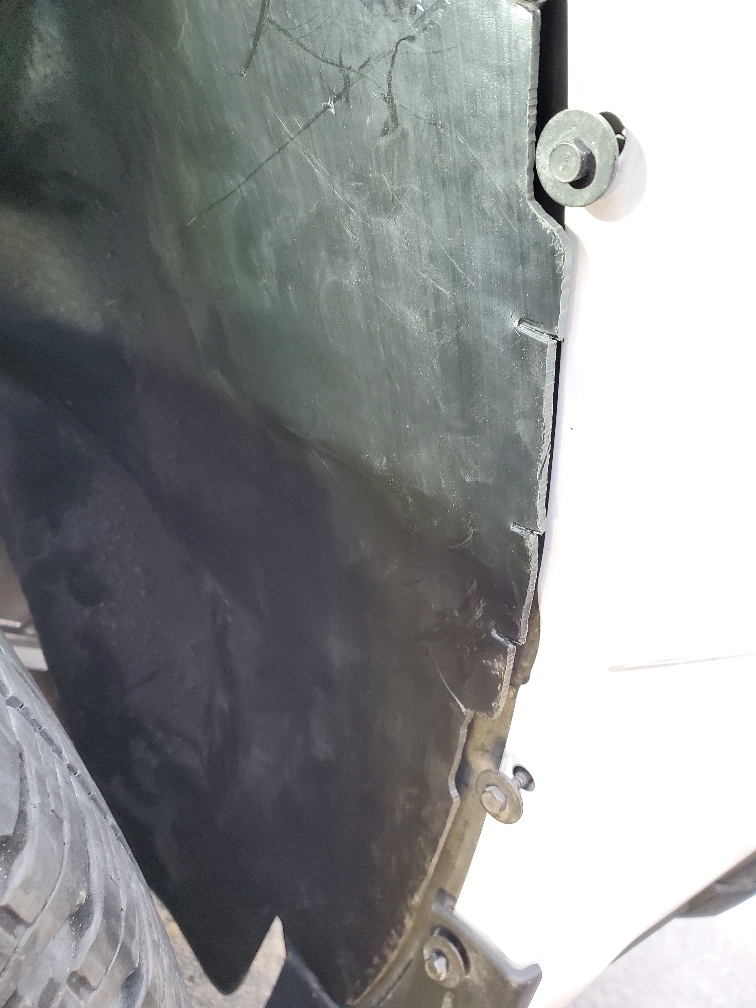
Now take the liner and stick it into place in the wheel opening. There's cutouts in the liner that go around all those bolts you loosened up. Get the liner into the right general area and start pushing the liner behind the rim of the wheel opening. This is the hardest part because it's a tight fit. I started from the rear and worked my way around, but it might be easier to start in the middle. At the front bottom, where the trim piece is bolted into place, the liner is too long to go behind that piece and it wouldn't look right as best as I can see anyway, so I let that little lip hang over the bolt for that trim piece. I may just trim that part of the liner away later. Once you have the liner all the way behind the lip, get the front hole at the frame lined up and start that bolt, then get the rear hole lined up and push the pushpin in, then tighten all the bolts (and put your mudflap back on if you have one).

Overall it took me about 25 minutes start to finish per side. They look good and added bonus I noticed a little less rear wheel noise driving with the liners in.
 

Attachments

  • IMG_20201231_155337097_HDR.jpg
    IMG_20201231_155337097_HDR.jpg
    156.3 KB · Views: 291
  • IMG_20201231_155341068_HDR.jpg
    IMG_20201231_155341068_HDR.jpg
    109.8 KB · Views: 285
  • IMG_20201231_155352917_HDR.jpg
    IMG_20201231_155352917_HDR.jpg
    123 KB · Views: 285

jdmartin

Ram Guru
Joined
Jan 25, 2019
Messages
1,103
Reaction score
1,211
Location
Southeast
I have these sitting in the garage, so thank you for this post!
You're welcome! One thing I should add is that the driver side was cut perfect around the little trim piece at the bottom but the passenger side was too long. So the passenger side really just needs to be trimmed down some.
 

cbraun81

Member
Joined
Oct 26, 2020
Messages
7
Reaction score
4
Location
Detroit, MI
Need to get some liners but they said won’t fit with ram box. When I look at OEM doesn’t look to be a difference.

Anyone put these on with ram box?
 

Kriegsman

New Member
Joined
Dec 21, 2020
Messages
1
Reaction score
1
I just installed these as well. Much thicker than the Mopar ones I looked at on the lot. I started both ends and worked to the middle. It's a little tricky, but didn't seem to fight as bad with the ends captured.
 

geebus

Member
Joined
Nov 21, 2020
Messages
5
Reaction score
4
So, I absolutely got my *** kicked by these bastards today! Lol, I'm ashamed but my penance is coming here to tell y'all how bad I got it. Took me like 2 hours of huffing, laying down in disgust, sweating, bleeding and having doubts, but they are in. I ended up cutting them a bit to get more play in the upper areas. And maybe on the sides a bit... I'm not proud of myself at all, but they are in.
88bdbf67c222550720114215f5709113.jpg
8734f67913f6308c3a9d88cfb779c6d9.jpg


Sent from my SM-N976V using Tapatalk
 

Kurtislowe68

Member
Joined
Nov 16, 2020
Messages
16
Reaction score
8
I did mine this past Thursday, I will also go on record to say that it takes a heck of a lot longer than the 20 or 30 minutes the instructions say it will take! But that is also reassuring to believe they will not just fall out or get too beat up. But like others have said, it’s mind boggling that all trims with 4x4 would not come standard with them. But an awesome addition for under $100.
 

obrien

Active Member
Joined
Dec 3, 2020
Messages
155
Reaction score
116
I did those as well.. it was pain the butt and you need a hardy gloves.. but they are in! not easy install though
 

Jbell$

Member
Joined
Feb 5, 2021
Messages
11
Reaction score
1
Does anyone have any installation tips? Mine will just not go, starting at the ends per the instructions and working my way to the top, the top tabs just can't be pushed behind the lip. Thanks in advance.
 

jdmartin

Ram Guru
Joined
Jan 25, 2019
Messages
1,103
Reaction score
1,211
Location
Southeast
Does anyone have any installation tips? Mine will just not go, starting at the ends per the instructions and working my way to the top, the top tabs just can't be pushed behind the lip. Thanks in advance.
After doing the passenger one I found it easiest to start at the front end and work my way around, rather than working from each end towards the middle. The other thing is it will be really helpful if the liner is warmed up first so that it's pliable.
 

Jbell$

Member
Joined
Feb 5, 2021
Messages
11
Reaction score
1
Did your truck have fender flares? I think the Laramie flare may be causing most of the issue. Its about .5" wider than the fender lip.
 

MayhemMOORE

Ram Guru
Joined
Apr 6, 2020
Messages
572
Reaction score
502
I did these a few weeks ago on my Laramie. It was about 25 degrees out, and about 55 in the garage. I had them inside for a couple of days prior to installation so they would be semi-pliable, and ran them in front of the heater right before installation as well. Each side took me less than 10 minutes, including loosening the screws far enough that there was plenty of room to maneuver, as well as raising the rear end to allow more space to get them in the wheel well. I had the heat gun out and ready to go, but it wasn't needed in the end. As mentioned previously, starting at the front and working the liner in that way seemed to work best in my case.
 

Green Streak

Active Member
Joined
Oct 31, 2018
Messages
28
Reaction score
37
Does anyone have any installation tips? Mine will just not go, starting at the ends per the instructions and working my way to the top, the top tabs just can't be pushed behind the lip. Thanks in advance.
Use your wife’s hair dryer to heat up those liners when you’re trying to bend them around the inside of the fenders. Took me about 30 mins and a lot of curse words to figure that one out.
 

obrien

Active Member
Joined
Dec 3, 2020
Messages
155
Reaction score
116
I left my fingernails there.. take a good gloves and indeed heat gun would be a big help. However I trust it more them factory ones, it is very rigid plastic which will not go anywhere. Again why wasn't it a standard? :)
 

jdmartin

Ram Guru
Joined
Jan 25, 2019
Messages
1,103
Reaction score
1,211
Location
Southeast
I left my fingernails there.. take a good gloves and indeed heat gun would be a big help. However I trust it more them factory ones, it is very rigid plastic which will not go anywhere. Again why wasn't it a standard? :)
No good answer to that! Other than maybe trying to upsell to a better package, which virtually no one is going to do for a wheel well liner. It's just another strategy to put more money in the manufacturer's pocket for things that used to be standard is my guess. And they figure 90% or more of these buyers won't notice or won't care that they're missing.
 
Joined
May 13, 2023
Messages
7
Reaction score
0
OK.... SOOOOOO on this topic... I am getting my a$$ kicked as well but I think its more of me not understanding. I have a Laramie and I have the liners in place but they do NOT seem to fit snug or I have done something wrong on this driver side. Have not attempted passenger yet but wanted some input if possible. I took out all the bolts and pulled the old partial liners. The rear has a rigid piece that I removed and split apart then put the structural part back into place with the bolt. I have tried to twist turn rotate scream at heat gun and anything else I can think of but they just dont want to line up correctly. Even broke my two body clips on the back flap getting that piece off so now have to go get new ones of those. This is the BEST its been so far but looks wrong to me. Also... do the liners go totally behind the metal body molding or in between the laramie plastic fender flares and the metal body mold? The bolt hole on the back lines up decently but the push pin side was a little off not enough to make it not work though and it went in without much of a fight. The "cut outs" on the liner are lining up with the bolts so IDK where I am so far off or if this is normal.
 

Attachments

  • 20240417_084243.jpg
    20240417_084243.jpg
    95.1 KB · Views: 8
  • 20240417_084247.jpg
    20240417_084247.jpg
    130.6 KB · Views: 8
  • 20240417_084251.jpg
    20240417_084251.jpg
    143.1 KB · Views: 8

Users who are viewing this thread

Top