Wandering Wheel
New Member
- Joined
- Mar 20, 2022
- Messages
- 4
- Reaction score
- 17
- Points
- 3
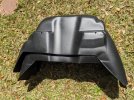
Did my first "mod" on the truck today and installed some wheel well liners. I'm going to be moving to Alaska at the end of the year and this is the first of many steps I'm taking to protect the truck. Since for some reason all trucks don't come standard with this sort of thing, I needed to do it myself. Decided to go with Rough Country after reading some good things about them on the forum and picked them up for $97.55, taxes and shipping included, from Amazon. Like others have said, they ship without a box. Here they are as packaged for shipping.
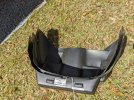
Shot from the other side. They had a couple dents in them but they were easy to pop out by leaving them in the sun for a while to soften up.
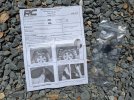
They come with 1x pushpin for each liner and an instruction sheet. Other than that they rely on the hardware already on the truck.
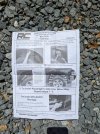
Many threads on here have covered installing wheel well liners, plus the instructions are fairly clear, so I'll focus more on my lessons learned.
What I didn't realize about this product is where it sits in the "layers" of material. I have the OE flares, so the order of layers from outside to inside are: Plastic flare - Sheet metal - Plastic molding (mini liner). The bolts in the wheel well hold everything together by pressing on the flare with a washer and threading into a metal insert on the plastic molding; effectively sandwiching the sheet metal in between. These Rough Country liners go in between the sheet metal and the plastic molding. The liners do not have holes for the bolts to pass through, they instead rely on being clamped to the sheet metal by the plastic molding. Look at my very first photo, see those rectangular cutouts along the inner edge of the liners? Those correspond to the bolt locations and allow you to slide the liner far enough in. So your new order of layers is: Plastic flare - Sheet metal - Liner - Plastic molding.
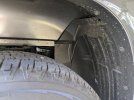
Here is a picture without the liner installed. You can see the bolts that hold the plastic molding into place.
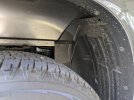
Simple right? Just loosen the bolts and shove that liner in there as far as it will go. Here is what I learned: It is extremely easy to put the liner in the wrong place and get it stuck between the OE flare and the sheet metal. Once it is there it is really difficult to get it into the right place. I don't have a heat gun, so I had to get creative with mirrors to get the sun to warm up where I got stuck.
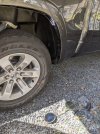
Those bolts are at least an inch long. I found it easier to loosen them to where they were barely hanging on or to remove them all together.
Since you can access the backside of most of the bolts holding things together, it is easy to guide things into place. For example, I did not have to use a piece of tape as in step 1, I just went from the backside of the wheel well with a small screwdriver and used it to guide the parts into position.
It took me like an hour to figure out the first one and then get it into the proper "layer," but the second went in after only 10 min or so. Overall I am pleased enough with them. They are contoured really well and fit snuggly in the wheel well when properly positioned.
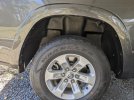
Love the forum and am happy I can finally contribute. Hope this helps someone.

Shot from the other side. They had a couple dents in them but they were easy to pop out by leaving them in the sun for a while to soften up.

They come with 1x pushpin for each liner and an instruction sheet. Other than that they rely on the hardware already on the truck.


Many threads on here have covered installing wheel well liners, plus the instructions are fairly clear, so I'll focus more on my lessons learned.
What I didn't realize about this product is where it sits in the "layers" of material. I have the OE flares, so the order of layers from outside to inside are: Plastic flare - Sheet metal - Plastic molding (mini liner). The bolts in the wheel well hold everything together by pressing on the flare with a washer and threading into a metal insert on the plastic molding; effectively sandwiching the sheet metal in between. These Rough Country liners go in between the sheet metal and the plastic molding. The liners do not have holes for the bolts to pass through, they instead rely on being clamped to the sheet metal by the plastic molding. Look at my very first photo, see those rectangular cutouts along the inner edge of the liners? Those correspond to the bolt locations and allow you to slide the liner far enough in. So your new order of layers is: Plastic flare - Sheet metal - Liner - Plastic molding.
Here is a picture without the liner installed. You can see the bolts that hold the plastic molding into place.

Simple right? Just loosen the bolts and shove that liner in there as far as it will go. Here is what I learned: It is extremely easy to put the liner in the wrong place and get it stuck between the OE flare and the sheet metal. Once it is there it is really difficult to get it into the right place. I don't have a heat gun, so I had to get creative with mirrors to get the sun to warm up where I got stuck.

Those bolts are at least an inch long. I found it easier to loosen them to where they were barely hanging on or to remove them all together.
Since you can access the backside of most of the bolts holding things together, it is easy to guide things into place. For example, I did not have to use a piece of tape as in step 1, I just went from the backside of the wheel well with a small screwdriver and used it to guide the parts into position.
It took me like an hour to figure out the first one and then get it into the proper "layer," but the second went in after only 10 min or so. Overall I am pleased enough with them. They are contoured really well and fit snuggly in the wheel well when properly positioned.

Love the forum and am happy I can finally contribute. Hope this helps someone.

