5thGenRams Forums

Register a free account today to become a member! Once signed in, you'll be able to participate on this site by adding your own topics and posts, as well as connect with other members through your own private inbox!

Rebel Center Console

Sfoster0717,

This is great and funny. We were just talking about that area this weekend. We will look into a design for that too. Fortunatly it is summer so he has some time for designing. His second printer came in yesterday so he is busy putting that together, 9-12hr assembly. Since you brought it to us first, is there any particular compartment set up you are thinking?

69Sting
 
Hi Everyone, I have access to a professional grade 3D scanner and 3D printer and can make basically anything for our trucks! Let me know what you want and I can whip it up super fast! Shoot me a PM
 
Armrest organizer is in final stages. trial one needed a few measurement adjustments. Today trial 2 will be tested for fit. Once this is set, he will work on the plate for the dash tray and then a slider organizer.
Unfortunately the armrest organizer is two 4hr prints so each trial takes basically a day to verify.

Looking forward to thoughts and tests.


Sent from my iPhone using Tapatalk
 
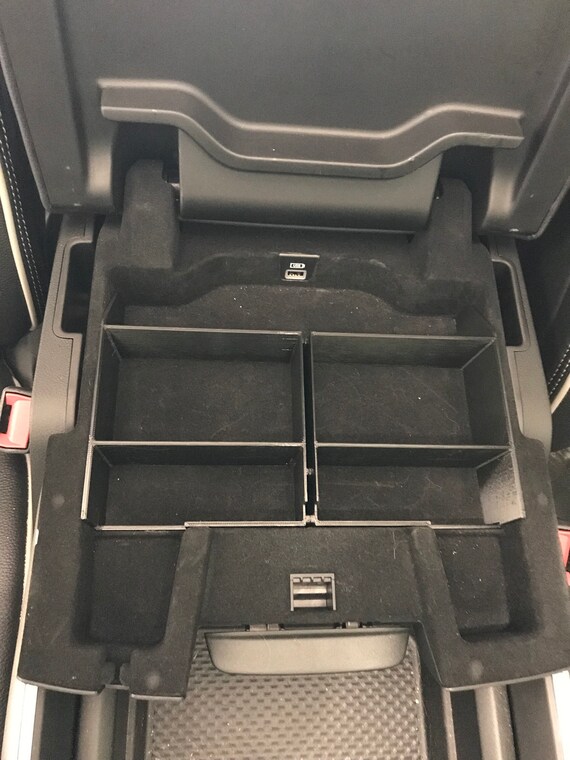
Test #2 completed. Fits 95% just right. Need to make 2 small adjustment that hopefully will be easy. Needs to be widened by a few millimeters and the height is great with the lower section but small items (like a lighting to 3mm adaptor) can move from section to section when the arm rest is raised to vertical. So we are working on raising the height of the walls to be closer to the top when closed. Of course in the top in the area where the latch is we have to accommodate for an area that doesn't match with the bottom. Hard part is to measure the height correctly but we have a plan.
Here are two pics of how it looks so far.
 

Attachments

  • Arm Rest sample top view.JPG
    Arm Rest sample top view.JPG
    203.7 KB · Views: 134
  • Arm Rest sample front angle.JPG
    Arm Rest sample front angle.JPG
    177.7 KB · Views: 135
Test #2 completed. Fits 95% just right. Need to make 2 small adjustment that hopefully will be easy. Needs to be widened by a few millimeters and the height is great with the lower section but small items (like a lighting to 3mm adaptor) can move from section to section when the arm rest is raised to vertical. So we are working on raising the height of the walls to be closer to the top when closed. Of course in the top in the area where the latch is we have to accommodate for an area that doesn't match with the bottom. Hard part is to measure the height correctly but we have a plan.
Here are two pics of how it looks so far.

Looks awesome! Thanks for the detailed work on this. Cannot wait to order one with you all. Tell your son thank you!


Sent from my iPhone using Tapatalk
 
Test #2 completed. Fits 95% just right. Need to make 2 small adjustment that hopefully will be easy. Needs to be widened by a few millimeters and the height is great with the lower section but small items (like a lighting to 3mm adaptor) can move from section to section when the arm rest is raised to vertical. So we are working on raising the height of the walls to be closer to the top when closed. Of course in the top in the area where the latch is we have to accommodate for an area that doesn't match with the bottom. Hard part is to measure the height correctly but we have a plan.
Here are two pics of how it looks so far.

One quick note: can you creat a notch in the front by the Latch so we can run the charging cable from the back USB forward through the front. The notch will make it easy to run the cable out through the area near the latch. Any questions?


Sent from my iPhone using Tapatalk
 
One quick note: can you creat a notch in the front by the Latch so we can run the charging cable from the back USB forward through the front. The notch will make it easy to run the cable out through the area near the latch. Any questions?


Sent from my iPhone using Tapatalk

That is something we can look into. As it is right now there is room to run the cable over the organizer. Would this be better than having it higher. Toss up of things falling from one compartment to another when vertical or the cord having room. But a notch is feasible. I will get with the designer on this.
Appreciate the feedback and suggestion.

I think the height is important so things don’t fly around is very important but if my GF doesn’t have a charging cord she might kill me too!! :/. I leave it in the designers hands!!


Sent from my iPhone using Tapatalk
 
I think the height is important so things don’t fly around is very important but if my GF doesn’t have a charging cord she might kill me too!! :/. I leave it in the designers hands!!


Sent from my iPhone using Tapatalk

We worked out a concept yesterday to have a channel running down the middle for a charging cord. If you don't want to run a charging cord it will be an area to store business cards/car wash cards or whatever.
Now that we know is a GF requirement and life or death for you, you will get a cord path. :)

With the new concept to design in the timing is off. I will be gone with the truck for the rest of the week at a wrestling camp and then my son (the designer/printer) will be at a lacrosse camp next week. So patience is greatly appreciated. He is working on it.

Sounds good to me. I will wait and see what you all come up with. Looking forward to the final product.


Sent from my iPhone using Tapatalk
 
Update.
Sorry this is taking longer than expected. But since this is my son's hobby and the other organizer is taking up both printers to catch up, this one is taking a bit longer.
The main reason this is taking longer is we have taken feedback and adjusted the design a few times and had to make some measurement updates, in the tune of 1/2 mm to make sure it fits.

We have a 'channel' for a usb cord to run from the back to the front and a business card/CC holder. Last night we thought we had it. Did a test fit and darn it, literally need to narrow by 1/2 mm. uhg. So back to the design table and new print. Fortunately this print only takes 10 hrs total for both sides to print.

Hopefully we will have a working version this weekend. I'll update on Monday. We really appreciate the patience.

69Sting
 
Sounds good and keep us posted. Hope sales on the other organizer are going well.


2019 1500 Rebel 4x4 5’7”
Maximum Steel Solid Paint
HEMI 5.7 V8
Level II Equipment Package
8.4” Uconnect w/o Nav
Blind spot monitor
Rhino Spray-in bed liner
Wheelhouse liners
Trailer tow package
Modifications:
MotoFab 2.5” front leveling spacer
Edge Performance Pulsar Kit
AFE Magnum Force Stage 2 CAI
Flowmaster series 40 Exhaust
Nitto Ridge Grappler LT295 55/R20 tires
KMC Gernade 20” Black XD rims
Custom painted calipers & drums
Blackout skid plate & RAM Badge
Husky front & rear mud guards
DeeZee Bed Mat
Westin tubular step bars
Exteng 2.0 soft trifold tonneau cover
3M 20% window tint all around
JL Audio speakers front and rear doors
JL Audio 5 channel amp
JL Audio 10” sub and custom enclosure
 
Bought a small organizer from a local big box home improvement store and went at it with a Dremmel. Even the red dividers almost match the Rebel's interior:

View attachment 33233

Hey I recognize that unit!!! Sure you didn’t come over to PA and take a pic of the one installed in my Rebel?


2019 1500 Rebel 4x4 5’7”
Maximum Steel Solid Paint
HEMI 5.7 V8
Level II Equipment Package
8.4” Uconnect w/o Nav
Blind spot monitor
Rhino Spray-in bed liner
Wheelhouse liners
Trailer tow package
Modifications:
MotoFab 2.5” front leveling spacer
Edge Performance Pulsar Kit
AFE Magnum Force Stage 2 CAI
Flowmaster series 40 Exhaust
Nitto Ridge Grappler LT295 55/R20 tires
KMC Gernade 20” Black XD rims
Custom painted calipers & drums
Blackout skid plate & RAM Badge
Husky front & rear mud guards
DeeZee Bed Mat
Westin tubular step bars
Exteng 2.0 soft trifold tonneau cover
3M 20% window tint all around
JL Audio speakers front and rear doors
JL Audio 5 channel amp
JL Audio 10” sub and custom enclosure
 
It is complete!!!! Lots of back to the drawing board on this one. Son learned a lot with trying to design to measurements you can't take when something is closed and don't have access ;)

Mustard54 - there is a charging cord channel designed in per your request.
if not running a charging cord, you can store business cards, a credit card or items like a car wash card.


Awesome. Pics look great!!! Thank you for the hard work.


2019 1500 Rebel 4x4 5’7”
Maximum Steel Solid Paint
HEMI 5.7 V8
Level II Equipment Package
8.4” Uconnect w/o Nav
Blind spot monitor
Rhino Spray-in bed liner
Wheelhouse liners
Trailer tow package
Modifications:
MotoFab 2.5” front leveling spacer
Edge Performance Pulsar Kit
AFE Magnum Force Stage 2 CAI
Flowmaster series 40 Exhaust
Nitto Ridge Grappler LT295 55/R20 tires
KMC Gernade 20” Black XD rims
Custom painted calipers & drums
Blackout skid plate & RAM Badge
Husky front & rear mud guards
DeeZee Bed Mat
Westin tubular step bars
Exteng 2.0 soft trifold tonneau cover
3M 20% window tint all around
JL Audio speakers front and rear doors
JL Audio 5 channel amp
JL Audio 10” sub and custom enclosure
 

Users who are viewing this thread

Back
Top