5thGenRams Forums

Register a free account today to become a member! Once signed in, you'll be able to participate on this site by adding your own topics and posts, as well as connect with other members through your own private inbox!

Looking to add AUX switches? Using the homelink buttons to control Lightbars DIY HOW TO for under $20.

dannymcd

Active Member
Joined
Jan 26, 2021
Messages
92
Reaction score
108
Location
Cleveland, OH
So I just added MicTuning C2 rocklights under my truck and I didn't want to drill a hole on a panel in the interior of the truck. So I purchased a eMylo DC 12V 1 Channel 433Mhz RF Wireless Relay Remote Control Momentary Light Switch Self-lock Transmitter with Receiver for Home Use
Learn more: https://www.amazon.com/dp/B01A6VO79M/ref=cm_sw_em_r_mt_dp_MDQ1YQ68V7K8GGBF2AYB?_encoding=UTF8&psc=1
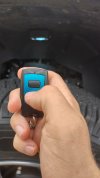
IMG_20210830_091915454_HDR.jpg
one of the 2 remotes included and the rock light it controls

they're rated at 10a, so you could wire them directly to anything under 120w's anything higher and they should be run to control a larger relay. if you buy a big light bar, it will likely already have a relay for that purpose. what this does is replaces the manual switch with a remote control.
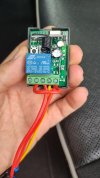
IMG_20210830_091756672_HDR.jpg
Here it is all wired up. since the switch i replaced was illuminated it already had a dedicated ground wire (yellow) if you don't have an illuminated switch the yellow wire will have to be connected to ground.
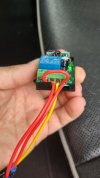
IMG_20210830_091749769_HDR.jpg

from right to left the connections are:
#1 normally closed - power flows from common to NC constantly until the controller is energized (on) typically you don't use this
#2 common -this is the input power for the switch (this is jumpered to #5)
#3 Normally open - this is where you wire the output power going to the lights/relay
#4 ground - this is the ground wire that allows the controller to work all the time
#5 12vDC input - this is the power that runs the controller, I've jumpered it to the relay on #2 but you can run them independently.

The nice thing is this controller is already programmed to be "latching" which means one push of the button will turn it on and it will stay on until the button is pushed again, you can change this to momentary on the eMylo and an application where that would be good is for a train horn setup.

SO this is all pretty straight forward and simple to do, but there's that last part where you have to get the homelink buttons programmed.
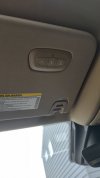
IMG_20210830_091937107_HDR.jpg
in the manual it tells you how to do this. it also tells you that a message with scroll across your instrument panel, but on my 2019 Laramie, it did not. so here's what i did.

#1 hold down 1&3 for 20 seconds, it should blink really fast keep holding that's not 20 seconds, it will change to a slow blink/solid. this clears all the programs, if you already have one of the buttons programmed to your garage door you DO NOT have to do this, you might not either way.

#2 press and hold the button you want to program, it will again blink really fast (strobe), then it will slow down to a normal blink KEEP HOLDING the button on the car and press and hold the button on the eMylo remote. HOLD BOTH until the light on the truck goes solid. it should be programmed.

you shouldn't have to do anything with the eMylo controller programming as long as you don't want to change it to momentary.

other things to keep in mind is that it is not waterproof so I've placed mine in the truck and hid it under the dash. you can also buy a waterproof junction box for it, below is an example of one of those.

Waterproof IP68 External Junction Box, 2 Way Plug Line M20 Coaxial Cable Connector Wire Range 5 to 15mm Outdoor External Electric Power Cord Boxes (Black)

by Helunsi

Learn more: https://www.amazon.com/dp/B07TFSLLBY/ref=cm_sw_em_r_mt_dp_WX3XPR4A3JZCCCANTR28?_encoding=UTF8&psc=1

Well that's it, I hope this will save a dash or two from the drill.
 

AMS Guru

AMS Guru, Ram Guru-ish
Joined
Oct 6, 2020
Messages
575
Reaction score
664
Location
Eastern Iowa
So I just added MicTuning C2 rocklights under my truck and I didn't want to drill a hole on a panel in the interior of the truck. So I purchased a eMylo DC 12V 1 Channel 433Mhz RF Wireless Relay Remote Control Momentary Light Switch Self-lock Transmitter with Receiver for Home Use
Learn more: https://www.amazon.com/dp/B01A6VO79M/ref=cm_sw_em_r_mt_dp_MDQ1YQ68V7K8GGBF2AYB?_encoding=UTF8&psc=1

View attachment 104123
one of the 2 remotes included and the rock light it controls

they're rated at 10a, so you could wire them directly to anything under 120w's anything higher and they should be run to control a larger relay. if you buy a big light bar, it will likely already have a relay for that purpose. what this does is replaces the manual switch with a remote control.
View attachment 104124
Here it is all wired up. since the switch i replaced was illuminated it already had a dedicated ground wire (yellow) if you don't have an illuminated switch the yellow wire will have to be connected to ground.

View attachment 104126

from right to left the connections are:
#1 normally closed - power flows from common to NC constantly until the controller is energized (on) typically you don't use this
#2 common -this is the input power for the switch (this is jumpered to #5)
#3 Normally open - this is where you wire the output power going to the lights/relay
#4 ground - this is the ground wire that allows the controller to work all the time
#5 12vDC input - this is the power that runs the controller, I've jumpered it to the relay on #2 but you can run them independently.

The nice thing is this controller is already programmed to be "latching" which means one push of the button will turn it on and it will stay on until the button is pushed again, you can change this to momentary on the eMylo and an application where that would be good is for a train horn setup.

SO this is all pretty straight forward and simple to do, but there's that last part where you have to get the homelink buttons programmed.
View attachment 104127
in the manual it tells you how to do this. it also tells you that a message with scroll across your instrument panel, but on my 2019 Laramie, it did not. so here's what i did.

#1 hold down 1&3 for 20 seconds, it should blink really fast keep holding that's not 20 seconds, it will change to a slow blink/solid. this clears all the programs, if you already have one of the buttons programmed to your garage door you DO NOT have to do this, you might not either way.

#2 press and hold the button you want to program, it will again blink really fast (strobe), then it will slow down to a normal blink KEEP HOLDING the button on the car and press and hold the button on the eMylo remote. HOLD BOTH until the light on the truck goes solid. it should be programmed.

you shouldn't have to do anything with the eMylo controller programming as long as you don't want to change it to momentary.

other things to keep in mind is that it is not waterproof so I've placed mine in the truck and hid it under the dash. you can also buy a waterproof junction box for it, below is an example of one of those.

Waterproof IP68 External Junction Box, 2 Way Plug Line M20 Coaxial Cable Connector Wire Range 5 to 15mm Outdoor External Electric Power Cord Boxes (Black)

by Helunsi

Learn more: https://www.amazon.com/dp/B07TFSLLBY/ref=cm_sw_em_r_mt_dp_WX3XPR4A3JZCCCANTR28?_encoding=UTF8&psc=1

Well that's it, I hope this will save a dash or two from the drill.
This is a really nice write-up thank you!
 

Whoa_Ram

Ram Guru
Joined
May 26, 2021
Messages
1,019
Reaction score
605
Location
Azle TX
Awesome. I had did this with my Jeep lights and was thinking about doing this to a led bar I want installed too.
 

PCB

Active Member
Joined
Jul 11, 2021
Messages
48
Reaction score
43
Location
Florida
Thank you very much for the detailed tutorial. The questions I have for you is what switch did you replace and how are you liking the rock light brand you chose?
 

dannymcd

Active Member
Joined
Jan 26, 2021
Messages
92
Reaction score
108
Location
Cleveland, OH
Thank you very much for the detailed tutorial. The questions I have for you is what switch did you replace and how are you liking the rock light brand you chose?
IMG_20210901_085502644.jpg

This is the switch that came with the Rock lights, it has 3 wires because it's lighted(which really helps with the wiring of the controller) I crimped some spade connectors so I could do the wiring inside and just clip it into the connectors on the switch, mostly because it was the first time I used one of these wireless controllers and I wasn't sure it was going to work as easy as it did and I wanted to be able to go back to the switch if it didn't work out. The rock lights are really nice for the price, I used 1 in each wheel well and 2 on each nerf bar, for me it's more of a style thing but they are very bright.
 

PCB

Active Member
Joined
Jul 11, 2021
Messages
48
Reaction score
43
Location
Florida
Thank you for the picture and explanation. So the switch is wired but you don’t have to use it at all now but can go back to it if the relay isn’t working? Where did you choose to splice in for the relay? Sorry if I am asking to many questions but I want to gauge if I can do this or should take it to a professional. Also, with the relay can you control up to three accessories on the home link buttons? (say rock lights, a light bar mounted up front on a grill guard, and a led light bar under the tailgate?). Thanks for your help and time.
 

dannymcd

Active Member
Joined
Jan 26, 2021
Messages
92
Reaction score
108
Location
Cleveland, OH
Thank you for the picture and explanation. So the switch is wired but you don’t have to use it at all now but can go back to it if the relay isn’t working? Where did you choose to splice in for the relay? Sorry if I am asking to many questions but I want to gauge if I can do this or should take it to a professional. Also, with the relay can you control up to three accessories on the home link buttons? (say rock lights, a light bar mounted up front on a grill guard, and a led light bar under the tailgate?). Thanks for your help and time.
Sure, the rock lights came with a wiring harness that included a lighted rocker switch that had 3 wires going to it #1 12vDC from the battery #2 12vDC from the switch to the lights, and #3 ground for the light in the switch to work.

The wires were connected to the switch with spade connectors so I simply pulled the connectors off the switch and added spade connectors to the wiring I did on the relay. From there all I had to do was plug it in to the wires that were originally attached to the switch.

You could use 3 separate relays to control 3 separate functions / lights and program each of them to one of the three buttons. The relays are paired to the remotes that come with them so they won't interfere with each other (they have different signals codes that make them specific to that relay) I plan on using the other 2 buttons once I decide what I'm going to control with them.
 

PCB

Active Member
Joined
Jul 11, 2021
Messages
48
Reaction score
43
Location
Florida
I really appreciate the response and will most definitely be having a professional handle that for certain lol.
 

TravisH

Active Member
Joined
Sep 20, 2021
Messages
128
Reaction score
93
from right to left the connections are:
#1 normally closed - power flows from common to NC constantly until the controller is energized (on) typically you don't use this
#2 common -this is the input power for the switch (this is jumpered to #5)
#3 Normally open - this is where you wire the output power going to the lights/relay
#4 ground - this is the ground wire that allows the controller to work all the time
#5 12vDC input - this is the power that runs the controller, I've jumpered it to the relay on #2 but you can run them independently.

You mean left to right, correct?
Awesome. I was scratching my head over aux switches but this works great. I was thinking about going with 4 relay board to have them all on one. Do you think each button would be a different frequency? Some of the amazon listings say they are rolling codes. I'm not sure what the homelink buttons are able to program to.
 

dannymcd

Active Member
Joined
Jan 26, 2021
Messages
92
Reaction score
108
Location
Cleveland, OH
You mean left to right, correct?
Awesome. I was scratching my head over aux switches but this works great. I was thinking about going with 4 relay board to have them all on one. Do you think each button would be a different frequency? Some of the amazon listings say they are rolling codes. I'm not sure what the homelink buttons are able to program to.
I think the rolling codes is just the security method to keep someone from stealing the signal code. I think the multiple relays have different codes for each block and I don't think you can program 2 relays to one button. I could be wrong but i think that's how it works.
 

TravisH

Active Member
Joined
Sep 20, 2021
Messages
128
Reaction score
93
I think the rolling codes is just the security method to keep someone from stealing the signal code. I think the multiple relays have different codes for each block and I don't think you can program 2 relays to one button. I could be wrong but i think that's how it works.

Yeah I just meant buying a 4 channel board instead of 3 one channel boards. Each button should be a separate frequency and I can learn each button.


Sent from my iPhone using Tapatalk
 

SKT Customs

5thGenRams Vendor
5thGenRams Vendor
Joined
Jun 14, 2018
Messages
1,213
Reaction score
1,619
Location
San Diego
I did this a year ago with my Baja Designs pods (but used a different RF receiver) and I kept everything in the engine bay since mine is weather proof. The buttons work flawlessly too and there’s hardly a delay at all. I was amazed that more people hadn’t thought about it before lol nice to see it spreading
 

dannymcd

Active Member
Joined
Jan 26, 2021
Messages
92
Reaction score
108
Location
Cleveland, OH
I did this a year ago with my Baja Designs pods (but used a different RF receiver) and I kept everything in the engine bay since mine is weather proof. The buttons work flawlessly too and there’s hardly a delay at all. I was amazed that more people hadn’t thought about it before lol nice to see it spreading
Yeah, I seen a video on how to make a floor lamp work with it, then after some digging I realized they make 12vDC versions and not just the 120vAC version. I brought it into the cab because I wasn't entirely sure it would work right and had the OEM switch ready to go but it worked on my first attempt. I was thinking about adding a 30" light bar, and if I did that I'd keep it all out there, these pod lights already have wires routed all over the place so it wasn't as big of a deal.
 

ksneubec

Active Member
Joined
Jun 28, 2021
Messages
26
Reaction score
9
Anyone have any issues syncing the emylo wireless remote to the Homelink? My Homelink flashes slowly when I push the button but never changes to fast or solid. I tried clearing the memory of that button (although it was never programmed) per the manual and it didn't help. I reached out to the thread author who was very nice but didn't have any other thoughts. Any suggestions?
 

TravisH

Active Member
Joined
Sep 20, 2021
Messages
128
Reaction score
93
So I just added MicTuning C2 rocklights under my truck and I didn't want to drill a hole on a panel in the interior of the truck. So I purchased a eMylo DC 12V 1 Channel 433Mhz RF Wireless Relay Remote Control Momentary Light Switch Self-lock Transmitter with Receiver for Home Use
Learn more: https://www.amazon.com/dp/B01A6VO79M/ref=cm_sw_em_r_mt_dp_MDQ1YQ68V7K8GGBF2AYB?_encoding=UTF8&psc=1

View attachment 104123
one of the 2 remotes included and the rock light it controls

they're rated at 10a, so you could wire them directly to anything under 120w's anything higher and they should be run to control a larger relay. if you buy a big light bar, it will likely already have a relay for that purpose. what this does is replaces the manual switch with a remote control.
View attachment 104124
Here it is all wired up. since the switch i replaced was illuminated it already had a dedicated ground wire (yellow) if you don't have an illuminated switch the yellow wire will have to be connected to ground.

View attachment 104126

from right to left the connections are:
#1 normally closed - power flows from common to NC constantly until the controller is energized (on) typically you don't use this
#2 common -this is the input power for the switch (this is jumpered to #5)
#3 Normally open - this is where you wire the output power going to the lights/relay
#4 ground - this is the ground wire that allows the controller to work all the time
#5 12vDC input - this is the power that runs the controller, I've jumpered it to the relay on #2 but you can run them independently.

The nice thing is this controller is already programmed to be "latching" which means one push of the button will turn it on and it will stay on until the button is pushed again, you can change this to momentary on the eMylo and an application where that would be good is for a train horn setup.

SO this is all pretty straight forward and simple to do, but there's that last part where you have to get the homelink buttons programmed.
View attachment 104127
in the manual it tells you how to do this. it also tells you that a message with scroll across your instrument panel, but on my 2019 Laramie, it did not. so here's what i did.

#1 hold down 1&3 for 20 seconds, it should blink really fast keep holding that's not 20 seconds, it will change to a slow blink/solid. this clears all the programs, if you already have one of the buttons programmed to your garage door you DO NOT have to do this, you might not either way.

#2 press and hold the button you want to program, it will again blink really fast (strobe), then it will slow down to a normal blink KEEP HOLDING the button on the car and press and hold the button on the eMylo remote. HOLD BOTH until the light on the truck goes solid. it should be programmed.

you shouldn't have to do anything with the eMylo controller programming as long as you don't want to change it to momentary.

other things to keep in mind is that it is not waterproof so I've placed mine in the truck and hid it under the dash. you can also buy a waterproof junction box for it, below is an example of one of those.

Waterproof IP68 External Junction Box, 2 Way Plug Line M20 Coaxial Cable Connector Wire Range 5 to 15mm Outdoor External Electric Power Cord Boxes (Black)

by Helunsi

Learn more: https://www.amazon.com/dp/B07TFSLLBY/ref=cm_sw_em_r_mt_dp_WX3XPR4A3JZCCCANTR28?_encoding=UTF8&psc=1

Well that's it, I hope this will save a dash or two from the drill.
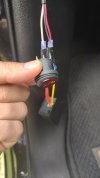
Old thread but I’m having a hell of a time trying to get these remotes to program. I do have button 1 already programmed as a rolling code to my garage.


Sent from my iPhone using Tapatalk
 

dannymcd

Active Member
Joined
Jan 26, 2021
Messages
92
Reaction score
108
Location
Cleveland, OH
Old thread but I’m having a hell of a time trying to get these remotes to program. I do have button 1 already programmed as a rolling code to my garage.


Sent from my iPhone using Tapatalk
Sorry for the long delay ive been busy with ski season and just got back into the messing with my cars and truck season. If you follow the poorly written directions from ram I think the most important part is holding down the remote button and the button on the truck for a very long time, you'd think with giant screen they could fill you in on if you're doing it right or not but it's basically doing it blind with that one blinking light.
 

Bigbags85

Well-Known Member
Joined
Jun 18, 2021
Messages
487
Reaction score
349
Location
WNY
Sorry for the long delay ive been busy with ski season and just got back into the messing with my cars and truck season. If you follow the poorly written directions from ram I think the most important part is holding down the remote button and the button on the truck for a very long time, you'd think with giant screen they could fill you in on if you're doing it right or not but it's basically doing it blind with that one blinking light.
I just programmed a remote gate opener that I used for my lightbar to the homelink buttons and it does say to have the remote within 1-2" of the homelink buttons while simultaneously pressing the remote and homelink buttons. It only took about 5 seconds to program.
 

Richard320

Spends too much time on here
Joined
Aug 3, 2019
Messages
2,089
Reaction score
2,223
Location
LA County, People's Republic of California
It took me enough tries and long enough for my thumbs to get tired of pressing before it learned. I held the new fob real close and also moved it some side to side, in case the internal antenna is off set somehow.
 

Users who are viewing this thread

Top