Biggiehorn
Ram Guru
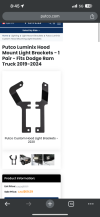
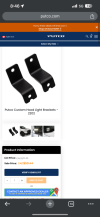
Product: Putco Luminix Hood Mount Light Brackets
Product Link: Putco RAM 1500 Luminix Hood Mount Light Brackets 2200 (19-23 RAM 1500) - Free Shipping
Price: $44.99
Install Difficulty: 1 out of 5
Install Time: Approximately 30 minutes
Couldn't really find much information on here about these from an installation standpoint, so I decided to throw together a quick how-to for the Putco A Pillar light brackets. Install is very straight forward, but these brackets may require slight modification for your specific application. With the potential modification considered, I'd still rate this at a 1 out of 5 on a difficulty scale. I decided to give these a shot based on the recommendation from a few others on here. The price of these compared to some of the major competitors in this space is what really made these appealing, but I also like the low profile nature of these brackets as well.
Step 1:
Remove the plastic trim panel on either side of your vehicle. These covers can be found at the base of the windshield on both the driver and passenger side. These trim panels cover the mounting location needed for the new brackets. To remove, I found that using a plastic pry tool worked best. Open the hood to gain additional access if needed. I used the pry tool to create leverage by applying upward pressure on the trim panel. These panels are held in by three clips and can be a little stubborn to remove, but with the pry tool, they shouldn't put up too much of a fight.

Step 2:
A) This is the first point I had to make a modification to my bracket. The mounting hardware from my pod lights would not fit through the pre-drilled holes on the bracket. I have read that this is common on nearly all of the pod light hardware. Rather than go purchase new hardware, I decided to drill my brackets out to the correct size. Be sure to check your hardware for fitment before installing the brackets on the truck and then realize that your mounting hardware is too large. I lost some time here because I had to pull everything off and then make the necessary adjustments.

B) Remove the fender bolts (1 per side) that are located under the trim panel covers that were just removed. Put the Putco bracket in place and re-install the fender bolt. Note: I believe these brackets may be specific to each side of the vehicle. I tried testing both on each side just to compare fitment, and I found that they will sit at slightly different angles. One angle sits more forward than the other. Make sure you install these where they sit further back so that you do not have clearance issues with the brackets or lights when opening your hood.

Step 3:
This is another point where I ran into the need to make a slight adjustment. The plastic panel would not reinstall properly with the bracket in place. I have heard and read reviews of some being able to install this bracket without trimming the plastic panel cover, and others that have had to trim it just as I have. Before trimming, I tried making several adjustments to the bracket and it just wasn’t happening. The panel would not re-engage with all 3 of the mounting locations, and it continuously would pop loose. The first photo below shows the panel gap before trimming, and the photos following show the adjustments I made to correct the fitment. I measured the area, marked it out, and used a dremel tool to carve out the necessary area to create the best fitment. After trimming, the panels locked back securely in place.


Step 4:
Install your lights. Again, I had to make an adjustment here, but this was not due to the Putco brackets. The mounting bolts for my lights were entirely too long, and they would have made contact with my fender. I had to cut those down considerably in order to make them fit. Additionally, you could also create a channel for the light’s wiring and run the wires under the panel cover as well. I have not decided if I am going to do that yet or not, but I do think it would create an even cleaner install. My lights are not wired up yet as I’m waiting on a few parts to arrive so that I can finish up the job.

Step 5:
Check fitment. Remember that the shape and size of the lights will vary. While I have plenty of clearance, that doesn’t mean that you will. Check the full travel of your hood to make sure that your lights or brackets do not make contact or interfere at all.
Conclusion:
These seem to be a decent option, especially at their price point, but if interested, just anticipate needing to modify the brackets in some fashion to make them work on your vehicle. If you have that expectation already set in mind before getting into this install, you shouldn’t really run into any other surprises. If you’re looking for something that doesn’t require any modifications to be made, I’d recommend looking at some of the other bracket options that are out there.


Product Link: Putco RAM 1500 Luminix Hood Mount Light Brackets 2200 (19-23 RAM 1500) - Free Shipping
Price: $44.99
Install Difficulty: 1 out of 5
Install Time: Approximately 30 minutes
Couldn't really find much information on here about these from an installation standpoint, so I decided to throw together a quick how-to for the Putco A Pillar light brackets. Install is very straight forward, but these brackets may require slight modification for your specific application. With the potential modification considered, I'd still rate this at a 1 out of 5 on a difficulty scale. I decided to give these a shot based on the recommendation from a few others on here. The price of these compared to some of the major competitors in this space is what really made these appealing, but I also like the low profile nature of these brackets as well.
Step 1:
Remove the plastic trim panel on either side of your vehicle. These covers can be found at the base of the windshield on both the driver and passenger side. These trim panels cover the mounting location needed for the new brackets. To remove, I found that using a plastic pry tool worked best. Open the hood to gain additional access if needed. I used the pry tool to create leverage by applying upward pressure on the trim panel. These panels are held in by three clips and can be a little stubborn to remove, but with the pry tool, they shouldn't put up too much of a fight.
Step 2:
A) This is the first point I had to make a modification to my bracket. The mounting hardware from my pod lights would not fit through the pre-drilled holes on the bracket. I have read that this is common on nearly all of the pod light hardware. Rather than go purchase new hardware, I decided to drill my brackets out to the correct size. Be sure to check your hardware for fitment before installing the brackets on the truck and then realize that your mounting hardware is too large. I lost some time here because I had to pull everything off and then make the necessary adjustments.
B) Remove the fender bolts (1 per side) that are located under the trim panel covers that were just removed. Put the Putco bracket in place and re-install the fender bolt. Note: I believe these brackets may be specific to each side of the vehicle. I tried testing both on each side just to compare fitment, and I found that they will sit at slightly different angles. One angle sits more forward than the other. Make sure you install these where they sit further back so that you do not have clearance issues with the brackets or lights when opening your hood.
Step 3:
This is another point where I ran into the need to make a slight adjustment. The plastic panel would not reinstall properly with the bracket in place. I have heard and read reviews of some being able to install this bracket without trimming the plastic panel cover, and others that have had to trim it just as I have. Before trimming, I tried making several adjustments to the bracket and it just wasn’t happening. The panel would not re-engage with all 3 of the mounting locations, and it continuously would pop loose. The first photo below shows the panel gap before trimming, and the photos following show the adjustments I made to correct the fitment. I measured the area, marked it out, and used a dremel tool to carve out the necessary area to create the best fitment. After trimming, the panels locked back securely in place.
Step 4:
Install your lights. Again, I had to make an adjustment here, but this was not due to the Putco brackets. The mounting bolts for my lights were entirely too long, and they would have made contact with my fender. I had to cut those down considerably in order to make them fit. Additionally, you could also create a channel for the light’s wiring and run the wires under the panel cover as well. I have not decided if I am going to do that yet or not, but I do think it would create an even cleaner install. My lights are not wired up yet as I’m waiting on a few parts to arrive so that I can finish up the job.
Step 5:
Check fitment. Remember that the shape and size of the lights will vary. While I have plenty of clearance, that doesn’t mean that you will. Check the full travel of your hood to make sure that your lights or brackets do not make contact or interfere at all.
Conclusion:
These seem to be a decent option, especially at their price point, but if interested, just anticipate needing to modify the brackets in some fashion to make them work on your vehicle. If you have that expectation already set in mind before getting into this install, you shouldn’t really run into any other surprises. If you’re looking for something that doesn’t require any modifications to be made, I’d recommend looking at some of the other bracket options that are out there.
Last edited: