
I figured I'd post this up as I installed my sliding bed rails today in preparation for getting a sliding tool box. I haven't found anyone here yet that has bought and installed the sliding tool box so I guess I'm going to be the guinea pig.
What's in the box: 16 nut inserts, 16 acorn head bolts, two rails and a set of instructions that have no words, only pictures. Frankly this new way of including instructions with only pictures pisses me off these days but that's another matter entirely.
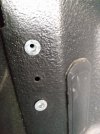
If you look at the bed of your truck, you'll see 4 sets of top and bottom holes close together. This is where the rails will be mounted.
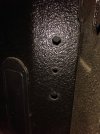
To begin with: if you have a spray in bed liner, you need to get a utility knife and trim away any liner that's in the holes. I thought I could make the inserts muscle through, but no dice. I spent more time trying to tap one in without trimming than it took me to trim all the other holes. See pictures.
Once the holes are cleaned up, tap the inserts into the holes. Then you need a 10mm socket and extension, and one of the bolts. You need to run that bolt all the way to bottom out, then crank a little more. The instruction pictures show 9 lbs of torque. I have a pretty good calibrated arm so I didn't bother with my torque wrench, but you can't give it much more than than as the inserts will spin in the holes. After you tighten it down, take the bolt back out and you'll notice that the insert is now stuck in there. These don't look like mushroom inserts but they are.
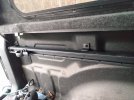
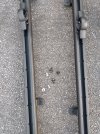
Once that is done grab a rail and put it up. The rails are interchangeable so it doesn't matter which one. The rails have plastic locator pins in each end. You don't need these. The one by the truck can goes in easy but the one by the tailgate just flexes and bends. I fought with the drivers side for 15 minutes. I took a utility knife and cut the passenger side off in 1.5 seconds. All they are for is to help you position it until you get the bolts started. Once you get it lined up, put in all the bolts loosely. Then the pics say to tighten to 10 lbs. I used my calibrated arm but again if you don't have a calibrated arm use a wrench because you can't gorilla these things on.
That's about it, really. They come with two sliding anchors and you can position those anywhere. If you have a truck cap like I do, these clear the cap.
When I get my toolbox I'll do another write up, as the tricky thing will be to see if the toolbox clears the bump outs on the truck cap.
What's in the box: 16 nut inserts, 16 acorn head bolts, two rails and a set of instructions that have no words, only pictures. Frankly this new way of including instructions with only pictures pisses me off these days but that's another matter entirely.
If you look at the bed of your truck, you'll see 4 sets of top and bottom holes close together. This is where the rails will be mounted.
To begin with: if you have a spray in bed liner, you need to get a utility knife and trim away any liner that's in the holes. I thought I could make the inserts muscle through, but no dice. I spent more time trying to tap one in without trimming than it took me to trim all the other holes. See pictures.
Once the holes are cleaned up, tap the inserts into the holes. Then you need a 10mm socket and extension, and one of the bolts. You need to run that bolt all the way to bottom out, then crank a little more. The instruction pictures show 9 lbs of torque. I have a pretty good calibrated arm so I didn't bother with my torque wrench, but you can't give it much more than than as the inserts will spin in the holes. After you tighten it down, take the bolt back out and you'll notice that the insert is now stuck in there. These don't look like mushroom inserts but they are.
Once that is done grab a rail and put it up. The rails are interchangeable so it doesn't matter which one. The rails have plastic locator pins in each end. You don't need these. The one by the truck can goes in easy but the one by the tailgate just flexes and bends. I fought with the drivers side for 15 minutes. I took a utility knife and cut the passenger side off in 1.5 seconds. All they are for is to help you position it until you get the bolts started. Once you get it lined up, put in all the bolts loosely. Then the pics say to tighten to 10 lbs. I used my calibrated arm but again if you don't have a calibrated arm use a wrench because you can't gorilla these things on.
That's about it, really. They come with two sliding anchors and you can position those anywhere. If you have a truck cap like I do, these clear the cap.
When I get my toolbox I'll do another write up, as the tricky thing will be to see if the toolbox clears the bump outs on the truck cap.
Attachments
Last edited:


