Kevin O'Leary
Active Member
- Joined
- Nov 28, 2019
- Messages
- 60
- Reaction score
- 29
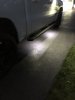
Is there a way to make the floor lighting stay on and serve as an ambient light for night drives? (My truck does'nt have the full ambieng lighting package...)
I went the OEM way... you do have to remove the old light assembly and connector; install the new factory assembly, new connector, and an extra wire for the ambient side of the light... i added one under each side of the dash and one under each side of the front seats in the factory locations... they are not terribly bright but they do the job... I am also adding factory ambient to each door... I will post the factory parts numbers in a day or so...

@T32--- I am on duty for the next 24 so I little patience, I am digging up what I can from memory... the ambient dimmer was already present in my vehicle and I picked up the dimmer wire from the factory plug if the ambient lights were present from factory. As far as the pins, I just re-pined the wires, I will post what I used when my shift ends.... For the under the front seats, you locate the yellow plug and see if the cavities are filled with the needed wiring. Mine was not, so i made harnesses to go under dash to the yellow plug, from the other side of the plug went to another harness that supplied the new light under the seats... Use the reference URL above and look for XY410A and XY420A.... those are yellow plugs, and from there you'll be able to find what cavity does what. Mine looks factory and you could not tell the difference... more to follow----
-=FM45=-
Go here---
Switch, Headlamp.. 2019 Ram 1500 5.7L HEMI V8 4WD LARAMIE CREW CAB - Myrtle Beach SC
2019 Ram 1500 5.7L HEMI V8 4WD LARAMIE CREW CAB Switch, Headlamp.www.moparpartsinc.com
you will see 4 listed, the key is look for overhead cupholder lamp... that lamp is controlled by the ambient dimmer switch....
So your truck doesn't have the 2 side by side dimmer wheels ???
-=FM45=-

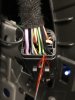
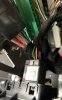
My plug is exactly like the pic you posted... the wht/gn wire is the ambient wire but you don't pick it up at the switch itself; our trucks use mux/data/resistance to send multiple info down one wire -- network like. You need to find the body control module, drivers side kick upper towards firewall, connector C6 and pin /wire 7 --- that is the white/green wire that controls ambient lighting... That wire should be present ... another question -- does your overhead console have the small led ambient light present but just not activating??
-=FM45=-

I am interested in this as well. I do have led package already and have led lights in foot well. I did hijack the connection from them and added led lights under back seat as well and didnt have issue so far. I am in NH. Where in MA are you?If you are referencing the plug behind the head light switch and dimmer, I believe all wires are present-- you leave as is.... Look at the BCM and locate C6 and see if the wire is present... If it is, I think if you change the switch to one that has a dimmer/ambient knobs and make the proper setting change with Alfa, your over head led would be working.... What part of the world are you from... if you are local I would be happy to assist you; I am in MA .... Again these vehicles use 1 wire to do multiple commands, the days of adding power or ground to a circuit are nearly over, DATA is the new game....
-=FM45=-
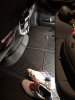
View attachment 67299
C6 = large white plug w/gray lock