
I do not think any. You need to take the cover behind the vent in the front on the bottom. Its on by a few clips. I have yet to do it but once that is off, the bracket will bolt to existing holes.So what modifications to the kit are necessary for the Rebel?
5thGenRams Forums
You are using an out of date browser. It may not display this or other websites correctly.
You should upgrade or use an alternative browser.
You should upgrade or use an alternative browser.
Easy and Cheap 20" Light Bar DIY Install (no fabrication needed)
- Thread starter SiRay6
- Start date
ramButz
Ram Guru
yes they do say that.but it will fit perfectly.heres mySo does this kit contain the brackets we are talking about? I am in the market to do a similar setup once my Rebel comes in. Also this kit specifically states it won't work on the Rebel, anyone know why and what modifications are necessary to make it work? Or is there another RC kit and bracket set that does?

20" LED Hidden Bumper Kit | Ram 1500 (19-24)
20" LED Hidden Bumper Kit | Ram 1500 (19-24)www.roughcountry.com
Attachments
ramButz
Ram Guru
yes they do say that.but it will fit perfectly.heres my
Attachments
Dansjeep2000
Active Member
- Joined
- Mar 1, 2021
- Messages
- 107
- Reaction score
- 113
- Points
- 43
- Age
- 47
Thank you!!yes they do say that.but it will fit perfectly.heres my
this tells you exactly what hardware you need (except I skipped the larger fender washers and when with a standard size)Thank you!!
lukesteeler89
Active Member
- Joined
- Oct 22, 2019
- Messages
- 46
- Reaction score
- 68
- Points
- 18
- Age
- 36
Glad someone answered this for you! The RC light bar kit is Part No. 70778, and just call and say you need the driver and passenger side brackets in that kit. Mine came out to $29.95, plus tax and bs- $32.34 out the door.Thanks, I will give them a call tomorrow.
Chris3058
Ram Guru
so the RC kit for the Rebel works...but not the ED? Intercooler must be the issue or has someone with the ED put one in?
Hello. I want to do this to my Rebel. I have already got a switch panel, ditch light mounts, and some other lights coming in. I have been holding off on this though. I do not have parking sensors, and it looks like you could almost double the light bar size without the sensors. Anybody done that? Probably will just need to get some generic angle brackets like the OP. I havent looked under it in a while, so need to climb back under and check if anything is in the way on the sides to go bigger. I wish someone made a kit that wasnt hidden and replaced the lower grille. I liked that on my 4th gen 2500 i could put one in the bumper that was pretty flush and looked liked it belonged there.
ChadT
Ram Guru
- Joined
- Oct 20, 2018
- Messages
- 747
- Reaction score
- 916
- Points
- 93
i got my off of ebay.they are not to expensive only cost 40.00$")
Thank you for all the information guys! I've learned a ton from this thread as I'm cobbling together parts for a lightbar setup for the truck.
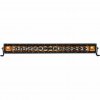
I ordered this 20in one from Rigid:

Not inexpensive, but should hide pretty well behind in the front of the truck.
I won't blab on and de-rail the thread, I MIGHT start my own, but this is a thank you all!
The thread was a good read!
ChadT
Ram Guru
- Joined
- Oct 20, 2018
- Messages
- 747
- Reaction score
- 916
- Points
- 93
this tells you exactly what hardware you need (except I skipped the larger fender washers and when with a standard size)
Today I went to a hardware store to buy the bolts, washers, etc.
I am soooo ready!
The parts thusfar:
- ebay lightbar bracket
- home debot bolts and washers
- rigid lightbar, 20in midnight SR
- rough country wireless "doohickey"
What I'm curious about, I'm wondering if I can pair the rough country wireless unit with one of the homelink garage door buttons due to the radio frequency.
If that's true, the theory could work for other guys and their lightbars regardless of cost right?
What I'm curious about, I'm wondering if I can pair the rough country wireless unit with one of the homelink garage door buttons due to the radio frequency.
If that's true, the theory could work for other guys and their lightbars regardless of cost right?

Using Homelink buttons to power lights
I did a little video to show how to use the Pilot PL-SW29 remote unit to hook up auxiliary lighting to the Homelink buttons. Doing it this way eliminates the need to run wire into the cab or mount switches. So if you don't have the Aux switches from the factory, don't fret. I got you covered...
 www.jeepgladiatorforum.com
ChadT
Ram Guru
- Joined
- Oct 20, 2018
- Messages
- 747
- Reaction score
- 916
- Points
- 93
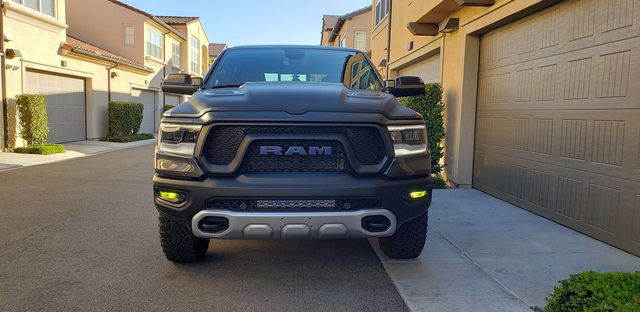
While this is semi off topic (As it's a Rigid lightbar), A BIG thank you to the guys in this thread for allll the information you posted!
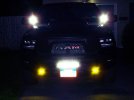
Ebay brackets, Rigid lightbar off ebay for ~$450, and here's the results.


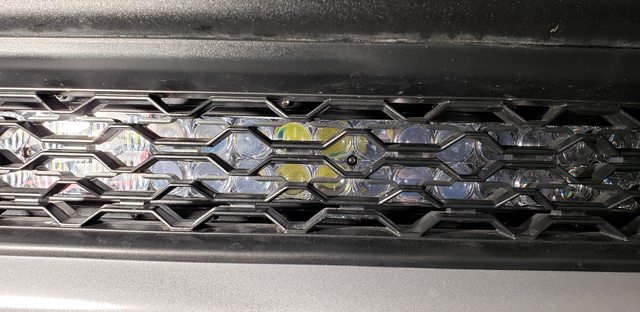
And yes, it's installed in this photo! It hides very well.


The goal I've had with the mods I've done on the truck, was generally to improve a few things while avoiding making negative tradeoffs toward the vehicle's performance. I wanted to keep the look within "margin of stock."
The untrained eye might not notice, but someone else with the truck can tell what's going on!
The lightbar is pretty well hidden by lightbar standards. Between the ebay bracket's high height, the single row bar form factor, AND the Rigid "midnight" (Blacked out) look? It hid well.
I really could not have asked for better.
For those on the fence about lightbars? If nothing else it's fun, it really is.
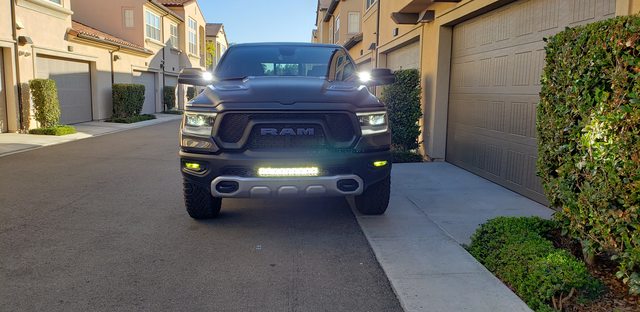
It's so much fun. I think this bar is a spot-light setup, I don't think any of the reflectors are "flood."
You can see forever and ever with them.
Longer a path you have in front of you, the better.
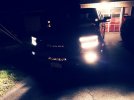
Other night I'm coming home, I hit the long driveway, taking the turn with speed because the Toyo AT3 tires have great lateral grip and the falcon shocks are very planted. Magnaflow exhaust roars, and I flick on the lightbar, All 15,840 lumens of it.
Between the light and sound?
Alllll the woodland critters showed off their 40 times!
They just scattered.
I call it the "Off my lawn 9000"
In terms of height angle and brightness, when the bar was on it rendered the highbeams kinda useless. For the beam pattern, it's fuller/better go to with lowbeams, lowerlights on, lightbar on - but only when other drivers aren't present, period no exceptions.
Throwing this much light into another driver is downright dangerous.
Ebay brackets, Rigid lightbar off ebay for ~$450, and here's the results.
And yes, it's installed in this photo! It hides very well.
The goal I've had with the mods I've done on the truck, was generally to improve a few things while avoiding making negative tradeoffs toward the vehicle's performance. I wanted to keep the look within "margin of stock."
The untrained eye might not notice, but someone else with the truck can tell what's going on!
The lightbar is pretty well hidden by lightbar standards. Between the ebay bracket's high height, the single row bar form factor, AND the Rigid "midnight" (Blacked out) look? It hid well.
I really could not have asked for better.
For those on the fence about lightbars? If nothing else it's fun, it really is.
It's so much fun. I think this bar is a spot-light setup, I don't think any of the reflectors are "flood."
You can see forever and ever with them.
Longer a path you have in front of you, the better.
Other night I'm coming home, I hit the long driveway, taking the turn with speed because the Toyo AT3 tires have great lateral grip and the falcon shocks are very planted. Magnaflow exhaust roars, and I flick on the lightbar, All 15,840 lumens of it.
Between the light and sound?
Alllll the woodland critters showed off their 40 times!
They just scattered.
I call it the "Off my lawn 9000"
In terms of height angle and brightness, when the bar was on it rendered the highbeams kinda useless. For the beam pattern, it's fuller/better go to with lowbeams, lowerlights on, lightbar on - but only when other drivers aren't present, period no exceptions.
Throwing this much light into another driver is downright dangerous.
Do you have a link to the eBay brackets?While this is semi off topic (As it's a Rigid lightbar), A BIG thank you to the guys in this thread for allll the information you posted!
Ebay brackets, Rigid lightbar off ebay for ~$450, and here's the results.
View attachment 101538
View attachment 101539
And yes, it's installed in this photo! It hides very well.
View attachment 101540
View attachment 101541
The goal I've had with the mods I've done on the truck, was generally to improve a few things while avoiding making negative tradeoffs toward the vehicle's performance. I wanted to keep the look within "margin of stock."
The untrained eye might not notice, but someone else with the truck can tell what's going on!
The lightbar is pretty well hidden by lightbar standards. Between the ebay bracket's high height, the single row bar form factor, AND the Rigid "midnight" (Blacked out) look? It hid well.
I really could not have asked for better.
For those on the fence about lightbars? If nothing else it's fun, it really is.
It's so much fun. I think this bar is a spot-light setup, I don't think any of the reflectors are "flood."
You can see forever and ever with them.
Longer a path you have in front of you, the better.
Other night I'm coming home, I hit the long driveway, taking the turn with speed because the Toyo AT3 tires have great lateral grip and the falcon shocks are very planted. Magnaflow exhaust roars, and I flick on the lightbar, All 15,840 lumens of it.
Between the light and sound?
Alllll the woodland critters showed off their 40 times!
They just scattered.
I call it the "Off my lawn 9000"
In terms of height angle and brightness, when the bar was on it rendered the highbeams kinda useless. For the beam pattern, it's fuller/better go to with lowbeams, lowerlights on, lightbar on - but only when other drivers aren't present, period no exceptions.
Throwing this much light into another driver is downright dangerous.
ramButz
Ram Guru
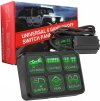
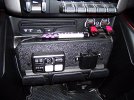
i used a GangSwitch.IMHONice write up. How are you powering the leds?
Attachments

ramButz
Ram Guru
that the manuf. i went withThank you for all the information guys! I've learned a ton from this thread as I'm cobbling together parts for a lightbar setup for the truck.
I ordered this 20in one from Rigid:
View attachment 99651
Not inexpensive, but should hide pretty well behind in the front of the truck.
I won't blab on and de-rail the thread, I MIGHT start my own, but this is a thank you all!
The thread was a good read!
Attachments
Truck$-4life
Active Member
- Joined
- Apr 16, 2022
- Messages
- 57
- Reaction score
- 8
- Points
- 8
- Age
- 32
I ordered the 40 inch bar. Shouldn't terribly hard to find mounting brackets, but haven't found them yet. Honestly about to just find an easy spot to mount then have my buddy fab a set. Cheap and super strong stuff, if anyone has any ideas lmk plz
dannydyn
Well-Known Member
First of all, great looking setup, and more importantly - thank you for taking the time to post pictures and provide links to the posts. Definitely will have to go with this solution.I'll share some pics first and then give a write-up.
I ordered my 20" Caliraisedled Light bar based off favorable reviews from the Tacoma and 4Runner peeps. The light portion is 20 inches but the overall length is 22 inches.
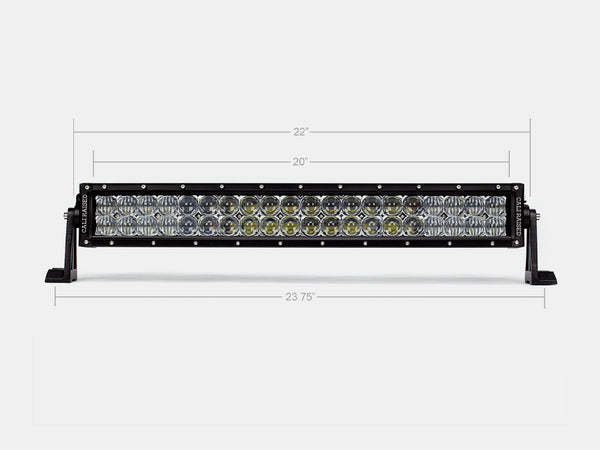
22" Dual Row 5D Optic OSRAM LED Bar
Shop at Cali Raised LED for the latest 22" Dual Row 5D Optic OSRAM LED Bar a strong, high-quality off-roading accessory for your vehicle.caliraisedled.com
This is my first Domestic vehicle and first truck but I have always modified my vehicles. I have been wanting to install a light bar in the lower grill position but have been undecided as to which kit to go with. My research led me to Rough Country's kit, M&R Dual Light Bar, to Baja Design's kit but I wanted to find the easiest way to do it myself without costing me an arm and a leg for something that I will rarely use. I do plan to take more trips with my family and two young kids (7 and 3) but it isn't something I need on a daily basis where I live. I can always upgrade to Rigid or Baja Designs if it is warranted based off use/need.
Some key highlights, cutting with a dremel is optional, but you need to drill 2 holes. If you are able to do this, keep reading. You will need some hardware, I used allen bolts, nylon lock nuts, and washers I found in my garage. I also love that I don't need to mess around with centering the light bar since we are installing it on factory components that are already centered!! YES!! haha
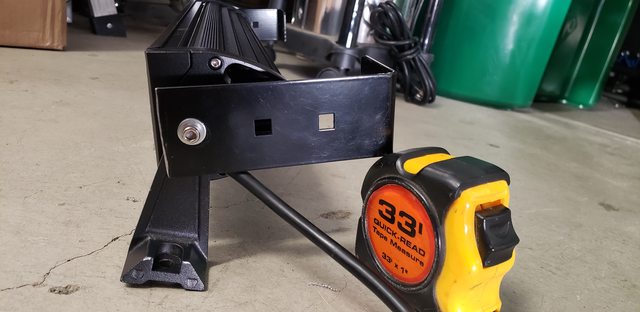
I came across these $24 brackets from etrailer and after some measuring and lot of luck, everything will work.
.
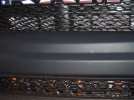
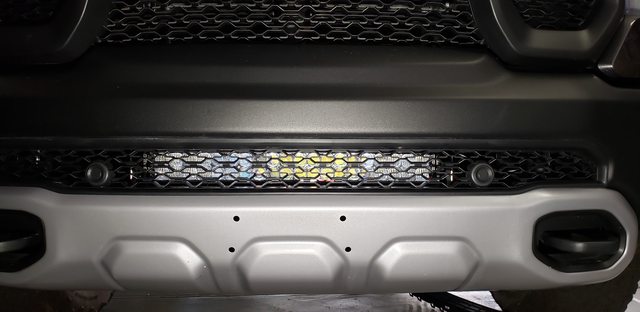
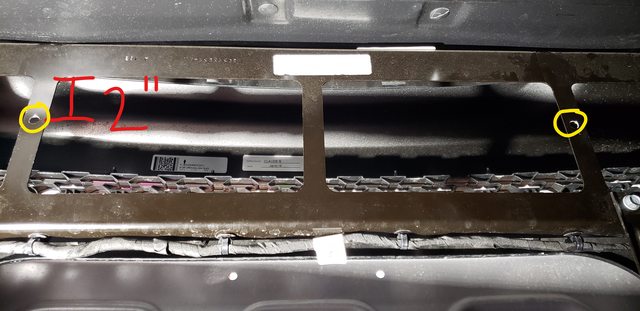
1) Remove the lower front grill, this has been covered in other threads quite extensively. You can pull it off by hand, start from the top and work your way around. Watch out for front parking sensor if you have it. I don't have pictures but I had to remove one bracket in order to fully remove the grill out of the bumper. It is a vertical bracket and prevents the grill cover from being pulled out of the bumper.
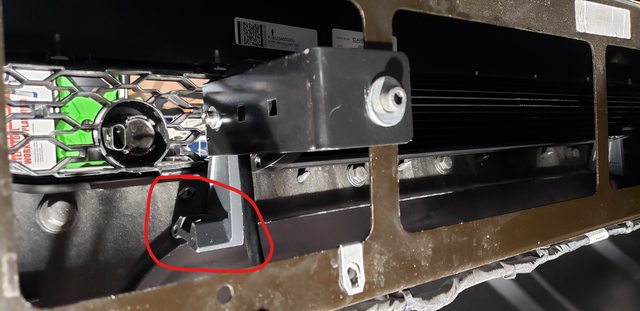
2) I cut off a few inches from the etrailer bracket because it will make contact with the front grill. I was also concerned that it would somehow block light output so I took out my dremel and cut off about 2inches. See below pictures of the bracket mounted on the light bar. You can see where I cut the bracket off to the left side of the picture (yes I should have touched the cut up with some paint to prevent rust).
3) My light bar came with side brackets which i installed in conjunction with the etrailer brackets. The main reason I did was to take advantage of the detents/notches in the bracket so the light bar doesn't inadvertently change angles while driving or hitting a bump. As luck will have it, there is a second benefit which I will get into later.
4) Mount the brackets like pictured. I made sure the etrailer brackets were installed as straight as possible knowing that I could adjust the angle once everything was installed on the truck. See pics.
5) On the bracket behind the lower grill you will need to drill two holes. I measured 2 inches below the top (see pictures) on both sides. I believe I used a 5/16" drill, but your needs will depend on your hardware.
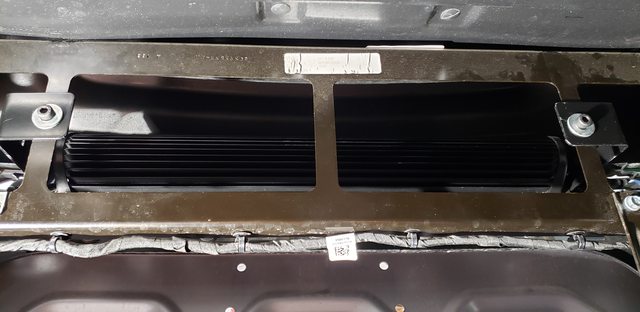
6) Bolt on your bracket and light bar unit to those two holes you drilled in step 5.
7) In step 3, I mentioned an additional benefit of the brackets that came with my lightbar. I was concerned that too much weight was being supported by the etrailer L bracket and thought my light bar was going to vibrate and shake a lot, especially during offroad use. Well, as luck would have it, the brackets that came with my light bar rests perfectly on a metal lip on the back of the bumper about 1/8 - 1/4" deep. So the front of the light bar is seated snuggly on top of this ledge bearing the weight of the front while the etrailer bracket supports the rear of the light bar.
I know this seems ghetto, but this is why it is a DIY and not a $600-$900 kit LOL. I am more excited about the fact that everything worked out so well, this rarely happens to me.

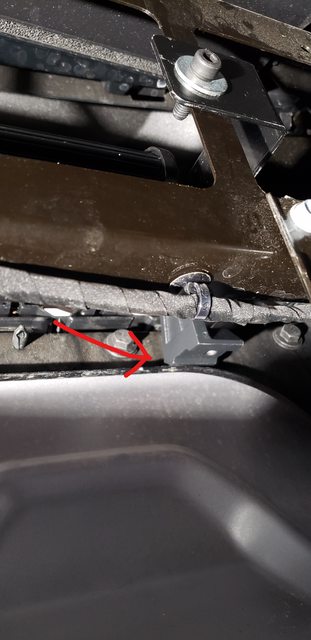
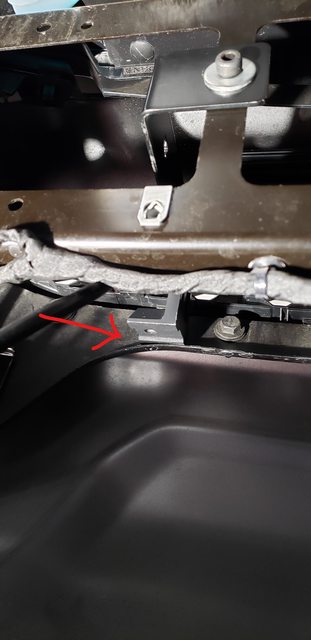
If I may float an idea here: For the light bar brackets that are resting on the bumper ridge, I would drill a hole on each side of the bumper ledge, and run a ziptie through the drilled hole and the hole on the bracket. The zipties should prevent any potential vibrations/knocking sounds against the bumper.
Great setup! And thank you again.
akostaac
Active Member
I ordered the 2 piece lower grill and M&R 40” light bar with amber drl. How bad was the install for you? Any pics? Thanks in advanceI ordered the 40 inch bar. Shouldn't terribly hard to find mounting brackets, but haven't found them yet. Honestly about to just find an easy spot to mount then have my buddy fab a set. Cheap and super strong stuff, if anyone has any ideas lmk plz

Users who are viewing this thread
Total: 1 (members: 0, guests: 1)


