New to the site, but I joined specifically to contribute here, as I was frustrated that I couldn’t get this seemingly easy task accomplished. I’ve played with this for a few hours now, and the original poster is correct in that this can be accomplished simply by removing the T9 screw at the end (exposed when you pull the handle). The process is nearly identical for the front doors with proximity sensors and lock button (I’ll elaborate below). I bought x4 handle assemblies as others have pointed out above, because I could not figure out the part number for ONLY the handle cover. The body matched handles are one piece and do not have the insert. The chrome insert can be removed but not without breaking the insert itself, and the finish behind is such that you couldn’t just take the insert out and clean off the adhesive. There is an abundance of adhesive behind it and as a result you must pry too hard and the cheap plastic piece will break which eliminates the chances of painting it separately.
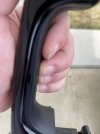
1) Pull the handle to expose and remove the T9 screw. I shoved a small microfiber towel between the handle and door to hold it in the pulled position.
2) With the handle pulled out and the screw removed, pull the cover out (pry with minimal force at both the top and bottom). The key is to minimize the outward travel once it “pops”, and to only pull from the rear of the handle
3) As others have noted, now the front part will become a pivot point, allowing the rear to pull outward, and you will be tempted to continue pulling and leveraging it out BUT DON’T. 4)There are two plastic tabs at the front end that are NOT made to be pried outward. I learned this through trial and error, and broke both tabs, but luckily I did this on the covers I was replacing so I didn’t care. Rather than using force and breaking these tabs, I would practice taking it off correctly so you get a feel for how it will go back on. With the handle released in (I took my towel out), you will need to pull out on the handle every-so-slightly (10-20% of the way) and slide the handle toward the front of the truck. It takes more force than you would expect, and the angle is such that it may feel like you are pushing the cover into the truck door but the tabs are only 1mm long and it doesn’t have to travel forward very far before it comes off
5) The sensor itself is fully housed and will hang by the wires once the cover is off. Once you have removed your new cover from the handle assembly you purchased, you can play around with the fit of the sensor before putting it on. The square-looking button must face out, and at the end there literally a square peg that fits into the square hole of the cover. A retention spring on the sensor will hold it loosely in place.
6)To put the new one on, you have to start by sliding the front side on. This was the part I couldn’t figure out for a while, because you have to get it overlayed just right, with maybe 10% overhanging to the front, and there isn’t a natural way for it to slide on. Instead the plastic on the front part of the cover needs to wiggled and bent slightly so the tabs can slide in. This will make more sense when you experience it first hand. Again, it slides on, but with the handle slightly pulled and open
7) once the tabs are slid into place and the cover is all the way back, release the handle, and snap the rear into place. Then pull the handle and put the T9 screw back. You are done!
Tips: leave the back part of the door handle (where the key goes on the driver door) alone. Also, you will see another T4 screw behind the handle that goes into the door. You may think this needs to be removed, it doesn’t, leave it alone


 8CAF1D02-12CB-4B7A-9A54-72B2280389FB.jpeg69.2 KB · Views: 45
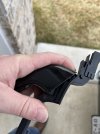 E33A483D-D2AA-4759-87BF-3EFD83561C39.jpeg92.3 KB · Views: 45
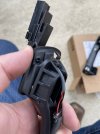 76C94F98-7D3E-4FD2-AEEF-7BF230F94F2A.jpeg86.6 KB · Views: 45
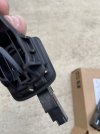 249F257D-7658-4A65-A58A-B72501C2FC98.jpeg71.6 KB · Views: 45
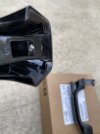 807CA46A-891B-4329-91C1-8BB832B7E14C.jpeg72.7 KB · Views: 44
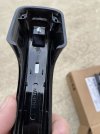 A6304AC7-E089-4978-AA0F-B31B2C7CCCA5.jpeg94.2 KB · Views: 45
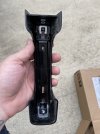 A5C60178-AA0C-4FF1-AEE3-C1E9313078D2.jpeg115.1 KB · Views: 45
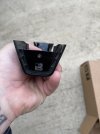 770A9C29-66C6-4E4D-B290-0027EA84068A.jpeg84.4 KB · Views: 43


