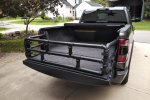
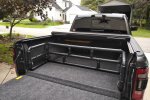
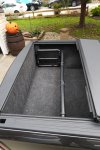
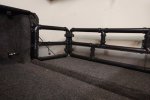
If anyone is considering a bed extender/divider, and you're looking for DIY ideas before you drop $250+ on one I made this post for you. I was looking for ideas but couldn't find any so I had to wing it. In the end (with revisions/modifications) I've spent under $100.
I made mine hinge, and I put mesh along the bottom but if you don't want it to fold, and don't want the screen you can do this for about $60 - $70 depending on the price of materials in your area.
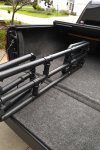
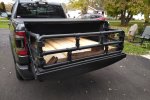
I made it from 1.5" black plastic drain pipe (aka Charlotte pipe). You can glue the pipes together for a smoother look, but I used hex head screws for a more "industrial" look. You could also use black drywall screws if you don't want to deal with the mess of glue, and don't really want the screws to show. These are what I used for the screen, after test fitting it with zip ties.
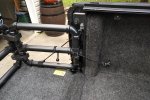
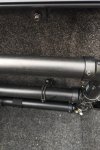
To secure it in the extension mode, I tied crab style clamps (found with other dog leash clamps) on each side. They're tied around the middle rail on the end post via paracord. These clamp to the tie down with the extender snug against he rubber tailgate stoppers. On the bottom rail I've got a piece of velcro which wraps around the tailgate cable. ← These can be seen in photo "bed extender (7)"
To secure it in the divider mode I have a bungee ball attached to the middle rail. These loop through the tie down, and the divider is prevented from sliding forward by the wheel well hump. ← These are seen in photos "bed extender (2)" and "bed extender (4)"
The screen is black coated aluminum gutter guard. It's not in most of the photos because it was a adaptation to prevent small stuff from getting through the gap after I used it a few times. ← Seen in photo "bed extender (11)"
I made the hinges out of wood blocks simply because I could, but tou could use actual hinges if you didn't want to take the time to make your own. By adding hinges it will fold "flat" allowing you to easily store it if it's in the way, but it will cost a little more in materials because you'll have to make 2 more posts.
If you want it solid instead of foldable, you'll need 4 less T's and 2 less 90's. Instead of making vertical posts at the ends, you'll put 90's to connect the lateral and longitudinal rails to create a squared off U instead of 3 flat rails connected by hinges.
I know this isn't fancy so it's not for someone who is mainly concerned with appearances. I made it all black so it doesn't look like poo, but this isn't show truck stuff. This is a diy project for something that cost 3x as much if you buy it retail. It does the same job, by allowing you to haul an 8' item flat in the bad as an extender (assuming you have the 6.4 bed), and keeps your groceries from sliding to the front as a divider (for any size bed). Basically, I'm posting this as craft fodder for those who may be trying to come up with their own design.
Feel free to post any bed extenders and/or dividers of what you have made. Maybe we can help others out who want to save some cash, or are just plain crafty and would rather make something than buy it.
Attachments
Last edited:

