I recently had the original chuck from my VIAIR 400P wear out and no longer stay on while inflating and looked for a replacement which was close to $40. As I was looking at the different replacements, I asked myself, self, can you build something that would work better? Also, looked at some of the 4 wheel inflator/deflator hoses out there and thought that $200+ for some hoses was a bit much.
So the journey began and I decided to build a 4 wheel inflator/deflator that is specific to the length of RAM trucks.
Let me know if you have questions, help you build one, or build one for you
Step 1: Order Parts
Parts list:
1 x 3-way manifold
2 x 3-way tee
1 x 1/4" MNPT Male Tank Valve
10 x 1/4" Barb x 1/4" NPT Male Pipe
1 x Flexzilla 1/4" x 50' Air Hose, 50 ft, MNPT Fittings
4 x Air Chuck, Closed Flow 1/4" FNPT
1 x 1/4 In. X 5 Ft. Swivel Whip Air Hose
1 x 1/4 In Full Port Ball Valve
10 x .500 brass ferrule - I had these and a crimp tool so see where you can get it the cheapest. If you don't want to use ferrules, you can use any type of hose clamp, crimp or screw.
2 x 1/4 In. Female Steel Automotive Plug
1 x RectorSeal TPlus 2
1 x 1/4 In. Female Steel Automotive Coupler
I also had the Grit deflator and Viair 400p
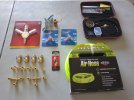
In the end I decided to replace the 3 way tees that you see above and go a different route. Tested several and was not happy with the grip the barbs had. The option I went with is in the parts list. Also, only ended up with one ball valve.
Step 2: Build Manifold
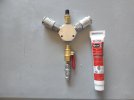
-Remove the center quick connect and the bottom 1/4 inch plug
-Screw 1/4" MNPT Male Tank Valve to the center spot on top
-Screw 1/4 In Full Port Ball Valve to the bottom
-Screw the 1/4" plug you removed earlier into the ball valve
Remember to use thread sealer
Step 3: Measure and cut
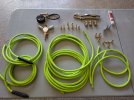
-2 x 8 foot hoses with 1/4" MNPT - Make sure to cut from the ends and leave the existing 1/4" MNPT fitting in place and not cut them off
-2 x 3 foot hoses
-2 x 14 foot hoses
Step 4: Hose creation
-Put the ferrules on the open ends of the hoses and insert the 1/4" Barb x 1/4" NPT Male Pipe
-Crimp ferrules
Step 5: Assemble
-Screw Air Chuck, Closed Flow 1/4" FNPT to one end of each 14' and 3' hose
-Screw all remaining open brass 1/4" MNPT ends to the brass 3-way female barstock tee
-Screw 1/4" plugs to flexzilla ends
Remember use thread sealer
Step 6: Plug it together, fill a bucket with water, pressurize line to 120psi with a compressor, and submerge in water to look for leaks.
The only bubbles would come from the air chuck end. They leak slightly at this PSI.
Step 7: Screw the quick releases to the ends of the 1/4 In. X 5 Ft. Swivel Whip Air Hose.
-Re-use the quick release you removed from the manifold earlier to the female end. The other quick connect you bought on the male swivel side.
Remember use thread sealer
Step 8: Step back, pour a drink, and marvel at your creation
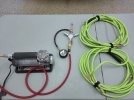
My crimps aren't the prettiest but they work
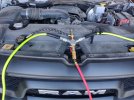
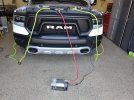
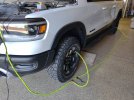
Here are some pics in use:
So the journey began and I decided to build a 4 wheel inflator/deflator that is specific to the length of RAM trucks.
Let me know if you have questions, help you build one, or build one for you
Step 1: Order Parts
Parts list:
1 x 3-way manifold
2 x 3-way tee
1 x 1/4" MNPT Male Tank Valve
10 x 1/4" Barb x 1/4" NPT Male Pipe
1 x Flexzilla 1/4" x 50' Air Hose, 50 ft, MNPT Fittings
4 x Air Chuck, Closed Flow 1/4" FNPT
1 x 1/4 In. X 5 Ft. Swivel Whip Air Hose
1 x 1/4 In Full Port Ball Valve
10 x .500 brass ferrule - I had these and a crimp tool so see where you can get it the cheapest. If you don't want to use ferrules, you can use any type of hose clamp, crimp or screw.
2 x 1/4 In. Female Steel Automotive Plug
1 x RectorSeal TPlus 2
1 x 1/4 In. Female Steel Automotive Coupler
I also had the Grit deflator and Viair 400p

In the end I decided to replace the 3 way tees that you see above and go a different route. Tested several and was not happy with the grip the barbs had. The option I went with is in the parts list. Also, only ended up with one ball valve.
Step 2: Build Manifold
-Remove the center quick connect and the bottom 1/4 inch plug
-Screw 1/4" MNPT Male Tank Valve to the center spot on top
-Screw 1/4 In Full Port Ball Valve to the bottom
-Screw the 1/4" plug you removed earlier into the ball valve
Remember to use thread sealer

Step 3: Measure and cut
-2 x 8 foot hoses with 1/4" MNPT - Make sure to cut from the ends and leave the existing 1/4" MNPT fitting in place and not cut them off
-2 x 3 foot hoses
-2 x 14 foot hoses

Step 4: Hose creation
-Put the ferrules on the open ends of the hoses and insert the 1/4" Barb x 1/4" NPT Male Pipe
-Crimp ferrules
Step 5: Assemble
-Screw Air Chuck, Closed Flow 1/4" FNPT to one end of each 14' and 3' hose
-Screw all remaining open brass 1/4" MNPT ends to the brass 3-way female barstock tee
-Screw 1/4" plugs to flexzilla ends
Remember use thread sealer
Step 6: Plug it together, fill a bucket with water, pressurize line to 120psi with a compressor, and submerge in water to look for leaks.
The only bubbles would come from the air chuck end. They leak slightly at this PSI.
Step 7: Screw the quick releases to the ends of the 1/4 In. X 5 Ft. Swivel Whip Air Hose.
-Re-use the quick release you removed from the manifold earlier to the female end. The other quick connect you bought on the male swivel side.
Remember use thread sealer
Step 8: Step back, pour a drink, and marvel at your creation

My crimps aren't the prettiest but they work
Here are some pics in use:


Last edited:


