5thGenRams Forums

Register a free account today to become a member! Once signed in, you'll be able to participate on this site by adding your own topics and posts, as well as connect with other members through your own private inbox!

Dash Insert Removal

sandrinm68

Member
Joined
Jan 20, 2019
Messages
18
Reaction score
12
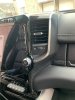
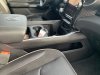
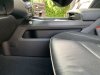
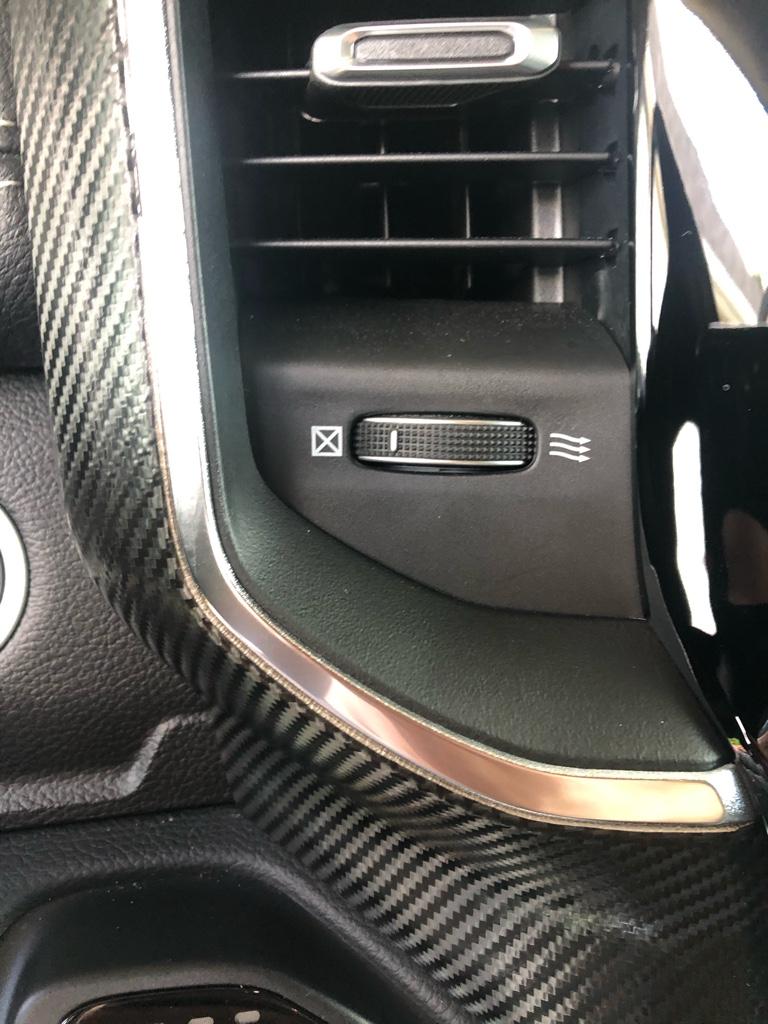
I was able to wrap the vinyl all the way around the panel I’m all areas except where it meets the chrome bezel, so was able to get a good tight stretch. Seems to be holding tight.

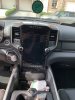
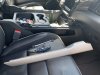
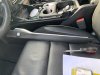
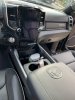
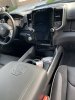
No I need to figure out the lower console pieces. Has anyone figured out how to remove the gold trim from the floor console?

I find a lot about removing the entire console, but if those pieces are fused like the upper, it will be harder to get a clean looking job.

0dd97dcff4712aaa2be024de2162bd7f.jpg


Sent from my iPhone using Tapatalk
 

Skater

Well-Known Member
Joined
May 8, 2020
Messages
496
Reaction score
330
Location
Tejas
It looks great. Looks like a lot of work to take it all apart and put it back together again.
 

sandrinm68

Member
Joined
Jan 20, 2019
Messages
18
Reaction score
12
It looks great. Looks like a lot of work to take it all apart and put it back together again.

Not too bad. It took me about 4 hours. And that was with a couple beers and a cigar.

My first attempt ever at vinyl wrap. Really not too difficult. Use heat gun and go slow.


Sent from my iPhone using Tapatalk
 

Beegle19

Active Member
Joined
Aug 22, 2018
Messages
99
Reaction score
15
Not too bad. It took me about 4 hours. And that was with a couple beers and a cigar.

My first attempt ever at vinyl wrap. Really not too difficult. Use heat gun and go slow.


Sent from my iPhone using Tapatalk
Have you attempted the wood panels yet? I'm about to do the dash but Want to do the wood center piece and door wood inserts too
 

sandrinm68

Member
Joined
Jan 20, 2019
Messages
18
Reaction score
12
No. I’ll leave those alone. The wood doesn’t bother me-at least it’s a coordinating color. For the center panel, you’ll probably have the same issue I did. No way to remove just the wood piece from the rest of the bezel without melting plastic welds. I have no idea on the door panels-I’ve never had them off on this truck.


Sent from my iPhone using Tapatalk
 

mikeru82

5thGenRams Supporter
Site Supporter
Joined
Nov 18, 2019
Messages
5,390
Reaction score
5,013
Location
The Palouse
Please pardon my ignorance, but what gold pieces are you guys referring to? I haven't noticed anything that's gold in my Laramie interior.
 

sandrinm68

Member
Joined
Jan 20, 2019
Messages
18
Reaction score
12
Please pardon my ignorance, but what gold pieces are you guys referring to? I haven't noticed anything that's gold in my Laramie interior.

Look at the fifth pic down in post #4 of this thread. It’s the plastic piece right next to the left center vent. It looks brownish in the pic but on my truck at least, is this weird goldish color that doesn’t match anything else in the interior.

Then there are two long pieces on the upper, outside part of the floor console that are the same color. Those are the ones I’m trying to figure out how to remove. I think they may be held on with clips but haven’t had a chance to work on it yet.


Sent from my iPhone using Tapatalk
 

mikeru82

5thGenRams Supporter
Site Supporter
Joined
Nov 18, 2019
Messages
5,390
Reaction score
5,013
Location
The Palouse
After looking again I see what you're describing. But in my truck it's not really gold. More of a really dark bronze. Apparently not obnoxious enough for me to even notice before. Certainly not enough to make me want to cover it with vinyl. Thanks for taking the time to explain it.
 

sandrinm68

Member
Joined
Jan 20, 2019
Messages
18
Reaction score
12
After looking again I see what you're describing. But in my truck it's not really gold. More of a really dark bronze. Apparently not obnoxious enough for me to even notice before. Certainly not enough to make me want to cover it with vinyl. Thanks for taking the time to explain it.

Now it’s probably the ONLY thing you’ll notice

Sorry...


Sent from my iPhone using Tapatalk
 

sandrinm68

Member
Joined
Jan 20, 2019
Messages
18
Reaction score
12
Well, I finally got around to wrapping gold trim on the floor console. For anyone else trying to do this, I thought I would explain how the pieces come off. My pictures show the left side – process for the right side is the same. If you’ve never vinyl wrapped before, there are tons of good videos on the internet so I won’t try to explain that process.

First, remove the knee bolster. These are held on with 4 clips and come off by gently pulling, starting from the bottom of the bolster:
1594063161211.png


Remove the 7mm screw from the front of the trim piece. You may be able to get access to this without removing the upper center instrument panel (not sure) but I had mine out anyway:
1594063200068.png


At the rear of the trim, insert a small, flat piece of plastic or metal to disengage the rear clip. I used a steel ruler but a small putty knife would work too:
1594063218957.png


The back of the trim piece that shows the clip we are disengaging with the ruler:
1594063241840.png


With the ruler still inserted, gently pry straight up, starting from the front of the trim piece. The gold trim, chrome bezel, and a piece of black trim will all come off as an assembly. It is held on with 4 clips:
1594063264604.png


To separate the gold trim from the rest of the assembly, remove the 4 torx screws and disengage the clips:
1594063287298.png


Disassembled and ready for the vinyl wrap:
1594063305217.png


Once your pieces are wrapped, re-assemble everything by reversing the steps:
1594063329893.png
 

CumpsD

Member
Joined
Jul 19, 2020
Messages
7
Reaction score
3
Location
Belgium
Thanks! I just did the same :)
 

Attachments

  • img_1816.jpg
    img_1816.jpg
    174.8 KB · Views: 126
  • img_1817.jpg
    img_1817.jpg
    150.7 KB · Views: 122
  • img_1842.jpg
    img_1842.jpg
    178.2 KB · Views: 118
  • img_1846.jpg
    img_1846.jpg
    193.6 KB · Views: 117
  • img_1849.jpg
    img_1849.jpg
    175.7 KB · Views: 117
  • img_1847.jpg
    img_1847.jpg
    176 KB · Views: 119
  • img_1848.jpg
    img_1848.jpg
    184.4 KB · Views: 120
  • img_1850.jpg
    img_1850.jpg
    170.4 KB · Views: 122

CumpsD

Member
Joined
Jul 19, 2020
Messages
7
Reaction score
3
Location
Belgium
I was actually wondering, I didn't take the multimedia console out, but is it easy to take it apart as it is with the middle ones? Because the result is a lot nicer when you can wrap around it instead of cutting
 

sandrinm68

Member
Joined
Jan 20, 2019
Messages
18
Reaction score
12
Nice job-it looks great!

I have the 8.4 inch screen but I think yours should remove the same way. Very easy to do. Instructions are at the beginning of this thread. Once you have it out, you can remove the screen and the other switch panel to allow you to wrap the vinyl around. The only area I could not wrap around is where the trim meets the chrome vent bezels. These pieces are plastic fused together and I didn’t want to try to melt them apart so I just trimmed the vinyl next to the chrome.

What is the button for on the front left of the console trim? I don’t have that in my Laramie.


Sent from my iPhone using Tapatalk
 

CumpsD

Member
Joined
Jul 19, 2020
Messages
7
Reaction score
3
Location
Belgium
I was afraid of that, I wanted to get the trim separate from the chrome vent bezels :)

The button is to switch between fuel and LPG gas :)

I have this in my bed:
IMG_1824.JPG
 

sandrinm68

Member
Joined
Jan 20, 2019
Messages
18
Reaction score
12
Ah, I don’t have that in my Laramie, either


Sent from my iPhone using Tapatalk
 

Ivan44

Member
Joined
Apr 29, 2020
Messages
15
Reaction score
8
I was afraid of that, I wanted to get the trim separate from the chrome vent bezels :)

The button is to switch between fuel and LPG gas :)

I have this in my bed:
View attachment 64452
Do you remember what size the button was? I want to put my air horn button there as well. looks great and easily accessible.
 

Users who are viewing this thread

Top