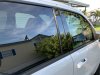
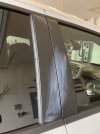
As stated before, the pillars have Hard, removable, plastic trim panels that are held on with light adhesive and 3 clips per door. Not too hard to remove. I just ran a razor knife down both sides to cut the adhesive, and some relatively light prying to pop the clips loose. I don’t see a viable reason for removing them since it’s not A very attractive look with them removed. Besides wrapping them in PPF as stated. It is body color underneath, but there’s recessed areas and holes for the clips. The higher end trim levels have the nicer piano black finish whereas the lower trim packages have the black textured plastic finish, which is what I had. I removed mine, smoothed, and painted them to look like the higher trim trucks. Came out nice. (I paint for a living)


")


")