HandyCruiser
Well-Known Member
- Joined
- Jun 28, 2021
- Messages
- 285
- Reaction score
- 345
- Points
- 63
- Age
- 60
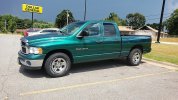
I've been making some repairs and upgrades to my 2003 Dodge Ram 1500 SLT Quadcab that I bought new from Fletcher Dodge in Little Rock in November 2002. Back in June of this year (2021), I hydroplaned during a heavy rainstorm and wrecked it on the left side. Even though I only carry liability insurance on it. I decided to fix it because it would have costs much more to replace it. And my title stays clean. But having almost 260,000 miles on the odometer, it needs some other repairs besides the damage from the wreck. Last week, I installed new tires and I noticed how far down the trucks sits in the front. It was time to do something about this. 
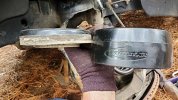
My choice was this Daystar brand 1.5 inch leveling kit. They are cheap and made in the good ol' US of A. And they are supposed to work with totally stock suspension. All that's needed is an alignment after installed.

As in this photo, you can see that these appear to add more than 1.5 inches compared to the stock coil pad. I figure they will compress once in the truck.
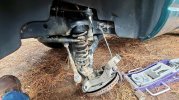
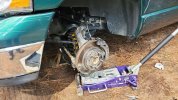
Folks have reported that you need coil spring compressors to do this job. That's not the case. I put the truck up fairly high on jack stands. Then I put a jack beneath the control arm to keep everything level. Once the upper control arm, outter tire rod end and sway bar link were loose, I was able to lower the jack and the coil spring just falls out. On the driver's side, I was able to remove a bolt from a brake hose bracket and there was enough slack that I didn't need to remove the brake hose or brake caliper. On the passenger side, I did need to remove the brake caliper because the hose was not this long. It is sort of tight getting the coil spring back in with the leveling pad, but it's not that hard to do it.
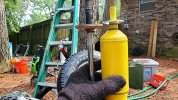
My front shocks were original and had 260,000 miles on them like the truck. So I decided to replace them with some reasonably priced Monroe shocks from Advance Auto. I like the fact that they have about half in inch more expanded length. That should be perfect with this leveling kit. I found a 15% discount code for advance online and used one of my $10 "Speedperks" I've been accumulating. Total cost for the shocks with discounts and sales tax was $52.48.
After installing the lift pads, I then used a jack beneath the control arm to lift everything back up and reconnect the upper control arm, outer tie rod end and sway bar link. When lifting the lower control arm with the jack, I put a piece of wood against the lower control arm to the inside of the where the shock fastens and then lifted with the jack against that piece of wood. This left the hole for the new shock unobstructed so I could install the shock after everything else was reconnected. On the passenger side, I needed to replace a worn upper control arm, so I did that as well during this project.
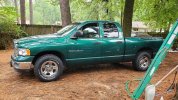
Here is a before photo.
And here is an after photo.
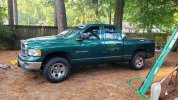
After that initial photo, the front end did settle by that evening after an alignment and after I helped my sister-in-law carry a new front door home from Home Depot. I got a "lifetime alignment" from Firestone. So I figure I will get it aligned again in about a month after everything has fully settled. I think it looks pretty good.
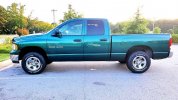
Next, I need to change the transmission fluid. I seem to have picked up a little torque converter shutter since the wreck. I figure the tranny must have gotten a little water in it.

My choice was this Daystar brand 1.5 inch leveling kit. They are cheap and made in the good ol' US of A. And they are supposed to work with totally stock suspension. All that's needed is an alignment after installed.

As in this photo, you can see that these appear to add more than 1.5 inches compared to the stock coil pad. I figure they will compress once in the truck.

Folks have reported that you need coil spring compressors to do this job. That's not the case. I put the truck up fairly high on jack stands. Then I put a jack beneath the control arm to keep everything level. Once the upper control arm, outter tire rod end and sway bar link were loose, I was able to lower the jack and the coil spring just falls out. On the driver's side, I was able to remove a bolt from a brake hose bracket and there was enough slack that I didn't need to remove the brake hose or brake caliper. On the passenger side, I did need to remove the brake caliper because the hose was not this long. It is sort of tight getting the coil spring back in with the leveling pad, but it's not that hard to do it.

My front shocks were original and had 260,000 miles on them like the truck. So I decided to replace them with some reasonably priced Monroe shocks from Advance Auto. I like the fact that they have about half in inch more expanded length. That should be perfect with this leveling kit. I found a 15% discount code for advance online and used one of my $10 "Speedperks" I've been accumulating. Total cost for the shocks with discounts and sales tax was $52.48.

After installing the lift pads, I then used a jack beneath the control arm to lift everything back up and reconnect the upper control arm, outer tie rod end and sway bar link. When lifting the lower control arm with the jack, I put a piece of wood against the lower control arm to the inside of the where the shock fastens and then lifted with the jack against that piece of wood. This left the hole for the new shock unobstructed so I could install the shock after everything else was reconnected. On the passenger side, I needed to replace a worn upper control arm, so I did that as well during this project.

Here is a before photo.

And here is an after photo.

After that initial photo, the front end did settle by that evening after an alignment and after I helped my sister-in-law carry a new front door home from Home Depot. I got a "lifetime alignment" from Firestone. So I figure I will get it aligned again in about a month after everything has fully settled. I think it looks pretty good.

Next, I need to change the transmission fluid. I seem to have picked up a little torque converter shutter since the wreck. I figure the tranny must have gotten a little water in it.


