I've been asked about my cab lights several times now, so I decided it's time to make a thread.
First order of business: I know this method isn't for everyone, and some people will think it's tacky, cheap or lazy. For those of you that feel that way, that's fine. You do mods on your truck the way you want. We don't need negativity, or opinions on why a traditional install is better. You do you. I made this thread for people who want to have cab lights, but would rather not drill holes in a perfectly good roof.
The disclaimer: I've done multiple cab light installs over the years (mostly on Rams). I'm no stranger to a traditional install, nor am I afraid to drill the holes required to do it. I did this no-drill install trying to find a better way. I was making it up as I went along so there may be some things that could be done differently. Consider it a prototype or guide to help you find the way that works best for you.
No drill options pros/cons: I wanted cab lights on my Ram, but having done installs before I didn't really want to take the headliner down and drill the holes. I found two alternatives. Here's the pros/cons of all three methods.
Cab Over America lights:
Pros: No drilling and no wires.
Cons: Very expensive at roughly $400!!! They have to be turned on/off manually (via wireless remote) every time you want to use them. They are solar powered so it's questionable if they'll get a lasting charge on a garage kept truck.
AVS Aerocab lights:
Pros: No drilling. No visible wires.
Cons: Not the cheapest option at roughly $200. Only 1 color/appearance option. Doesn't look like cab lights during the day (more like a visor). The lights are smaller and placed along the front edge of the roof unlike traditional cab lights, so not a traditional look at night either unless viewed directly from the front.
My method:
Pros: Cheapest option at roughly $90. No drilling. Traditional cab light appearance and you can choose the lens and LED color you prefer.
Cons: Visible wire loom when viewed from above (unless you have a roof rack).
How I did it:
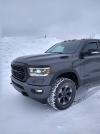
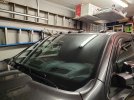
These are wired to my parking lights so they turn on/off just like the OEM lights will do. I ordered a set of standard LED cab lights (Amber) with smoked lenses for $35. Any set you prefer should do. I got smoked lenses instead of the standard Dodge white/clear because I have a night edition and everything else is smoked/black. Here's the finished product.
I didn't take pictures as I went because I really didn't expect anyone to ask about them, and I wasn't planning on making a thread. Sorry about that. I'll try to describe everything clearly for stuff I don't have pictures of though.
To start, I took some 3M automotive tape and applied it to the bottom of the lamps, leaving a slot in the tape for the wires to come out the back.
I stuck the lamps on the roof with the "tails" sticking out the back. I considered sticking it out the front and running the wires along the top of the windshield but the test fitting like that didn't look good at all.
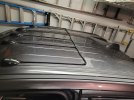
I then ran the wires rearward to about mid-roof (in the area of the B-pillar) where they crossed over to the rain gutter. I experimented with different lengths of wire to make them as discrete as possible, this mid-roof location seemed best. ↓↓↓
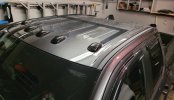
The wire then follows the edge of the windshield and goes into the cowl. I used the passenger side so the wire isn't crusted with ice in the winter when the wipers are on. For all of you up north you probably know what I'm talking about when the wipers create that hard pack along the edge of the window during a heavy snow. So using the passenger side avoids it getting caught up in that mess. ↓↓↓
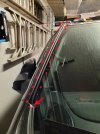
Once inside the cowl you can pull the wire into the engine compartment. From there you can route it to the fuse box or to one of your marker lights to splice in. Hard to see in this photo but it's the white line circled in red along the weather strip. ↓↓↓
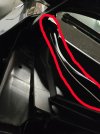
All of the wires are wrapped in looms across the roof. The portion on the windshield is run through the center of a self adhesive rubber seal.
This is a D shape seal 8mm x 10 feet for $9. ↓↓↓
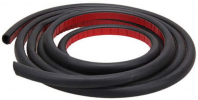
This is the cable wrap I used on the roof. Get the split kind so you can wrap it rather than having to feed the wire trough it. 0.33" x 25 feet for $9. ↓↓↓
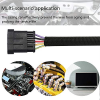
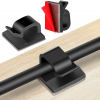
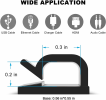
Last was a box of self adhesive clips to hold the wires in place. 60 pieces for $7. ↓↓↓
I picked up 50 feet of wire (dual strand with 2 colors) for $20 at the local hardware store.
Cab lights $35, wires $20, loom $9, rubber seal/loom $9, tape $10 and clips $7 (or $20 for roll of vinyl in lieu of looms and clips). Brining the total price of my project to $90. Keeping in mind that a traditional install would have cost $55 because I still would have had to buy the lights and wires. Going drill free only cost an extra $35 and some time of trial/error figuring out what looked best.
This was my first attempt at such a thing, and one thing I've learned from designing stuff is that you tend to get better and/or find better ways with each iteration. I originally tired laying strips of gray vinyl over the wires instead of looms. It worked great but I didn't like the joints in the wires because it made the vinyl bulge at those locations. Even though that method was lower profile and harder to see from the ground, I think it looked sloppier when you saw the roof from above (such as from a porch or window). IMHO the looms came out much cleaner.
Overall, I'm happy with how it turned out. I've had enough people ask me about these that it's apparent people aren't noticing the wires. I've had to point them out every time someone asked about putting cab lights on, and inquired about how difficult it is to do. If you're looking for them you can see them, but they don't stand out. I may try something different the next time around but I really like that I didn't have to drill a single hole in my truck to install these, and all the no drill options are quicker/easier than a traditional install. You could also add a roof rack which would conceal the wires from overhead observers too. Or maybe even work the wiring into the rack some how. Hmmmm, options.
Anyway, there it is. Fully functional cab lights, with a traditional appearance, and no drilling all for under $100.
First order of business: I know this method isn't for everyone, and some people will think it's tacky, cheap or lazy. For those of you that feel that way, that's fine. You do mods on your truck the way you want. We don't need negativity, or opinions on why a traditional install is better. You do you. I made this thread for people who want to have cab lights, but would rather not drill holes in a perfectly good roof.
The disclaimer: I've done multiple cab light installs over the years (mostly on Rams). I'm no stranger to a traditional install, nor am I afraid to drill the holes required to do it. I did this no-drill install trying to find a better way. I was making it up as I went along so there may be some things that could be done differently. Consider it a prototype or guide to help you find the way that works best for you.
No drill options pros/cons: I wanted cab lights on my Ram, but having done installs before I didn't really want to take the headliner down and drill the holes. I found two alternatives. Here's the pros/cons of all three methods.
Cab Over America lights:
Pros: No drilling and no wires.
Cons: Very expensive at roughly $400!!! They have to be turned on/off manually (via wireless remote) every time you want to use them. They are solar powered so it's questionable if they'll get a lasting charge on a garage kept truck.
AVS Aerocab lights:
Pros: No drilling. No visible wires.
Cons: Not the cheapest option at roughly $200. Only 1 color/appearance option. Doesn't look like cab lights during the day (more like a visor). The lights are smaller and placed along the front edge of the roof unlike traditional cab lights, so not a traditional look at night either unless viewed directly from the front.
My method:
Pros: Cheapest option at roughly $90. No drilling. Traditional cab light appearance and you can choose the lens and LED color you prefer.
Cons: Visible wire loom when viewed from above (unless you have a roof rack).
How I did it:
These are wired to my parking lights so they turn on/off just like the OEM lights will do. I ordered a set of standard LED cab lights (Amber) with smoked lenses for $35. Any set you prefer should do. I got smoked lenses instead of the standard Dodge white/clear because I have a night edition and everything else is smoked/black. Here's the finished product.


I didn't take pictures as I went because I really didn't expect anyone to ask about them, and I wasn't planning on making a thread. Sorry about that. I'll try to describe everything clearly for stuff I don't have pictures of though.
To start, I took some 3M automotive tape and applied it to the bottom of the lamps, leaving a slot in the tape for the wires to come out the back.
I stuck the lamps on the roof with the "tails" sticking out the back. I considered sticking it out the front and running the wires along the top of the windshield but the test fitting like that didn't look good at all.
I then ran the wires rearward to about mid-roof (in the area of the B-pillar) where they crossed over to the rain gutter. I experimented with different lengths of wire to make them as discrete as possible, this mid-roof location seemed best. ↓↓↓


The wire then follows the edge of the windshield and goes into the cowl. I used the passenger side so the wire isn't crusted with ice in the winter when the wipers are on. For all of you up north you probably know what I'm talking about when the wipers create that hard pack along the edge of the window during a heavy snow. So using the passenger side avoids it getting caught up in that mess. ↓↓↓

Once inside the cowl you can pull the wire into the engine compartment. From there you can route it to the fuse box or to one of your marker lights to splice in. Hard to see in this photo but it's the white line circled in red along the weather strip. ↓↓↓

All of the wires are wrapped in looms across the roof. The portion on the windshield is run through the center of a self adhesive rubber seal.
This is a D shape seal 8mm x 10 feet for $9. ↓↓↓

This is the cable wrap I used on the roof. Get the split kind so you can wrap it rather than having to feed the wire trough it. 0.33" x 25 feet for $9. ↓↓↓

Last was a box of self adhesive clips to hold the wires in place. 60 pieces for $7. ↓↓↓


I picked up 50 feet of wire (dual strand with 2 colors) for $20 at the local hardware store.
Cab lights $35, wires $20, loom $9, rubber seal/loom $9, tape $10 and clips $7 (or $20 for roll of vinyl in lieu of looms and clips). Brining the total price of my project to $90. Keeping in mind that a traditional install would have cost $55 because I still would have had to buy the lights and wires. Going drill free only cost an extra $35 and some time of trial/error figuring out what looked best.
This was my first attempt at such a thing, and one thing I've learned from designing stuff is that you tend to get better and/or find better ways with each iteration. I originally tired laying strips of gray vinyl over the wires instead of looms. It worked great but I didn't like the joints in the wires because it made the vinyl bulge at those locations. Even though that method was lower profile and harder to see from the ground, I think it looked sloppier when you saw the roof from above (such as from a porch or window). IMHO the looms came out much cleaner.
Overall, I'm happy with how it turned out. I've had enough people ask me about these that it's apparent people aren't noticing the wires. I've had to point them out every time someone asked about putting cab lights on, and inquired about how difficult it is to do. If you're looking for them you can see them, but they don't stand out. I may try something different the next time around but I really like that I didn't have to drill a single hole in my truck to install these, and all the no drill options are quicker/easier than a traditional install. You could also add a roof rack which would conceal the wires from overhead observers too. Or maybe even work the wiring into the rack some how. Hmmmm, options.
Anyway, there it is. Fully functional cab lights, with a traditional appearance, and no drilling all for under $100.
Last edited:


