JD FOX
Member
- Joined
- Dec 6, 2018
- Messages
- 13
- Reaction score
- 38
- Points
- 13
- Age
- 32
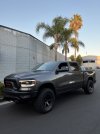
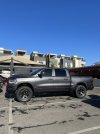
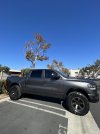
It feels great to be sharing this finally. I have been wanting to do this since the day I bought the truck; so I guess this has been three years in the making. This has been the closest thing to christmas day I could experience as a 28 year old. My Pepper has received some upgrades.
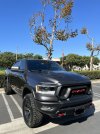
I will preface this post by saying I manage an auto-body shop which made a lot of these customizations very easy to make a reality. Previously I had painted the skid plate satin black and replaced/painted the emblems around the truck.
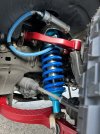
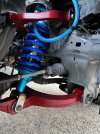
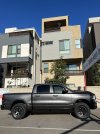
Suspension: Carli 2.5 Performance Kit
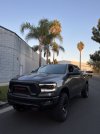
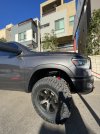
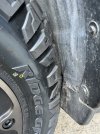
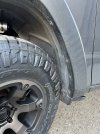
Tires: Nitto Ridge Grapplers 35x12.50R18
Wheels: 18inch Fuel Beast w/ -12 offset
Hub Centric Rings: GOR-108-7780 (summit racing)
Lug Nuts: McGard 65315BK - Spline Drive
Red Paint Code: 229136 / 325 (Ferrari - Rosso Mugello)
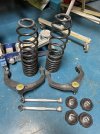
I prepped and painted the following:
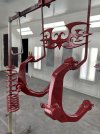
Solvent Red w/ Matte Clear:
Upper & Lower Control Arms
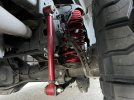
Rear Springs
Rear Sway Bar Links
Satin Black:
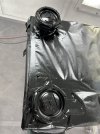
Wheel Center Caps (eliminate the chrome logo)
Sway Bar Link Nuts
Wheel Liner Trimming:
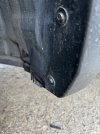
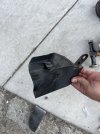
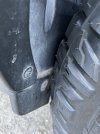
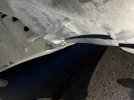
The 35s hit the wheel liner in two places on left and right turns. I expected this, just had to make some adjustments. At the bottom of the rebel fenders there are two plastic trim moldings - these have to go for clearance. Afterwards there is a metal tab that is exposed from the fender. I hammered and dollied this flat and bent it upwards. This gets that metal tab out of the way and holds the fender liner back so the tire clears. I’ll have my painter spot in some paint where it broke on the bottom side, no biggie.
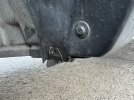
I took it for a test drive but still had some rubbing, although much lighter than before. Towards the frame of the truck the hanging fender liner just needed to be pinned back. Two self-tapping screws into the frame did the trick. I am sure you could have just cut the plastic here as well.
First take:
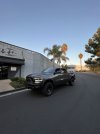
Driving it back from the shop, the terribly paved southern california roads didn't bounce me around in the cab as much. Cornering feels better. I am about to head out and enjoy the Saturday with it so I can provide more insight here and pictures.
I think my favorite part of my build is how much more like a proper truck this set makes my rebel look. The carven exhaust growl now matches the look of the truck. Next week I will pick up my AMP steps and install them. Getting into the truck is a bit of a hop now. I can do it just fine but my mom insisted on the steps.
I will update this post with more pictures and impressions later on. I just want to go drive this truck.
I will preface this post by saying I manage an auto-body shop which made a lot of these customizations very easy to make a reality. Previously I had painted the skid plate satin black and replaced/painted the emblems around the truck.
Suspension: Carli 2.5 Performance Kit
Tires: Nitto Ridge Grapplers 35x12.50R18
Wheels: 18inch Fuel Beast w/ -12 offset
Hub Centric Rings: GOR-108-7780 (summit racing)
Lug Nuts: McGard 65315BK - Spline Drive
Red Paint Code: 229136 / 325 (Ferrari - Rosso Mugello)
I prepped and painted the following:
Solvent Red w/ Matte Clear:
Upper & Lower Control Arms
Rear Springs
Rear Sway Bar Links
Satin Black:
Wheel Center Caps (eliminate the chrome logo)
Sway Bar Link Nuts
Wheel Liner Trimming:
The 35s hit the wheel liner in two places on left and right turns. I expected this, just had to make some adjustments. At the bottom of the rebel fenders there are two plastic trim moldings - these have to go for clearance. Afterwards there is a metal tab that is exposed from the fender. I hammered and dollied this flat and bent it upwards. This gets that metal tab out of the way and holds the fender liner back so the tire clears. I’ll have my painter spot in some paint where it broke on the bottom side, no biggie.
I took it for a test drive but still had some rubbing, although much lighter than before. Towards the frame of the truck the hanging fender liner just needed to be pinned back. Two self-tapping screws into the frame did the trick. I am sure you could have just cut the plastic here as well.
First take:
Driving it back from the shop, the terribly paved southern california roads didn't bounce me around in the cab as much. Cornering feels better. I am about to head out and enjoy the Saturday with it so I can provide more insight here and pictures.
I think my favorite part of my build is how much more like a proper truck this set makes my rebel look. The carven exhaust growl now matches the look of the truck. Next week I will pick up my AMP steps and install them. Getting into the truck is a bit of a hop now. I can do it just fine but my mom insisted on the steps.
I will update this post with more pictures and impressions later on. I just want to go drive this truck.
Attachments
-
 IMG_5925.JPG188.2 KB · Views: 143
 -
 IMG_6031.JPG120.1 KB · Views: 142
 -
 IMG_6042.JPG137.1 KB · Views: 144
 -
 IMG_6057.JPG167.6 KB · Views: 140
 -
 IMG_6058.JPG179.9 KB · Views: 138
 -
 IMG_6062.JPG127.5 KB · Views: 136
 -
 IMG_6064.JPG204.6 KB · Views: 134
 -
 IMG_6066.JPG154.3 KB · Views: 134
 -
 IMG_6068.JPG118.4 KB · Views: 135
 -
 IMG_6076.JPG96.2 KB · Views: 135