5thGenRams Forums

Register a free account today to become a member! Once signed in, you'll be able to participate on this site by adding your own topics and posts, as well as connect with other members through your own private inbox!

Mopar power running board motor is bad

Rogo725

Member
Joined
Jul 30, 2020
Messages
15
Reaction score
3
Points
3
Age
37
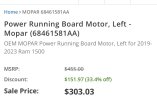
Is there a part number for the Mopar power running boards motor? Mine is clearly stripped and cannot raise or lower the driver side step. It grinds and then just stopped.

Was gonna rip them off, but curious if I can just order the motor to try and fix it before I do that.

Thanks
 
IMG_0226.jpeg
The right one is a different number, but they exist
 
Decisions, decisions…. Rip them off or replace the motor…..
 
Motor only replacement writeup

I replaced the driver's side motor (motor only, not entire hinge assembly) with an aftermarket motor from ebay. The motor cost about $120.

Tools needed: 13mm socket, 10mm socket, 6mm hex wrench, blue threadlocker

I found that it was very easy to remove the entire running board assembly in one piece and then work on the motor separately.

Get the board to the fully deployed position
1) On my Limited, I raised the truck to offroad2 height.
2) Get the running board into the fully deployed position. I opened the door while stepping on the board to force it all the way down.
3) With it in the down position, unplug the motor.

Remove entire running board
4) Use a 13mm ratchet to remove the 3 bolts on each side holding the front and rear hinge assemblies to the body. They came off very easily.
5) lift the entire assembly which includes the front motor and hinge, running board, and rear hinge off the bolts and place on floor. A box or two positioned in the appropriate places can help, but it can easily be done by one person even without an assistant.

Remove motor
6) Remove the 10mm bolt from the bottom of the front hinge - it connects to a metal block that is used to hold the flat part of the motor shaft in place. The block will fall out once the bolt is removed. Keep the bolt together with the metal block which has a specific shape (bolt attaches to narrower side)
7) Remove the three 6mm hex screws that hold the motor to the hinge. There is blue threadlocker on these screws. I was able remove all three screws manually using some force with a good quality 6mm hex wrench, but you may need to heat up the screw with a heat gun or torch if they are really stuck.
8) Pull the motor out. Note of the position of the flat part of the shaft relative to the motor housing, as this is the the position that is required to hold the metal block in place when the step is in the deployed position. Remove as much dried threadlocker as possible from the three screws.

Get the shaft of the new motor into the same orientation as the shaft in the old motor
9) Plug the motor in loosely. You will need to rest the motor on something tall enough for the cord to reach.
10) Having a helper here will make this step easier. When either opening or closing the door, unplug the motor when the flat part of the shaft approaches the position you noted in step 8 above. Close enough is good enough - the point of this is to make it easier to put back into hinge assembly with the step in the fully deployed position.

Reattach the motor
11) Slide the motor into the hinge assembly. If step 10 was successful, the flat side of the motor shaft should be positioned to allow the metal block to be reattached to the bolt. You should be able to insert the metal block into the hinge assembly and reattach the bolt. Be careful of pinching your fingers on the hinge. Hand tighten the bolt.
12) Put some threadlocker onto each screw while reassembling the motor. Tighten everything down so that the motor is secure.

Mount the running board back to the truck
13) A helper would be useful, but a well placed box will also work. I placed the rear hinge on a box near the height of the lowest mounting bolts and then lifted the front into place. loosely attach one nut to keep it in place and then finish mounting the rear hinge. Tighten all 6 bolts.
14) With the door open, reconnect the motor wiring. Close the door and wait for the motor to retract the step.
15) Open the door. With the step extended all the way out fully tighten the 10mm bolt.

Gaze at your completed work.

20240227_151439.jpg
 
Last edited:
Great write-up! Hopefully I won't need it, but will be very helpful if I do.
 
Motor only replacement writeup

I replaced the driver's side motor (motor only, not entire hinge assembly) with an aftermarket motor from ebay. The motor cost about $120.

Tools needed: 13mm socket, 10mm socket, 6mm hex wrench, blue threadlocker

I found that it was very easy to remove the entire running board assembly in one piece and then work on the motor separately.

Get the board to the fully deployed position
1) On my Limited, I raised the truck to offroad2 height.
2) Get the running board into the fully deployed position. I opened the door while stepping on the board to force it all the way down.
3) With it in the down position, unplug the motor.

Remove entire running board
4) Use a 13mm ratchet to remove the 3 bolts on each side holding the front and rear hinge assemblies to the body. They came off very easily.
5) lift the entire assembly which includes the front motor and hinge, running board, and rear hinge off the bolts and place on floor. A box or two positioned in the appropriate places can help, but it can easily be done by one person even without an assistant.

Remove motor
6) Remove the 10mm bolt from the bottom of the front hinge - it connects to a metal block that is used to hold the flat part of the motor shaft in place. The block will fall out once the bolt is removed. Keep the bolt together with the metal block which has a specific shape (bolt attaches to narrower side)
7) Remove the three 6mm hex screws that hold the motor to the hinge. There is blue threadlocker on these screws. I was able remove all three screws manually using some force with a good quality 6mm hex wrench, but you may need to heat up the screw with a heat gun or torch if they are really stuck.
8) Pull the motor out. Note of the position of the flat part of the shaft relative to the motor housing, as this is the the position that is required to hold the metal block in place when the step is in the deployed position. Remove as much dried threadlocker as possible from the three screws.

Get the shaft of the new motor into the same orientation as the shaft in the old motor
9) Plug the motor in loosely. You will need to rest the motor on something tall enough for the cord to reach.
10) Having a helper here will make this step easier. When either opening or closing the door, unplug the motor when the flat part of the shaft approaches the position you noted in step 8 above. Close enough is good enough - the point of this is to make it easier to put back into hinge assembly with the step in the fully deployed position.

Reattach the motor
11) Slide the motor into the hinge assembly. If step 10 was successful, the flat side of the motor shaft should be positioned to allow the metal block to be reattached to the bolt. You should be able to insert the metal block into the hinge assembly and reattach the bolt. Be careful of pinching your fingers on the hinge. Hand tighten the bolt.
12) Put some threadlocker onto each screw while reassembling the motor. Tighten everything down so that the motor is secure.

Mount the running board back to the truck
13) A helper would be useful, but a well placed box will also work. I placed the rear hinge on a box near the height of the lowest mounting bolts and then lifted the front into place. loosely attach one nut to keep it in place and then finish mounting the rear hinge. Tighten all 6 bolts.
14) With the door open, reconnect the motor wiring. Close the door and wait for the motor to retract the step.
15) Open the door. With the step extended all the way out fully tighten the 10mm bolt.

Gaze at your completed work.

View attachment 178874
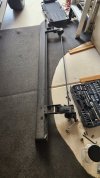
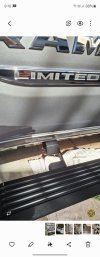
Hi Men I have a problem part of the frame its broke; the motor work fine but I think will be better to replace all the part ; I found this at ebay do you think will work? For 2019-2022 RAM 1500 Mopar Power Running Board Motor Assembly Left Driver Side | eBay

Also I have a question how you do to remove that piece i circle to add the replace.
 

Attachments

  • PHOTO-2024-10-15-09-19-08.jpg
    PHOTO-2024-10-15-09-19-08.jpg
    77.2 KB · Views: 76
  • PHOTO-2024-10-15-08-29-23.jpg
    PHOTO-2024-10-15-08-29-23.jpg
    180.2 KB · Views: 76
Motor only replacement writeup

I replaced the driver's side motor (motor only, not entire hinge assembly) with an aftermarket motor from ebay. The motor cost about $120.

Tools needed: 13mm socket, 10mm socket, 6mm hex wrench, blue threadlocker

I found that it was very easy to remove the entire running board assembly in one piece and then work on the motor separately.

Get the board to the fully deployed position
1) On my Limited, I raised the truck to offroad2 height.
2) Get the running board into the fully deployed position. I opened the door while stepping on the board to force it all the way down.
3) With it in the down position, unplug the motor.

Remove entire running board
4) Use a 13mm ratchet to remove the 3 bolts on each side holding the front and rear hinge assemblies to the body. They came off very easily.
5) lift the entire assembly which includes the front motor and hinge, running board, and rear hinge off the bolts and place on floor. A box or two positioned in the appropriate places can help, but it can easily be done by one person even without an assistant.

Remove motor
6) Remove the 10mm bolt from the bottom of the front hinge - it connects to a metal block that is used to hold the flat part of the motor shaft in place. The block will fall out once the bolt is removed. Keep the bolt together with the metal block which has a specific shape (bolt attaches to narrower side)
7) Remove the three 6mm hex screws that hold the motor to the hinge. There is blue threadlocker on these screws. I was able remove all three screws manually using some force with a good quality 6mm hex wrench, but you may need to heat up the screw with a heat gun or torch if they are really stuck.
8) Pull the motor out. Note of the position of the flat part of the shaft relative to the motor housing, as this is the the position that is required to hold the metal block in place when the step is in the deployed position. Remove as much dried threadlocker as possible from the three screws.

Get the shaft of the new motor into the same orientation as the shaft in the old motor
9) Plug the motor in loosely. You will need to rest the motor on something tall enough for the cord to reach.
10) Having a helper here will make this step easier. When either opening or closing the door, unplug the motor when the flat part of the shaft approaches the position you noted in step 8 above. Close enough is good enough - the point of this is to make it easier to put back into hinge assembly with the step in the fully deployed position.

Reattach the motor
11) Slide the motor into the hinge assembly. If step 10 was successful, the flat side of the motor shaft should be positioned to allow the metal block to be reattached to the bolt. You should be able to insert the metal block into the hinge assembly and reattach the bolt. Be careful of pinching your fingers on the hinge. Hand tighten the bolt.
12) Put some threadlocker onto each screw while reassembling the motor. Tighten everything down so that the motor is secure.

Mount the running board back to the truck
13) A helper would be useful, but a well placed box will also work. I placed the rear hinge on a box near the height of the lowest mounting bolts and then lifted the front into place. loosely attach one nut to keep it in place and then finish mounting the rear hinge. Tighten all 6 bolts.
14) With the door open, reconnect the motor wiring. Close the door and wait for the motor to retract the step.
15) Open the door. With the step extended all the way out fully tighten the 10mm bolt.

Gaze at your completed work.

View attachment 178874
Thanks for the detailed writing
Motor only replacement writeup

I replaced the driver's side motor (motor only, not entire hinge assembly) with an aftermarket motor from ebay. The motor cost about $120.

Tools needed: 13mm socket, 10mm socket, 6mm hex wrench, blue threadlocker

I found that it was very easy to remove the entire running board assembly in one piece and then work on the motor separately.

Get the board to the fully deployed position
1) On my Limited, I raised the truck to offroad2 height.
2) Get the running board into the fully deployed position. I opened the door while stepping on the board to force it all the way down.
3) With it in the down position, unplug the motor.

Remove entire running board
4) Use a 13mm ratchet to remove the 3 bolts on each side holding the front and rear hinge assemblies to the body. They came off very easily.
5) lift the entire assembly which includes the front motor and hinge, running board, and rear hinge off the bolts and place on floor. A box or two positioned in the appropriate places can help, but it can easily be done by one person even without an assistant.

Remove motor
6) Remove the 10mm bolt from the bottom of the front hinge - it connects to a metal block that is used to hold the flat part of the motor shaft in place. The block will fall out once the bolt is removed. Keep the bolt together with the metal block which has a specific shape (bolt attaches to narrower side)
7) Remove the three 6mm hex screws that hold the motor to the hinge. There is blue threadlocker on these screws. I was able remove all three screws manually using some force with a good quality 6mm hex wrench, but you may need to heat up the screw with a heat gun or torch if they are really stuck.
8) Pull the motor out. Note of the position of the flat part of the shaft relative to the motor housing, as this is the the position that is required to hold the metal block in place when the step is in the deployed position. Remove as much dried threadlocker as possible from the three screws.

Get the shaft of the new motor into the same orientation as the shaft in the old motor
9) Plug the motor in loosely. You will need to rest the motor on something tall enough for the cord to reach.
10) Having a helper here will make this step easier. When either opening or closing the door, unplug the motor when the flat part of the shaft approaches the position you noted in step 8 above. Close enough is good enough - the point of this is to make it easier to put back into hinge assembly with the step in the fully deployed position.

Reattach the motor
11) Slide the motor into the hinge assembly. If step 10 was successful, the flat side of the motor shaft should be positioned to allow the metal block to be reattached to the bolt. You should be able to insert the metal block into the hinge assembly and reattach the bolt. Be careful of pinching your fingers on the hinge. Hand tighten the bolt.
12) Put some threadlocker onto each screw while reassembling the motor. Tighten everything down so that the motor is secure.

Mount the running board back to the truck
13) A helper would be useful, but a well placed box will also work. I placed the rear hinge on a box near the height of the lowest mounting bolts and then lifted the front into place. loosely attach one nut to keep it in place and then finish mounting the rear hinge. Tighten all 6 bolts.
14) With the door open, reconnect the motor wiring. Close the door and wait for the motor to retract the step.
15) Open the door. With the step extended all the way out fully tighten the 10mm bolt.

Gaze at your completed work.

View attachment 178874
Thanks for the detailed writing. It helps a lot. Did you replaced it with Oem Motor or a replacement one. Did you find is it possible to refurbish the hinges n motor rather changing the motor. Mostly the hinge pins makes the trouble.
 
IF you can take the bad motor apart.
I had a similar problem with a RV slide motor. They wanted $700.00 for a motor( DC motors are expensive). Since it was broke( not working) I took it apart to see why. Low and behold it was only corrosion from leaking seals. Cleaned things up reassembled and it worked like new!!
Saved $700.00.... so, it's worth a try.
Paul B
 
Motor only replacement writeup

I replaced the driver's side motor (motor only, not entire hinge assembly) with an aftermarket motor from ebay. The motor cost about $120.

Tools needed: 13mm socket, 10mm socket, 6mm hex wrench, blue threadlocker

I found that it was very easy to remove the entire running board assembly in one piece and then work on the motor separately.

Get the board to the fully deployed position
1) On my Limited, I raised the truck to offroad2 height.
2) Get the running board into the fully deployed position. I opened the door while stepping on the board to force it all the way down.
3) With it in the down position, unplug the motor.

Remove entire running board
4) Use a 13mm ratchet to remove the 3 bolts on each side holding the front and rear hinge assemblies to the body. They came off very easily.
5) lift the entire assembly which includes the front motor and hinge, running board, and rear hinge off the bolts and place on floor. A box or two positioned in the appropriate places can help, but it can easily be done by one person even without an assistant.

Remove motor
6) Remove the 10mm bolt from the bottom of the front hinge - it connects to a metal block that is used to hold the flat part of the motor shaft in place. The block will fall out once the bolt is removed. Keep the bolt together with the metal block which has a specific shape (bolt attaches to narrower side)
7) Remove the three 6mm hex screws that hold the motor to the hinge. There is blue threadlocker on these screws. I was able remove all three screws manually using some force with a good quality 6mm hex wrench, but you may need to heat up the screw with a heat gun or torch if they are really stuck.
8) Pull the motor out. Note of the position of the flat part of the shaft relative to the motor housing, as this is the the position that is required to hold the metal block in place when the step is in the deployed position. Remove as much dried threadlocker as possible from the three screws.

Get the shaft of the new motor into the same orientation as the shaft in the old motor
9) Plug the motor in loosely. You will need to rest the motor on something tall enough for the cord to reach.
10) Having a helper here will make this step easier. When either opening or closing the door, unplug the motor when the flat part of the shaft approaches the position you noted in step 8 above. Close enough is good enough - the point of this is to make it easier to put back into hinge assembly with the step in the fully deployed position.

Reattach the motor
11) Slide the motor into the hinge assembly. If step 10 was successful, the flat side of the motor shaft should be positioned to allow the metal block to be reattached to the bolt. You should be able to insert the metal block into the hinge assembly and reattach the bolt. Be careful of pinching your fingers on the hinge. Hand tighten the bolt.
12) Put some threadlocker onto each screw while reassembling the motor. Tighten everything down so that the motor is secure.

Mount the running board back to the truck
13) A helper would be useful, but a well placed box will also work. I placed the rear hinge on a box near the height of the lowest mounting bolts and then lifted the front into place. loosely attach one nut to keep it in place and then finish mounting the rear hinge. Tighten all 6 bolts.
14) With the door open, reconnect the motor wiring. Close the door and wait for the motor to retract the step.
15) Open the door. With the step extended all the way out fully tighten the 10mm bolt.

Gaze at your completed work.

View attachment 178874
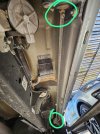
I’m having trouble taking the motor out now. Any tips? Thanks for the great write up though!
 
Motor only replacement writeup

I replaced the driver's side motor (motor only, not entire hinge assembly) with an aftermarket motor from ebay. The motor cost about $120.

Tools needed: 13mm socket, 10mm socket, 6mm hex wrench, blue threadlocker

I found that it was very easy to remove the entire running board assembly in one piece and then work on the motor separately.

Get the board to the fully deployed position
1) On my Limited, I raised the truck to offroad2 height.
2) Get the running board into the fully deployed position. I opened the door while stepping on the board to force it all the way down.
3) With it in the down position, unplug the motor.

Remove entire running board
4) Use a 13mm ratchet to remove the 3 bolts on each side holding the front and rear hinge assemblies to the body. They came off very easily.
5) lift the entire assembly which includes the front motor and hinge, running board, and rear hinge off the bolts and place on floor. A box or two positioned in the appropriate places can help, but it can easily be done by one person even without an assistant.

Remove motor
6) Remove the 10mm bolt from the bottom of the front hinge - it connects to a metal block that is used to hold the flat part of the motor shaft in place. The block will fall out once the bolt is removed. Keep the bolt together with the metal block which has a specific shape (bolt attaches to narrower side)
7) Remove the three 6mm hex screws that hold the motor to the hinge. There is blue threadlocker on these screws. I was able remove all three screws manually using some force with a good quality 6mm hex wrench, but you may need to heat up the screw with a heat gun or torch if they are really stuck.
8) Pull the motor out. Note of the position of the flat part of the shaft relative to the motor housing, as this is the the position that is required to hold the metal block in place when the step is in the deployed position. Remove as much dried threadlocker as possible from the three screws.

Get the shaft of the new motor into the same orientation as the shaft in the old motor
9) Plug the motor in loosely. You will need to rest the motor on something tall enough for the cord to reach.
10) Having a helper here will make this step easier. When either opening or closing the door, unplug the motor when the flat part of the shaft approaches the position you noted in step 8 above. Close enough is good enough - the point of this is to make it easier to put back into hinge assembly with the step in the fully deployed position.

Reattach the motor
11) Slide the motor into the hinge assembly. If step 10 was successful, the flat side of the motor shaft should be positioned to allow the metal block to be reattached to the bolt. You should be able to insert the metal block into the hinge assembly and reattach the bolt. Be careful of pinching your fingers on the hinge. Hand tighten the bolt.
12) Put some threadlocker onto each screw while reassembling the motor. Tighten everything down so that the motor is secure.

Mount the running board back to the truck
13) A helper would be useful, but a well placed box will also work. I placed the rear hinge on a box near the height of the lowest mounting bolts and then lifted the front into place. loosely attach one nut to keep it in place and then finish mounting the rear hinge. Tighten all 6 bolts.
14) With the door open, reconnect the motor wiring. Close the door and wait for the motor to retract the step.
15) Open the door. With the step extended all the way out fully tighten the 10mm bolt.

Gaze at your completed work.

View attachment 178874
Thanks for posting. I replaced the whole assembly (motor and hinge) in under an hour. I had to mount and activate it to get the hinge to open prior to assembly on the running board. I purchased the motor and hinge from Amazon. Amazon.com
 
Hey all,

I just went through the parts replacement process for the power running boards on my 2019 Limited. Mine have been struggling for the last two years or so. I live in the mountains of Colorado and the motors and pivots just get blasted absolutely blasted with snow, ice and crud for about 7 months of the year. They've been getting squeakier and slower as time goes on. There is almost no shielding from the front tire spray on my truck, just a "barely there" extension off the rear of the wheel well that doesn't do much at all.

About a month ago, my 17 year old son decided to drive off road in the truck. He was obviously doing something stupid and managed to rip the passenger side step clean off. The thin metal sections of the front motor assembly and rear hinge that connect with the step itself cracked clean off. The step was in the bed of the truck and everything else was still in place. Minor dents to the underside of the step.

I searched the internet and got some clarity on what was needed. They sell almost everything separately for the power steps. I ended up on Amazon and eBay as I didn't really want to pay for OEM Mopar branded parts. There are a number of sellers on Amazon selling the same front motor assembly for around $150. Apparently this same power step has been used on a number of other vehicle models and manufacturers. I ordered a front motor for both sides. There are basically no aftermarket rear hinges available that I could find. I had to pay for a Mopar version and it was almost $300 for just the hinge. I got it off eBay from Ziegler. So yes, the non-motorized, nothing-going-on rear hinge assembly is TWICE as much as the motor and front assembly!

Since the rear hinge was so expensive, I decided to just re-use the rear hinge on the driver's side. Once these three parts arrived I pulled off the steps from both sides and swapped everything out.

There are six bolts (three front and three in the rear) on each running board assembly holding them to the underside of the truck plus one 5 pin harness per motor. The running boards are held on to the motor and hinge assembly with two 5mm hex bolts at the motor assembly and two more at the rear hinge. There is a connecting rod running from the front motor to the rear hinge. It's a long rod that connects to an output shaft on the front motor assembly and drives the rear hinge. It's held on with a single Torx 30 screw at each end. That's pretty much it.

The nuts holding the assembly to the truck are 12mm, I think (I don't remember exactly) and you can get at them fairly easily. I used a 3/8" ratchet and socket with and without a 3" extension to remove them.

I think the easiest way to do the whole thing is to disconnect the wiring harness, remove the 6 nuts and take the whole power step off as a unit. Then you can remove the screws holding the step to the motor/hinge assemblies and get the step off. It was pretty locked on and I had to used a dead blow mallet and a little juice to get the step to come off.

I used a small impact driver to get the 4 bolts out of the bottom of the step. They were a little sticky to remove (lots of Locktite on them) but backed out fine with the impact driver. The two Torx 30 holding the connecting rod to the motor and hinge came out with a T30 bit and the impact driver. These would be tough to get moving with a screwdriver-style T30. They aren't crazy tight but they are tighter than I could loosen without using an impact. If you had a T30 bit and a socket wrench you'd be fine.

The motor and hinge were a little bit tough to pull off of the connecting rod but I just wiggled them a bit and they slid off fine. Re-assembly with the new motor and hinge took about 12 seconds.

Having to re-use the rear hinge on the driver's side wasn't great. It was very sticky and it's obvious that the bushings the metal pivots rotate in were pretty cooked. As I mentioned, the winters have been very hard on these steps. The pivots are just hanging in the muck all winter. It doesn't appear that there is any way to rebuild any of the pivots with new bushings. It looks like everything is pressed in at initial assembly. It would take a big press and some finagling to press the four pivot shafts out of each assembly. It's all built as a complete unit and there are no individual parts that I could find.

I cleaned up the rear hinge I was re-using and cycled it open and closed many times while applying silicone spray lube to exposed end of each pivot. It got better but was nothing like the buttery smooth cycling of the new hinge I bought for the passenger side. Worth another $300 plus tax and shipping? Maybe??

For reassembly, you lift the rebuilt step into place and hang it from the 6 studs coming out of the underside of the truck. The 6 nuts go back on, torqued to "kinda tight," snap the wiring harness back on (slow down here and make sure your orientation is correct, it's 5 pins and there is a gap on one side that will help you figure it out) and you're back in business with a mostly new power step.

My drivers side step has worn down to bare metal where my foot goes each time I get in or out of the truck. I was considering attempting to repaint it but I'm thinking that a truck bed liner/Rhinoliner style spray-on finish might work better. That's the next project.

If your truck's power step is slow, noisy or otherwise not running like it was when the truck was new, you can fix it pretty simply and affordably.
 

Users who are viewing this thread

Back
Top