5thGenRams Forums

Register a free account today to become a member! Once signed in, you'll be able to participate on this site by adding your own topics and posts, as well as connect with other members through your own private inbox!

How to: Wiring a switch bank

M3forged

Active Member
Joined
Mar 16, 2024
Messages
65
Reaction score
84
Points
18
Age
44
Newb question. I'm new to all this so please bear with me. I want to understand how exactly the wiring goes, my main question is when wiring a switch bank itself do the positive and negative get wired directly to the battery or do I need to tap a fuse for the positive? And regards to the accessory itself is it negative to battery and positive to switch? Thanks so much
 
Depending on the switch bank you'll have options, but they're mostly the same. Mine was battery + to the power box with - to either battery or ground, a turn on wire with a fuse tap for ACC/IGN on, then the wiring from the power box to the switch panel. When wiring lights/accessories you wire + to the power box and - to a ground. Depending on your use case you can have something that enables them to be on without the truck being on, but I don't foresee that use case and didn't do that.
 
Power box, do you mean the fuse box? I think I'm getting it now. Switch bank (-) and accessory (-) to battery (-) or ground and then the battery (+) to an in-line fuse to the switch bank (+) and finally the accessory (+) to the individual rocker switch on the switch bank.
 
Last edited:
I have this one: https://www.amazon.com/gp/product/B08J6MJD4N/?th=1.

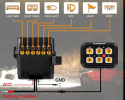
My fault, by power box I meant switch panel and by switch panel I meant the actual button device. This picture is pretty self explanatory. As far as wiring the lights/accessories the power (+) goes to the switch panel and the negative (-) goes to the negative terminal or a ground. I usually just find a good ground.
1711460192527.png
 
Last edited:
To add to this - any constant hot wire for any accessory should always be run to your fuse block on the hot lugs for constant power. Add an inline fuse or breaker, but avoid wiring things directly to your battery.
 
One more thing please. What prevents the switch bank from continuously being on if its hooked to the battery directly? I only want it on when the truck is on. If I'm understanding this correctly the way explained above is basically everything is grounded, the hot wire for the accessory is tapped from the fuse then up to the individual rocker switch. For the way I want it does that mean I'm also tapping another fuse to power the bank itself and not using the (+) from the battery?
 
One more thing please. What prevents the switch bank from continuously being on if its hooked to the battery directly? I only want it on when the truck is on. If I'm understanding this correctly the way explained above is basically everything is grounded, the hot wire for the accessory is tapped from the fuse then up to the individual rocker switch. For the way I want it does that mean I'm also tapping another fuse to power the bank itself and not using the (+) from the battery?
okay so generally if you buy a switch panel, this is how it goes.
when you wire up the box, it should have a thick power cable, a thinner power cable, and ground.
Thick power cable goes to your positive battery post.
Thin power cable goes to whatever is IGN triggered fuse slot.
Ground goes to body.

Now, when you wire up the lights, light's positive go to the post that match the switch you want to use, and you can just body ground the light.
The switch panel is turned off when ign is off, because ign fuse is no longer triggering the system to be on.

What switch bank do you have? Because from the looks of it you got the individual rocker switch type system that is not what we are explaining, and does require a different approach.
Yep, it's like wiring up an amp. It's got a power cable connected straight to the battery with an ACC/IGN trigger wire that actually turns the unit on and then peripherals are attached to the amp.
 
Ahh maybe thats what im missing. I just see the pos and neg connections, not a 3rd for IGN.

Nilight 6 Gang Rocker Switch Panel 5Pin
https://www.amazon.com/dp/B08R1T1SGN?starsLeft=1&ref_=cm_sw_r_cso_em_apan_dp_KDNK9S2H57KX3PJAAWNX_1
okay i see what you did there.

this one is a lot more involving and complicated to do it correctly and even then, you will NOT be able to use IGN trigger (meaning, your switch panel will be ALWAYS on). My recommendation would be return it and get one of those Chinese Auxbeams :sick: or pony up and get Switch-Pro 9100 (y)

Before we begin, let me tell you a bit about myself and why you should listen to me. I work at part time at a shop that does a lot of overlanding/ offroad trucks and SUV outfitting (part time so I have scheduling flexibility to go on trips and long-term expeditions) in southern California. I am their wiring guy and I do lights and switches install at least once weekly in addition to lift kits and other things like oil change, diff and tranny services, mounting and dismounting tires, etc. I can do repair work, but I'm not as proficient in those jobs than other techs. That's my professional side.
The first wiring job I did was 7 years ago on my 2017 4Runner. I learned everything on that truck along with guidances from friends who are electrical engineers and individual racecar drivers, and through the years I've made countless improvements on the 4Runner until I got confidence to do this professionally. On my Rebel, I used the Switch-Pro 9100 that I took off from my 4Runner along with a suite of Baja Designs lights that I took off (and eventually sold to one of my friends to upgrade). In addition, I also run two more stand alone systems on the truck for overlanding use: one in the cab for fridge, HAM radio, and off-grid power system, and the other one in the camper for camper lights and additional camping gizmos. I build my truck to the highest performance standard.

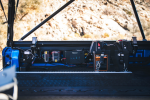
Your choice of switch is very similar to what I've chosen for the camper, only difference is the route you're going does not involve DC-DC charger and secondary battery (see below). Excuse the not-so-straight mounting and exposed wire, I am prototyping the mounting panel here and it makes no sense for me to hide everything only to take them out when I do the "official" version.
1711584084532.png

IF you still want to continue with that one, here's what you will need to do this CORRECTLY (but still will be constant on):
  • Additional parts needed:
  • Wiring Process (read through the whole process before doing anything):
    • Step 0: Install SDHQ Battery Terminal Kit. Power block goes to positive post of your battery, negative block goes to body. Do NOT battery ground anything on this truck.
    • Step 1: Make a 7 wire harness long enough to penetrate through firewall to your chosen location for your Nilight switch. Once they are through the firewall, crimp female spade terminals to 6 of them and connect them to the male spade on the switches. Pay special attention to which color goes to which switch, and use a label maker to label them on the harness on the engine side. For the remaining one, use a butt connector to connect to the red wire on the switch. This will be the power for the switches. Mount everything in and zip tie your harness so they are out of the way and make sure it doesn't interfere with your pedals.
      • Note: This would be a good time to run additional wires through the firewall and label them as "EXTRA" so in case you want to add more stuff in the future you won't have to fish the wire through again. No need to terminate these because they are not connected to anything.
    • Step 2: Find a suitable location for your Blue Sea Circuit Breaker, Blue Sea Termianl Block, and Blue Sea Fuse Block with ground and securely install them.
      • Circuit breaker will be the "safety" and "on-off" switch for you. This will go between your battery and the Fuse Block with Ground. You will wire the 6 or 8 gauge wire from battery to this, then from this to your Blue Sea Block with Ground.
      • Fuse BLock with Ground will be your "distribution panel" You will use this for anything that needs to be constant on (for future) and wire the power cable for the switch (the one you used with butt connectors) to one of the fused slot using a #10 ring terminal. Ground this to the body ground block you installed in Step 0.
        • Running the switch to a fused slot is critical to ensure if anything happens, you are protected. ALWAYS FUSE EVERYTHING as you can/ will see from my write up
      • Terminal Block will be your switched panel. You will wire the 6 switched harness to this using #10 ring terminals, individually. This will act as the "trigger" for your lights.
        • Note: doing this will require you to purchase wiring harnesses for ALL of your future lights, cut off the switches that come with the harnesses, find the wire that send power to the harness and wire that to the terminal block instead using #10 ring terminal.
        • ALTERNATIVELY, you can just crimp whatever you are going to use and not use this, and tape off whatever wires you're not using. HOWEVER, you must ensure you seal off whatever wires you're not using so you don't accidentally short out your truck. The same process to wire lights above applies.
    • Step 3: Make sure everything is nice and tight, plug everything back, and see if the switch panel lights up. If it does, you're good.
    • Step 4: Wire the lights.
      • Using the harness provided by the lighting company, connect the positive to your positive terminal block installed in step 0. Make sure fuse is present in the harness.
      • Using the harness provided by the lighting company, connect the ground to your ground terminal block installed in step 0.
      • Using the harness provided, find the wire that sends power to the switch. Cut that wire and crimp it off using a butt connector without stripping the wire to ensure no continuity of power.
      • Using the harness provided, find the wire that sends power to the relay after the switch is turned on. Cut that wire and discard the switch, strip it, and crimp a #10 terminal to it before connecting it to the terminal block. Choose whatever spot you like.
      • Connect the harness to the light. Make sure to hide the harness and secure it with zip tie.
      • Secure the relay and zip tie the harness with zip tie out of the way.
    • Step 5: Step back, admire your work, and question your decision to do things this way.
  • Additional notes:
    • You can wire the trigger wire for the switch (the one that you used butt connector in step 1) to the OE fuse box that's Ignition triggered. HOWEVER, because your switch system will be your trigger for ALL 6 switches, the power draw may be too much for the OE fuse slot to handle and cause you to break things. Usually, ignition triggered fuse slot in the OE fuse box is only about 10A, and that is not much to work with.
    • When running Chinese branded switches and lights, keep in mind that those are not built to the same standard that US manufacturers and companies do. Therefore, it is of extreme importance to run double or even triple protection systems.
    • I only recommend Blue Sea components (circuit breaker, fuse block with ground, terminal block, etc) because they are made for higher standard and power tolerance as well as resistance to corrosion from salt. Above Blue Sea components are all marine grade parts, and SDHQ make things for race teams that abuse their trucks. I understand that your truck may never see trail or the amount of abuse I put my truck through (that is still no match to the professional race trucks), but understand that expensive and proper components give you peace of mind that they will not fail for regular road use.
    • All the parts I included above are what I use on my personal truck and for my customers for wiring jobs. I've seen Chinese branded switch systems and light fail (often) but my wiring and harness that I make has NEVER failed. That includes Auxbeam panels, replica Baja Designs lights (Jaja Designs or Beijing Designs found cheaply on Amazon, FCK lights, etc), so if you want to do it cheaply, expect to redo this in the future.
    • Set aside an entire weekend for this. This is not something you can do in a few hours especially if you're completely new to wiring.

After writing all these, I hope I didn't scare you and if I do, then it's mission success for me LOL
 
Last edited:
okay i see what you did there.

this one is a lot more involving and complicated to do it correctly and even then, you will NOT be able to use IGN trigger (meaning, your switch panel will be ALWAYS on). My recommendation would be return it and get one of those Chinese Auxbeams :sick: or pony up and get Switch-Pro 9100 (y)

Before we begin, let me tell you a bit about myself and why you should listen to me. I work at part time at a shop that does a lot of overlanding/ offroad trucks and SUV outfitting (part time so I have scheduling flexibility to go on trips and long-term expeditions) in southern California. I am their wiring guy and I do lights and switches install at least once weekly in addition to lift kits and other things like oil change, diff and tranny services, mounting and dismounting tires, etc. I can do repair work, but I'm not as proficient in those jobs than other techs. That's my professional side.
The first wiring job I did was 7 years ago on my 2017 4Runner. I learned everything on that truck along with guidances from friends who are electrical engineers and individual racecar drivers, and through the years I've made countless improvements on the 4Runner until I got confidence to do this professionally. On my Rebel, I used the Switch-Pro 9100 that I took off from my 4Runner along with a suite of Baja Designs lights that I took off (and eventually sold to one of my friends to upgrade). In addition, I also run two more stand alone systems on the truck for overlanding use: one in the cab for fridge, HAM radio, and off-grid power system, and the other one in the camper for camper lights and additional camping gizmos. I build my truck to the highest performance standard.

Your choice of switch is very similar to what I've chosen for the camper, only difference is the route you're going does not involve DC-DC charger and secondary battery (see below). Excuse the not-so-straight mounting and exposed wire, I am prototyping the mounting panel here and it makes no sense for me to hide everything only to take them out when I do the "official" version.
View attachment 179951

IF you still want to continue with that one, here's what you will need to do this CORRECTLY (but still will be constant on):
  • Additional parts needed:
  • Wiring Process (read through the whole process before doing anything):
    • Step 0: Install SDHQ Battery Terminal Kit. Power block goes to positive post of your battery, negative block goes to body. Do NOT battery ground anything on this truck.
    • Step 1: Make a 7 wire harness long enough to penetrate through firewall to your chosen location for your Nilight switch. Once they are through the firewall, crimp female spade terminals to 6 of them and connect them to the male spade on the switches. Pay special attention to which color goes to which switch, and use a label maker to label them on the harness on the engine side. For the remaining one, use a butt connector to connect to the red wire on the switch. This will be the power for the switches. Mount everything in and zip tie your harness so they are out of the way and make sure it doesn't interfere with your pedals.
      • Note: This would be a good time to run additional wires through the firewall and label them as "EXTRA" so in case you want to add more stuff in the future you won't have to fish the wire through again. No need to terminate these because they are not connected to anything.
    • Step 2: Find a suitable location for your Blue Sea Circuit Breaker, Blue Sea Termianl Block, and Blue Sea Fuse Block with ground and securely install them.
      • Circuit breaker will be the "safety" and "on-off" switch for you. This will go between your battery and the Fuse Block with Ground. You will wire the 6 or 8 gauge wire from battery to this, then from this to your Blue Sea Block with Ground.
      • Fuse BLock with Ground will be your "distribution panel" You will use this for anything that needs to be constant on (for future) and wire the power cable for the switch (the one you used with butt connectors) to one of the fused slot using a #10 ring terminal. Ground this to the body ground block you installed in Step 0.
        • Running the switch to a fused slot is critical to ensure if anything happens, you are protected. ALWAYS FUSE EVERYTHING as you can/ will see from my write up
      • Terminal Block will be your switched panel. You will wire the 6 switched harness to this using #10 ring terminals, individually. This will act as the "trigger" for your lights.
        • Note: doing this will require you to purchase wiring harnesses for ALL of your future lights, cut off the switches that come with the harnesses, find the wire that send power to the harness and wire that to the terminal block instead using #10 ring terminal.
        • ALTERNATIVELY, you can just crimp whatever you are going to use and not use this, and tape off whatever wires you're not using. HOWEVER, you must ensure you seal off whatever wires you're not using so you don't accidentally short out your truck. The same process to wire lights above applies.
    • Step 3: Make sure everything is nice and tight, plug everything back, and see if the switch panel lights up. If it does, you're good.
    • Step 4: Wire the lights.
      • Using the harness provided by the lighting company, connect the positive to your positive terminal block installed in step 0. Make sure fuse is present in the harness.
      • Using the harness provided by the lighting company, connect the ground to your ground terminal block installed in step 0.
      • Using the harness provided, find the wire that sends power to the switch. Cut that wire and crimp it off using a butt connector without stripping the wire to ensure no continuity of power.
      • Using the harness provided, find the wire that sends power to the relay after the switch is turned on. Cut that wire and discard the switch, strip it, and crimp a #10 terminal to it before connecting it to the terminal block. Choose whatever spot you like.
      • Connect the harness to the light. Make sure to hide the harness and secure it with zip tie.
      • Secure the relay and zip tie the harness with zip tie out of the way.
    • Step 5: Step back, admire your work, and question your decision to do things this way.
  • Additional notes:
    • You can wire the trigger wire for the switch (the one that you used butt connector in step 1) to the OE fuse box that's Ignition triggered. HOWEVER, because your switch system will be your trigger for ALL 6 switches, the power draw may be too much for the OE fuse slot to handle and cause you to break things. Usually, ignition triggered fuse slot in the OE fuse box is only about 10A, and that is not much to work with.
    • When running Chinese branded switches and lights, keep in mind that those are not built to the same standard that US manufacturers and companies do. Therefore, it is of extreme importance to run double or even triple protection systems.
    • I only recommend Blue Sea components (circuit breaker, fuse block with ground, terminal block, etc) because they are made for higher standard and power tolerance as well as resistance to corrosion from salt. Above Blue Sea components are all marine grade parts, and SDHQ make things for race teams that abuse their trucks. I understand that your truck may never see trail or the amount of abuse I put my truck through (that is still no match to the professional race trucks), but understand that expensive and proper components give you peace of mind that they will not fail for regular road use.
    • All the parts I included above are what I use on my personal truck and for my customers for wiring jobs. I've seen Chinese branded switch systems and light fail (often) but my wiring and harness that I make has NEVER failed. That includes Auxbeam panels, replica Baja Designs lights (Jaja Designs or Beijing Designs found cheaply on Amazon, FCK lights, etc), so if you want to do it cheaply, expect to redo this in the future.
    • Set aside an entire weekend for this. This is not something you can do in a few hours especially if you're completely new to wiring.

After writing all these, I hope I didn't scare you and if I do, then it's mission success for me LOL
I’m not going to lie, after we spoke about the switch pro I’ve looking into those and kind of figuring out what I want to get and after reading this breakdown it has me twisted lol. I don’t have any real off road shops near me so I’m pretty SOL and have to try it myself anyway so it what it is I guess lol.
 
I’m not going to lie, after we spoke about the switch pro I’ve looking into those and kind of figuring out what I want to get and after reading this breakdown it has me twisted lol. I don’t have any real off road shops near me so I’m pretty SOL and have to try it myself anyway so it what it is I guess lol.
oh don't be afraid. switch pro is easy.
The thick power cable has a fuse built in, so wire that to positive on your battery. The ground goes to body. Fish the switch panel cable through the firewall. In the big bundle of wires, locate the one that's labeled "ignition" (should be baby blue) and wire that to a ign fuse slot using add-a-fuse. And you're done.

When install lights, you can either use the switch pro as a trigger or just wire the lights directly to it.
For Squadrons and S1, S2, it's okay to wire the lights direct and body ground.
For XL (pro, Racers) or LP4, LP6, LP9, use the harness and wire the trigger to switch pro.

See how simple the process is compared to the Nilight?

oh and still use the SDHQ kit I linked. That will make your life a lot simpler.
Also use NH Overland engine bay switch-pro mount. They also have a kit that's pre-wired so cuts down some of your work.


spend me a PM for my phone number to text me, or send me a DM on IG (@ram_rebel_dt_eric). IG DM is gonna be better if I need to send high res pictures or find links for you.
I don’t have any social media but I will def hit you up after I have everything in hand. Might take a month or two to save up for everything but at least it’ll be quality I appreciate all your help answering my questions
 
I don’t have any social media but I will def hit you up after I have everything in hand. Might take a month or two to save up for everything but at least it’ll be quality I appreciate all your help answering my questions
any time bud!
offer remains open. i much rather have people save up for the quality stuff than just get mickey mouse things now and deal with fixing it later.
 
Man, thank you for the thorough answer. Yeah I'm not going to do the Nilight. I looked at the Auxbeam you mentioned and I'll be going that route. I really like the idea of routing the accessories to the relay bank, having the circuit breaker, and only one wire going through the firewall to the switch.
 
Man, thank you for the thorough answer. Yeah I'm not going to do the Nilight. I looked at the Auxbeam you mentioned and I'll be going that route. I really like the idea of routing the accessories to the relay bank, having the circuit breaker, and only one wire going through the firewall to the switch.
yeap in that case just swap the nilight for auxbeam.
auxbeam :sick: comes with china circuit breaker. use that at your own risk or upgrade to blue sea.

and test the system before installing. i've got 60% failure rate out the box. also know that you may have to redo it a few years later because china quality.
in fact, test ALL the lights and stuff before installing, unless they are Diode or Baja Designs or Rigid.
 

Users who are viewing this thread

Back
Top