WhamBamRam
New Member
- Joined
- Oct 15, 2024
- Messages
- 1
- Reaction score
- 2
- Points
- 1
Hey all, I just did a bed light installation and thought I’d share a few key points on installation. It’s wired to the battery, using a relay that switches on when the cargo lights come on. This is nice because the key fob or factory cargo light button can turn them on, and there are no manual aftermarket switches needed.
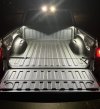
The lights are basic LED whatevers. $22 I think. This really doesn’t matter too much because running the wiring is the hard part - if the lights die at some point it’s easy to just throw in new ones if the rest of the wiring is already there.
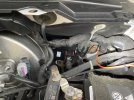
Penetration points from engine bay into cab / bed into cab are always the thing that require a lot of thought and planning. For this truck, a 2019+ 1500 Big Horn, it’s super easy. For firewall penetration, I saw a bunch of posts on this forum recommending use of the big grommet. However, I found a 4th gen gem on YouTube that indicated there was a rubber nipple that, if cut, opened up a penetration point that seemed to be purposefully designed for exactly this kind of thing. Turns out that nipple did exist on my truck, and I used a small scissors to cut a little bit out of the end, enough to push a wire through. It’s hard to get a picture of this, but hopefully this tells the story. Check out where the orange wire enters the firewall.
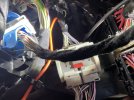
On the cab side, the wire comes out what looks to be a dedicated unused tunnel for wiring. I love it. This pic is terrible but it gives a rough idea of where the wire emerges.
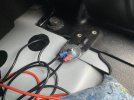
From the bed to cab, it’s also super easy. Under the back seat up behind the storage area, unscrew the little threaded disc that holds this section of carpet down and fold back the carpet. Also in this pic you see where the relay ended up temporarily. I’ll probably put that bad boy in some harness and mount it soon. I like to solder and shrink wrap all connections.
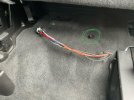
Once folded back, it looks like this. The pic below shows which grommet to remove and slice to run wires. I haven’t finished cleaning up wiring back here, so don’t judge. Beneath this grommet there’s a little bend then open air! And it’s right near the bed. Awesome. This is more than big enough for coaxial cable if you radio folks want to run antennas.
There’s just no reason to ever drill into your ram box to get a wire from bed to cab.
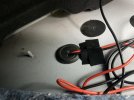
I removed some paint from this handy tab that’s part of the seat bracket, and made a ground point for both the relay and the lights.
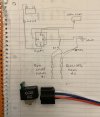
Here’s the circuit I made for this installation. Hope this helps you guys. This has been the easiest wire running on a pickup I’ve ever done. I think the lights have way better illumination than the factory bed lights, and for the price you can’t beat it.
The relay I used is great. True Mods brand with integrated fuse and wiring harness, like $2 apiece.
I don’t have pics, but for the cargo light +12V trigger wire, just tap into the positive side of the cargo lamp circuit. You’ll see where to do that when you remove the 4 screws it takes to remove the cargo lamp/3rd brake lamp housing to access the bulbs. There’s a little piece of foam at the inside bottom of the cargo light housing cavity that defines the border of the interior headliner. Just have a buddy with small hands help you fish the wire through. It’s not impossible. And just to be clear, you’re running wiring that’s already inside the cab here. There’s no need to go from outside to inside.

The lights are basic LED whatevers. $22 I think. This really doesn’t matter too much because running the wiring is the hard part - if the lights die at some point it’s easy to just throw in new ones if the rest of the wiring is already there.
Penetration points from engine bay into cab / bed into cab are always the thing that require a lot of thought and planning. For this truck, a 2019+ 1500 Big Horn, it’s super easy. For firewall penetration, I saw a bunch of posts on this forum recommending use of the big grommet. However, I found a 4th gen gem on YouTube that indicated there was a rubber nipple that, if cut, opened up a penetration point that seemed to be purposefully designed for exactly this kind of thing. Turns out that nipple did exist on my truck, and I used a small scissors to cut a little bit out of the end, enough to push a wire through. It’s hard to get a picture of this, but hopefully this tells the story. Check out where the orange wire enters the firewall.

On the cab side, the wire comes out what looks to be a dedicated unused tunnel for wiring. I love it. This pic is terrible but it gives a rough idea of where the wire emerges.

From the bed to cab, it’s also super easy. Under the back seat up behind the storage area, unscrew the little threaded disc that holds this section of carpet down and fold back the carpet. Also in this pic you see where the relay ended up temporarily. I’ll probably put that bad boy in some harness and mount it soon. I like to solder and shrink wrap all connections.

Once folded back, it looks like this. The pic below shows which grommet to remove and slice to run wires. I haven’t finished cleaning up wiring back here, so don’t judge. Beneath this grommet there’s a little bend then open air! And it’s right near the bed. Awesome. This is more than big enough for coaxial cable if you radio folks want to run antennas.
There’s just no reason to ever drill into your ram box to get a wire from bed to cab.

I removed some paint from this handy tab that’s part of the seat bracket, and made a ground point for both the relay and the lights.

Here’s the circuit I made for this installation. Hope this helps you guys. This has been the easiest wire running on a pickup I’ve ever done. I think the lights have way better illumination than the factory bed lights, and for the price you can’t beat it.
The relay I used is great. True Mods brand with integrated fuse and wiring harness, like $2 apiece.
I don’t have pics, but for the cargo light +12V trigger wire, just tap into the positive side of the cargo lamp circuit. You’ll see where to do that when you remove the 4 screws it takes to remove the cargo lamp/3rd brake lamp housing to access the bulbs. There’s a little piece of foam at the inside bottom of the cargo light housing cavity that defines the border of the interior headliner. Just have a buddy with small hands help you fish the wire through. It’s not impossible. And just to be clear, you’re running wiring that’s already inside the cab here. There’s no need to go from outside to inside.


