
Thought it might be best to post a new thread separate from the main one I've seen (of 29 pages and counting)...
I installed a Hellwig 7794 rear bar a month or so ago onto my '25 Laramie Sport and set it on the farthest forward setting (tightest). Noticeable cornering and general road handling improvement over the OEM bar, so much so that I recently pulled the trigger on a 7787 front bar along with a set of Suspension Maxx end links.
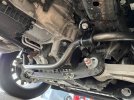
So initially, I was told by Hellwig that the end link mounting holes on the 7787 bar were .65" (16.51mm). - beware, they're not. The holes on my bar were actually approximately .826" (just about 21mm) - so I had to order the end link set p/n SMX-1321 (21mm bolt) instead of the SMX-1319 (19mm bolt) set recommended for the OEM bar.
For the 21mm link bolt ends to fit thru, I had to clearance the bar holes only very slightly. The link bushings come already assembled and pre-torqued so they were a plug & play install.
The bar install took maybe 90 minutes total and would probably have gone faster if my truck had been on a lift instead of the ground. Not a difficult 1-person job in any case, but the limited ground clearance increased my install time due to having to switch sides of the truck a few times instead of otherwise having been able to move freely across the whole underside.
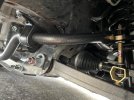
The hollow OEM front bar is much lighter than the solid Hellwig and the OEM end links are laughable compared to the beefy Suspension Maxx replacements. The OEM end link bottom bolts required a two-handed removal effort, with both a wrench held in place over the bottom bolts and 5/16" socket to turn the hex-sided stems protruding beneath them for the bolts to actually be loosened off. You can't just turn the bolts, as that simply causes the entire link shaft to spin and nothing loosens that way.
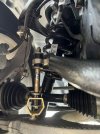
Installing the Suspension Maxx links is much more straightforward - just the top bolts going thru each bar hole and the bottom bolt going thru each control arm mount. Both ends @ link use nylon-lined lock nuts for added safety.
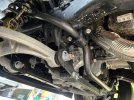
From the ground, I lifted the Hellwig bar 1 side at a time into place with new end links already loosely in place and loosely bolted the Hellwig sway bushings into place after greasing them. Then I lifted the bar ends and oriented the end links into their bottom holes.
Once I had the bar centered and each end link properly oriented in their mounts, I tightened the bushings and the links in various stages from left to right until everything was evenly tightened in full.
Road test results are significant (in my opinion) - having both matched Hellwig front/rear bars now in place arguably improved the composure of this truck exponentially in the curves and especially in all turns. No more ploughing effect in turns or any uneasy steering input resistence in curves or lane changes.
So in my opinion absolutely worth these DIY investment(s) for both bar assemblies as well as the Suspension Maxx end links up front.
I installed a Hellwig 7794 rear bar a month or so ago onto my '25 Laramie Sport and set it on the farthest forward setting (tightest). Noticeable cornering and general road handling improvement over the OEM bar, so much so that I recently pulled the trigger on a 7787 front bar along with a set of Suspension Maxx end links.
So initially, I was told by Hellwig that the end link mounting holes on the 7787 bar were .65" (16.51mm). - beware, they're not. The holes on my bar were actually approximately .826" (just about 21mm) - so I had to order the end link set p/n SMX-1321 (21mm bolt) instead of the SMX-1319 (19mm bolt) set recommended for the OEM bar.
For the 21mm link bolt ends to fit thru, I had to clearance the bar holes only very slightly. The link bushings come already assembled and pre-torqued so they were a plug & play install.
The bar install took maybe 90 minutes total and would probably have gone faster if my truck had been on a lift instead of the ground. Not a difficult 1-person job in any case, but the limited ground clearance increased my install time due to having to switch sides of the truck a few times instead of otherwise having been able to move freely across the whole underside.
The hollow OEM front bar is much lighter than the solid Hellwig and the OEM end links are laughable compared to the beefy Suspension Maxx replacements. The OEM end link bottom bolts required a two-handed removal effort, with both a wrench held in place over the bottom bolts and 5/16" socket to turn the hex-sided stems protruding beneath them for the bolts to actually be loosened off. You can't just turn the bolts, as that simply causes the entire link shaft to spin and nothing loosens that way.
Installing the Suspension Maxx links is much more straightforward - just the top bolts going thru each bar hole and the bottom bolt going thru each control arm mount. Both ends @ link use nylon-lined lock nuts for added safety.
From the ground, I lifted the Hellwig bar 1 side at a time into place with new end links already loosely in place and loosely bolted the Hellwig sway bushings into place after greasing them. Then I lifted the bar ends and oriented the end links into their bottom holes.
Once I had the bar centered and each end link properly oriented in their mounts, I tightened the bushings and the links in various stages from left to right until everything was evenly tightened in full.
Road test results are significant (in my opinion) - having both matched Hellwig front/rear bars now in place arguably improved the composure of this truck exponentially in the curves and especially in all turns. No more ploughing effect in turns or any uneasy steering input resistence in curves or lane changes.
So in my opinion absolutely worth these DIY investment(s) for both bar assemblies as well as the Suspension Maxx end links up front.
Attachments
Last edited:


