
JRD
Well-Known Member
- Joined
- Sep 29, 2018
- Messages
- 350
- Reaction score
- 218
- Points
- 43
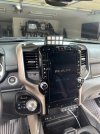
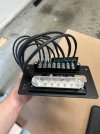
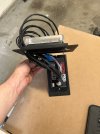
This is a multi layered thread as I’m currently trying to install my switch pro. For reference, I am using the CJC Dash Mount (picture attached) and the Switch Pro
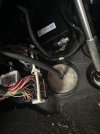
1. I have the mount ready to receive power, and with the screen removed I can see daylight. There is a little hole to the bottom left, however my fish tape is getting hung up and when I try to use a light I cannot see it. I should’ve took a picture, but does anyone know where I’m referencing and where it protrudes into the engine bay?
2. I know someone on here has the same mount, but I tried to find your thread/comment and couldn’t locate it. Where did you run your lines if you see this?
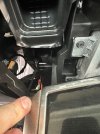
3. After I couldn’t locate the protrusion, i started looking for an alternate route. If I drop the power straight down it runs under the steering wheel which I could fish through that way. (I am not technical in this field so I added photos for reference) alternatively, if someone has a better idea please let me know.
4. From numerous discussions with @boogielander i know the light blue wire for the switch pro goes to Fuse F37. Did anyone hook up the pink/white? If so, which fuse? I’d like to be able to dim the controller due to its location.
Thank you for reading, sorry if these are noob questions but I just try to do things myself before paying someone else.
1. I have the mount ready to receive power, and with the screen removed I can see daylight. There is a little hole to the bottom left, however my fish tape is getting hung up and when I try to use a light I cannot see it. I should’ve took a picture, but does anyone know where I’m referencing and where it protrudes into the engine bay?
2. I know someone on here has the same mount, but I tried to find your thread/comment and couldn’t locate it. Where did you run your lines if you see this?
3. After I couldn’t locate the protrusion, i started looking for an alternate route. If I drop the power straight down it runs under the steering wheel which I could fish through that way. (I am not technical in this field so I added photos for reference) alternatively, if someone has a better idea please let me know.
4. From numerous discussions with @boogielander i know the light blue wire for the switch pro goes to Fuse F37. Did anyone hook up the pink/white? If so, which fuse? I’d like to be able to dim the controller due to its location.
Thank you for reading, sorry if these are noob questions but I just try to do things myself before paying someone else.
Attachments

Last edited:


