brotharon
Active Member
Hello Forum,
So, I called around to several Houston area dealerships and kept getting quoted ~$700 for the purchase and install of a factory trailer brake controller. This seemed outrageous to me, and so I set out to find information about what all was involved in this installation. In the process of doing this I found a lot of information, and I just wanted to share my experience from start to finish including flashing the software myself in order to add the trailer brake controller to UConnect so that I don't have to go to the dealership for anything.
If you are interested in finding out how you can do this yourself at home and in under 2 hours (even if your neighbors keep dropping by and it is 100 degrees outside) then here we go!
Step 1: is to order the parts from whatever vendor you feel like ordering them from. I have the 12" touchscreen (as you will see in the pictures) and these are the parts that worked for me. Individual mileage may vary, but I think that you should be fine with these unless you have some kind of weird unicorn 1500 that takes special parts or something.
PART LIST (original from staffcurtis, but updated by me):
Step 1: get the parts (If you don't want to do the software yourself, or your local dealer will flash the software for less than $100 you can save some money by taking it in to the dealer for the flash. The advantage to having the AlfaObd and the other hardware is that you can read engine codes and clear errors plus add other software updates besides the trailer. There may be some value in that for some people and not for others. Individual mileage will vary.)
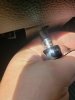
Step 2: Disconnect your negative battery terminal. See pics below. Use a 10mm wrench, or something equivalent.


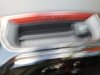
Step 3: remove the center stack of the dash. This is not as scary as some people make it out to be. Remove the 2 screws at the top. Place on hand in the cupped area at the top and one at the bottom of the piece. Pull straight out (toward the back of the cab) it will come out, and it is a sturdy piece, you wont break it unless you are being a gorilla. Don't be a gorilla.


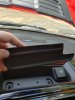
For the connector pictured below I used a very small screwdriver to depress the latch to remove it. You may or may not need to, but I have sausage fingers so I had to. You will have an easier time if you disconnect all of the plugs on the back of the console. It is not a lot of connectors, and it just reduces the chances of damaging wiring or the console...it also makes it much easier to deal with.

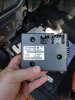
Step 4: Unwrap that sweet connector that is all covered in cloth tape. You will need it to connect to your trailer brake switch later!

So, I called around to several Houston area dealerships and kept getting quoted ~$700 for the purchase and install of a factory trailer brake controller. This seemed outrageous to me, and so I set out to find information about what all was involved in this installation. In the process of doing this I found a lot of information, and I just wanted to share my experience from start to finish including flashing the software myself in order to add the trailer brake controller to UConnect so that I don't have to go to the dealership for anything.
If you are interested in finding out how you can do this yourself at home and in under 2 hours (even if your neighbors keep dropping by and it is 100 degrees outside) then here we go!
Step 1: is to order the parts from whatever vendor you feel like ordering them from. I have the 12" touchscreen (as you will see in the pictures) and these are the parts that worked for me. Individual mileage may vary, but I think that you should be fine with these unless you have some kind of weird unicorn 1500 that takes special parts or something.
PART LIST (original from staffcurtis, but updated by me):
68277136af trailer tow module $79.07
68309259ac (this is the right one at this time for the 12" and probably others) switch instrument panel $28.69
68346572ab module bracket $1.39
6510468aa x3 nuts $0.61 each
6101946 x3 screw $0.54 each
OBD2 Reader (I used BAFX products OBD2 Bluetooth Reader from Amazon) ~$25
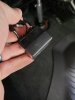
FCA Security Gateway Bypass Module ~$50
AlfaObd (From the app store) ~$50
All in price: ~$237.60 (including the software update)
68309259ac (this is the right one at this time for the 12" and probably others) switch instrument panel $28.69
68346572ab module bracket $1.39
6510468aa x3 nuts $0.61 each
6101946 x3 screw $0.54 each
OBD2 Reader (I used BAFX products OBD2 Bluetooth Reader from Amazon) ~$25
FCA Security Gateway Bypass Module ~$50
AlfaObd (From the app store) ~$50
All in price: ~$237.60 (including the software update)
Step 1: get the parts (If you don't want to do the software yourself, or your local dealer will flash the software for less than $100 you can save some money by taking it in to the dealer for the flash. The advantage to having the AlfaObd and the other hardware is that you can read engine codes and clear errors plus add other software updates besides the trailer. There may be some value in that for some people and not for others. Individual mileage will vary.)
Step 2: Disconnect your negative battery terminal. See pics below. Use a 10mm wrench, or something equivalent.
Step 3: remove the center stack of the dash. This is not as scary as some people make it out to be. Remove the 2 screws at the top. Place on hand in the cupped area at the top and one at the bottom of the piece. Pull straight out (toward the back of the cab) it will come out, and it is a sturdy piece, you wont break it unless you are being a gorilla. Don't be a gorilla.
For the connector pictured below I used a very small screwdriver to depress the latch to remove it. You may or may not need to, but I have sausage fingers so I had to. You will have an easier time if you disconnect all of the plugs on the back of the console. It is not a lot of connectors, and it just reduces the chances of damaging wiring or the console...it also makes it much easier to deal with.
Step 4: Unwrap that sweet connector that is all covered in cloth tape. You will need it to connect to your trailer brake switch later!