
5thGenRams Forums
You are using an out of date browser. It may not display this or other websites correctly.
You should upgrade or use an alternative browser.
You should upgrade or use an alternative browser.
Mopar bug shield/wind deflector
- Thread starter VenomBee
- Start date
- Joined
- May 22, 2018
- Messages
- 190
- Reaction score
- 136
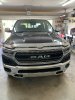
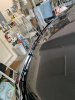
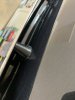
Just removed my dealer installed deflector. Tape, clips and screws for the clips, no drilling.Has anyone installed a front bug shield /wind deflector from Mopar part number 82215476? Do you have to drill or does it screw right in?
Took 5 minutes to get off.
was this the black or the chrome deflector?Just removed my dealer installed deflector. Tape, clips and screws for the clips, no drilling.
Took 5 minutes to get off.
- Joined
- May 22, 2018
- Messages
- 190
- Reaction score
- 136
Chromewas this the black or the chrome deflector?
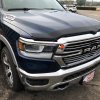
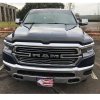
I installed the chrome Mopar specific bug deflector,a few days after purchase of truck.
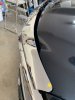
The install was pretty straight forward. One thing to note,the two end clips,are pressure pinched to the hood,and IMO,pinch the hood a little harder than I would like. It also has 6 rubber bumpers,that are applied to the hood,under the deflector,with self adhesive tape.
After several weeks with the deflector on,I never fell in love with it(on my 04 and 14 Rams,was a definite improvement visually!)and removed it. That being said,some of the self adhesive from the bumpers,adhered to the hood. I used WD-40 and a microfiber,and gently melted/removed the adhesive.(the 6 self adhesive hood protectors,for the clips,removed with no adhesive residue left on the hood)
The bug shield had a slight flaw in the "plastic" chrome,which I showed the dealer day after install,and dealer was happy to swap out. They were and still are on back order.
The quality as far as flow with hood is spot on! IMO though,it took away from the hood and the chrome trim already there,and wasn't as impressive as my former bug shields on previous Gens trucks.
When I returned it today,they did have a black version of the bug shield,which I and the parts guy looked at. We both agreed it was so-so.......and would look good on a vehicle that's trying to achieve a black out themed truck. For a better way to describe the black version,it's the same finish you would see on the back of a TV,cable box etc etc. It's matte black/dull finish.
Attachments
- Joined
- May 22, 2018
- Messages
- 190
- Reaction score
- 136
I agree, thought it took to much from the front end. Mine was dealer installed, and I removed it 2 days after picking the truck up. I do remember the residue, called the shop that was getting ready to ceramic coat my truck and he said don’t bother with it, he would remove it.
scannon
New Member
Is there a clear version of the OEM bug deflector? Any pictures of it installed on a Delmonico Red 1500 with chrome grille?
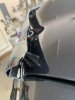
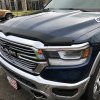
I went with the black over the chrome unit.
Unlike Autoplay, I mounted the cone supports to the plastic deflector instead of the painted hood.
Unlike Autoplay, I mounted the cone supports to the plastic deflector instead of the painted hood.
Attachments
Do these deflectors make the mirrors vibrate?
mine do not vibrate.
The_Chemist
Well-Known Member
I'm thinking of purchasing a chrome deflector. The road I drive (I-83) from Harrisburg to York is notorious for inflicting stone chips to the front edge of your car hood. My 2011 Hyundai Santa Fe is loaded with stone chips inflicted from trucks on (I-83)I went with the black over the chrome unit.
Unlike Autoplay, I mounted the cone supports to the plastic deflector instead of the painted hood.
I'm very interested in installing a deflector on my 2019 Longhorn the way you installed yours. The rubber bumpers attached to the deflector itself instead of the paint on the hood.
Have you had any issues with the paint on the hood of your truck where the rubber bumpers touch it? I was wondering if the bumpers vibrate or move just enough to be abrasive to the paint.
Thanks.
Have you had any issues with the paint on the hood of your truck where the rubber bumpers touch it? I was wondering if the bumpers vibrate or move just enough to be abrasive to the paint.
Thanks.
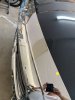
No vibration at all, no rub marks either. There is a clean spot where the tips of the cones rest against the painted hood, nothing abrasive at all.
I pushed the rubber cones in about an inch to where they are just snug and support the deflector.
I can get a microfiber wash cloth under them when washing the truck by
carefully lifting the deflector. I plan on removing the deflector regularly to keep the hood clean and waxed as needed.
I gave serious thought to purchasing the chrome unit, but I did not care for the black screws to fasten the defector. the black screws reflect off the chrome finish and seems to me to detract from the overall appearance. If Mopar had furnished chrome fasteners I may have went with the chrome.
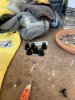
Take your time and be somewhat forceful removing the pushpins from the rubber weather seal under the hood. They are a PIA to take off as you must snap them to get them out. I used double sided tape to hold the ends of the weatherstripping up until I found replacement pins. You will see what I mean.
Pieces of the pins will remain in the hood. I used compressed air and a vacuum to try to get the small pieces out, but only got a small piece of one. I don’t hear anything rattling when I open the hood, so maybe they ave fallen out or are wedged I the folds of the hood.
Sorry to be so long winded, I don’t have pictures for the 1000 words.
The_Chemist
Well-Known Member
Thanks very much for the excellent instructions.No vibration at all, no rub marks either. There is a clean spot where the tips of the cones rest against the painted hood, nothing abrasive at all.
I pushed the rubber cones in about an inch to where they are just snug and support the deflector.
I can get a microfiber wash cloth under them when washing the truck by
carefully lifting the deflector. I plan on removing the deflector regularly to keep the hood clean and waxed as needed.
I gave serious thought to purchasing the chrome unit, but I did not care for the black screws to fasten the defector. the black screws reflect off the chrome finish and seems to me to detract from the overall appearance. If Mopar had furnished chrome fasteners I may have went with the chrome.
Take your time and be somewhat forceful removing the pushpins from the rubber weather seal under the hood. They are a PIA to take off as you must snap them to get them out. I used double sided tape to hold the ends of the weatherstripping up until I found replacement pins. You will see what I mean.
Pieces of the pins will remain in the hood. I used compressed air and a vacuum to try to get the small pieces out, but only got a small piece of one. I don’t hear anything rattling when I open the hood, so maybe they ave fallen out or are wedged I the folds of the hood.
Sorry to be so long winded, I don’t have pictures for the 1000 words.
I have an ivory 3 coat truck, so I didn't want the black deflector. I thought it may stand out.
It does sound like installation is going to be a real PITA. I had no idea that pushpins had to be removed in order to fasten the deflector to the hood. Ugh.
I installed a factory deflector on a Ford Explorer that I owned years ago. That one was simple.
I ordered the Mopar Chrome deflector last evening online. Hopefully I didn't waste the money.
The kit comes with some paint protection film that must be placed on the hood in the locations noted for the mounting brackets. the two end brackets actually pinch the hood so accuracy is a must. get help if needed dry fitting the defector to the hood. i removed the protective plastic from the deflector and put it on the hood until i had everything marked out.
most of all do not rush you will need every bit of an hour maybe more for a quality install.
most of all do not rush you will need every bit of an hour maybe more for a quality install.
The_Chemist
Well-Known Member
Thanks. I had no idea this much work would be involved for the installation. The Ford unit I did years ago was simple. Just some clear protective film for the brackets and tightening screws on the underside of the hood.The kit comes with some paint protection film that must be placed on the hood in the locations noted for the mounting brackets. the two end brackets actually pinch the hood so accuracy is a must. get help if needed dry fitting the defector to the hood. i removed the protective plastic from the deflector and put it on the hood until i had everything marked out.
most of all do not rush you will need every bit of an hour maybe more for a quality install.
see post #9anyone have pics with the black deflector installed? Thanks
kingkasc
Well-Known Member
- Joined
- Sep 3, 2018
- Messages
- 217
- Reaction score
- 37
Very nice thank you.see post #9
Rampat
Ram Guru
Thoughts on the Mopar vs AVS?
Users who are viewing this thread
Total: 1 (members: 0, guests: 1)
Site Vendors


